For a while a wanted to make my own flight recorder similar to the commercial altimeters but with my own requirements for functionality. In addition it needed to be visually appealing and functional in the same time … After some thinking about the design and functionality the idea for the MINI FLIGHT RECORDER was developed in my mind and I set myself to work.
The new MINI FLIGHT RECORDER (MFR from now on) has the following functionality:
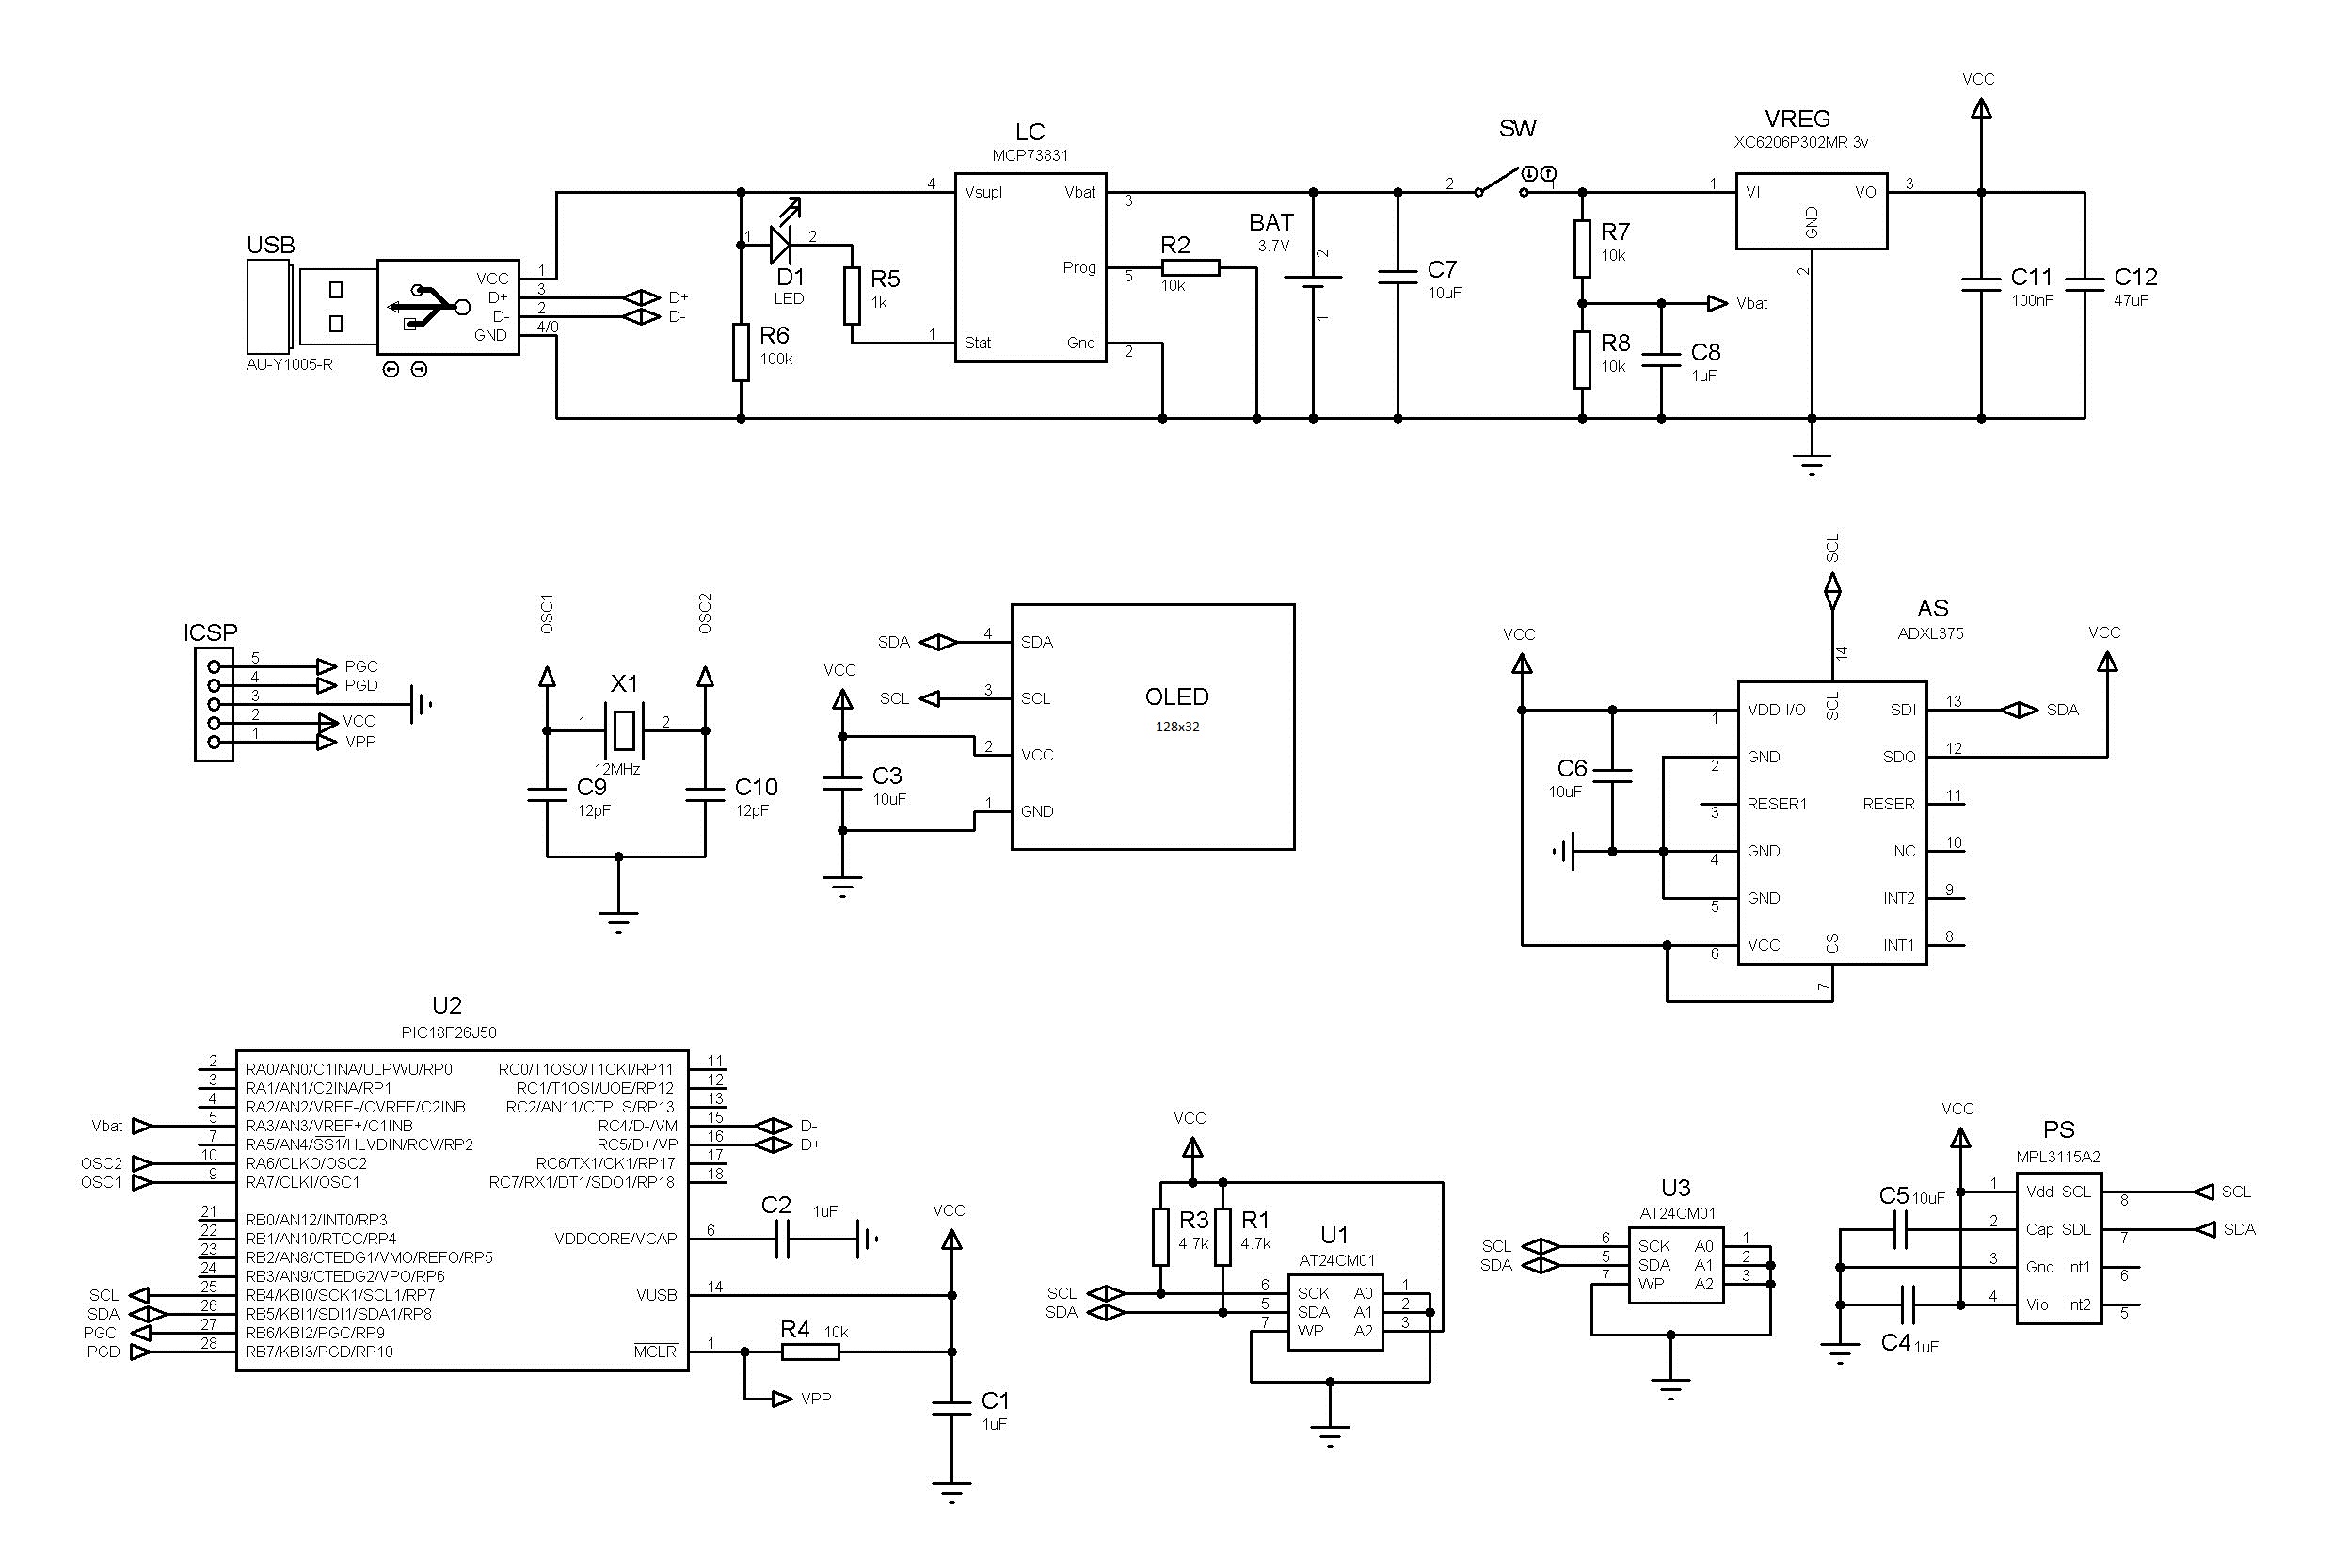
– Barometric/Altimeter sensor MPL3115A2
– Built in temperature sensor
– 3D High g accelerometer ADXL375
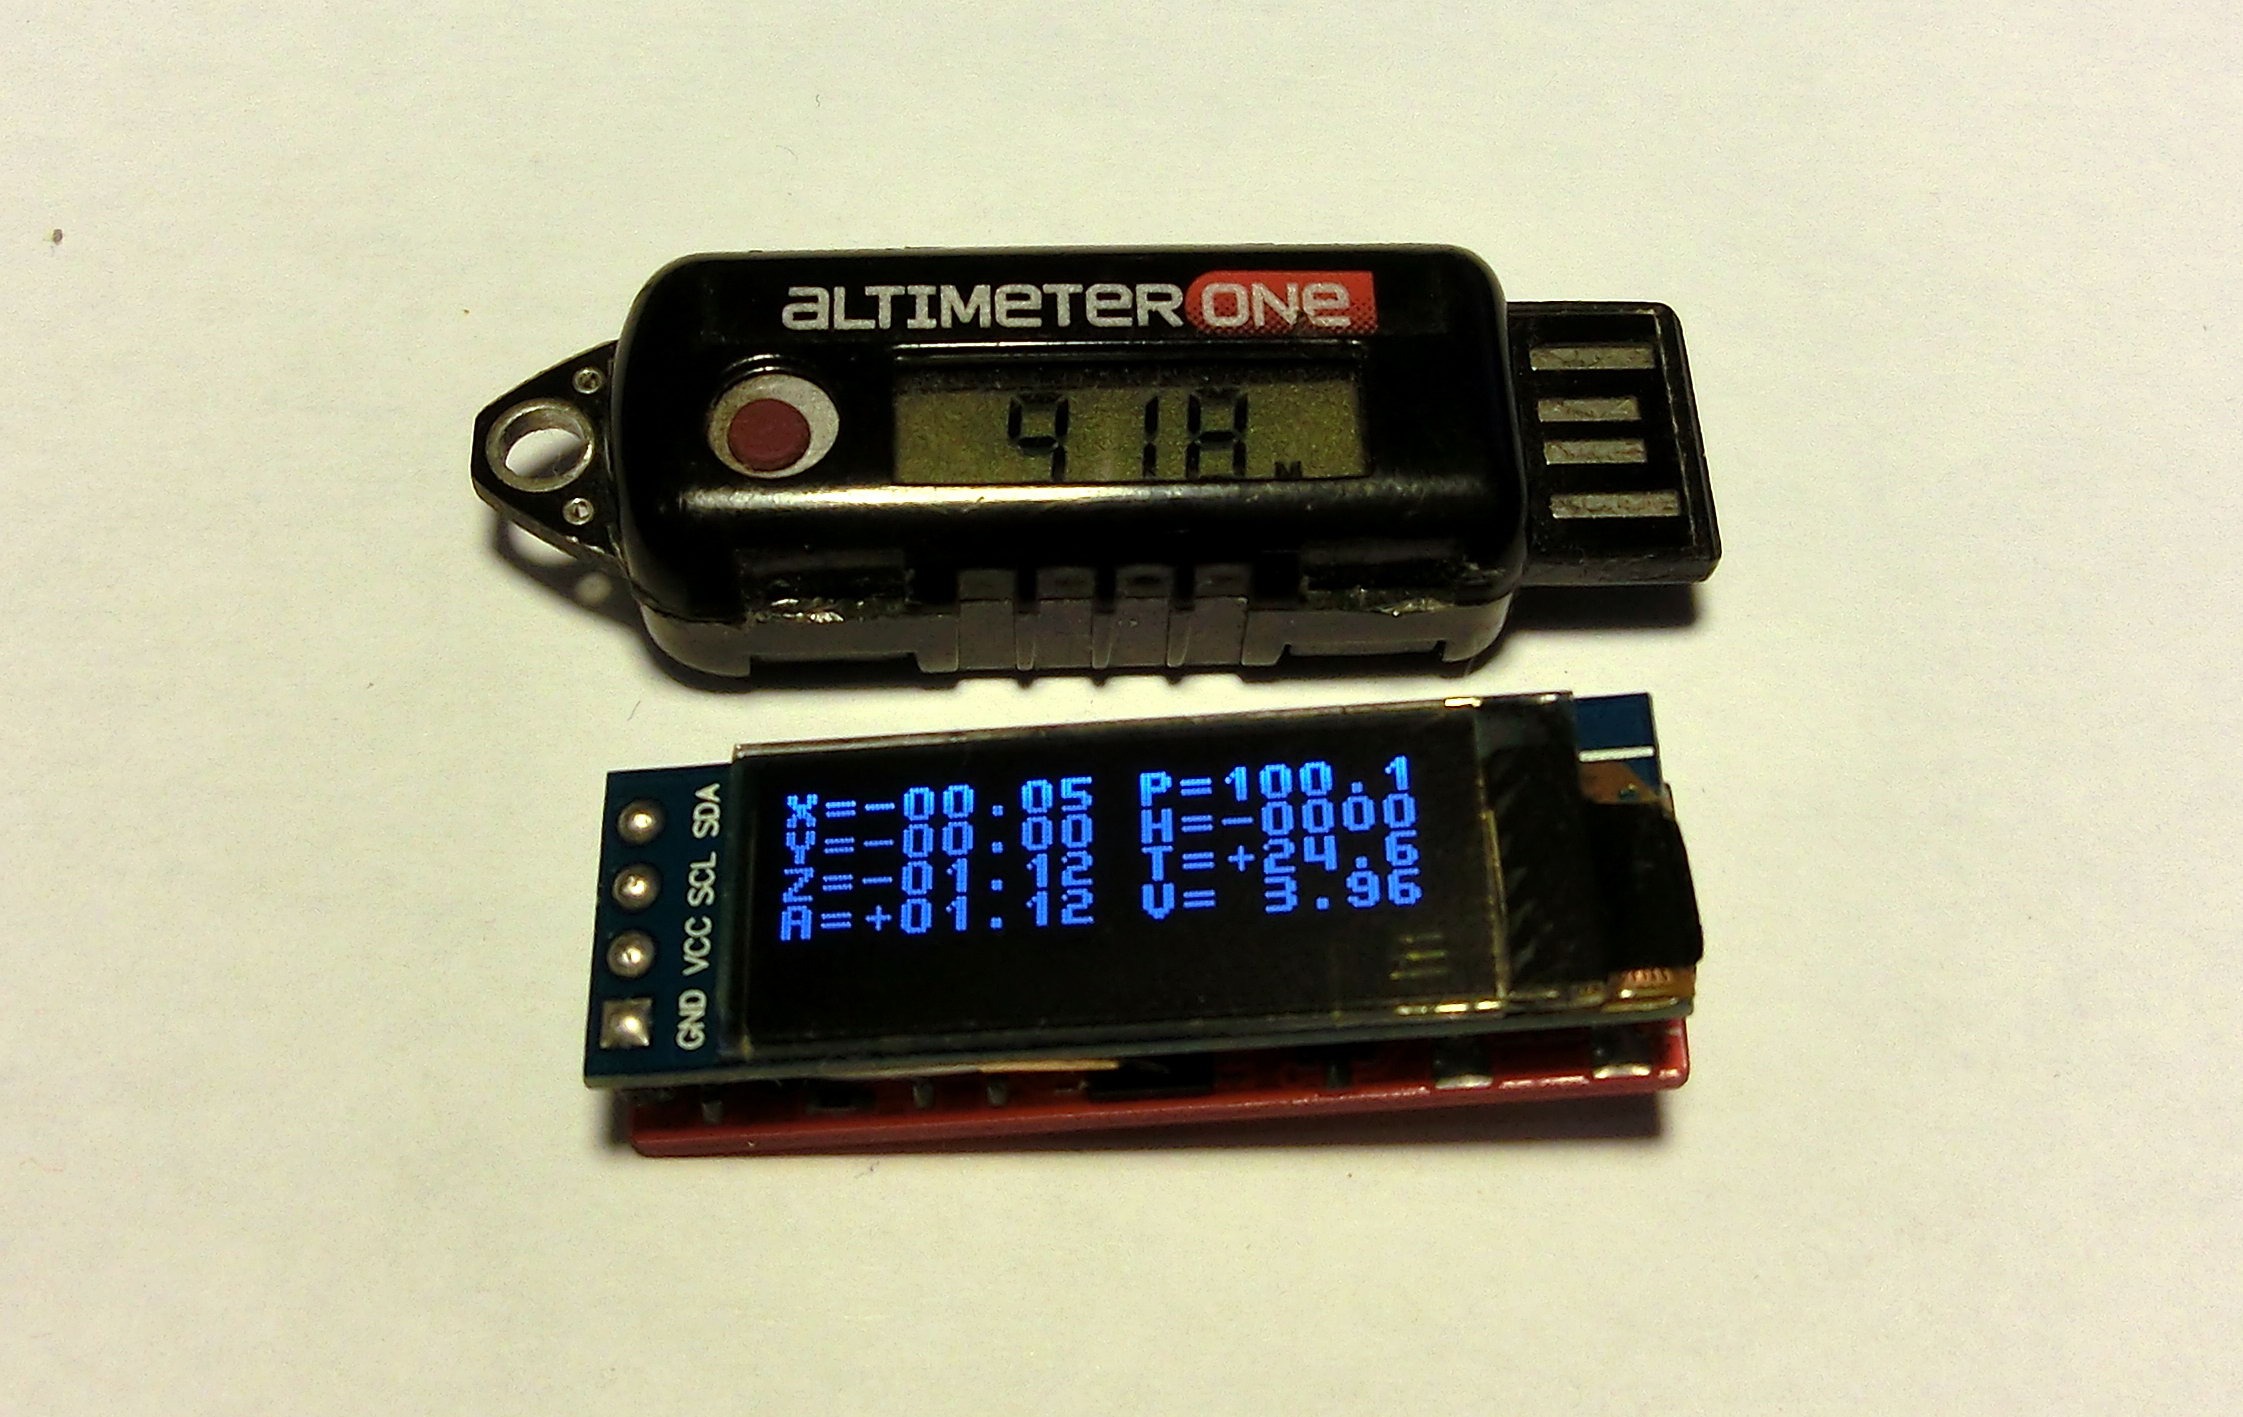
– 128×32 OLED graphic display
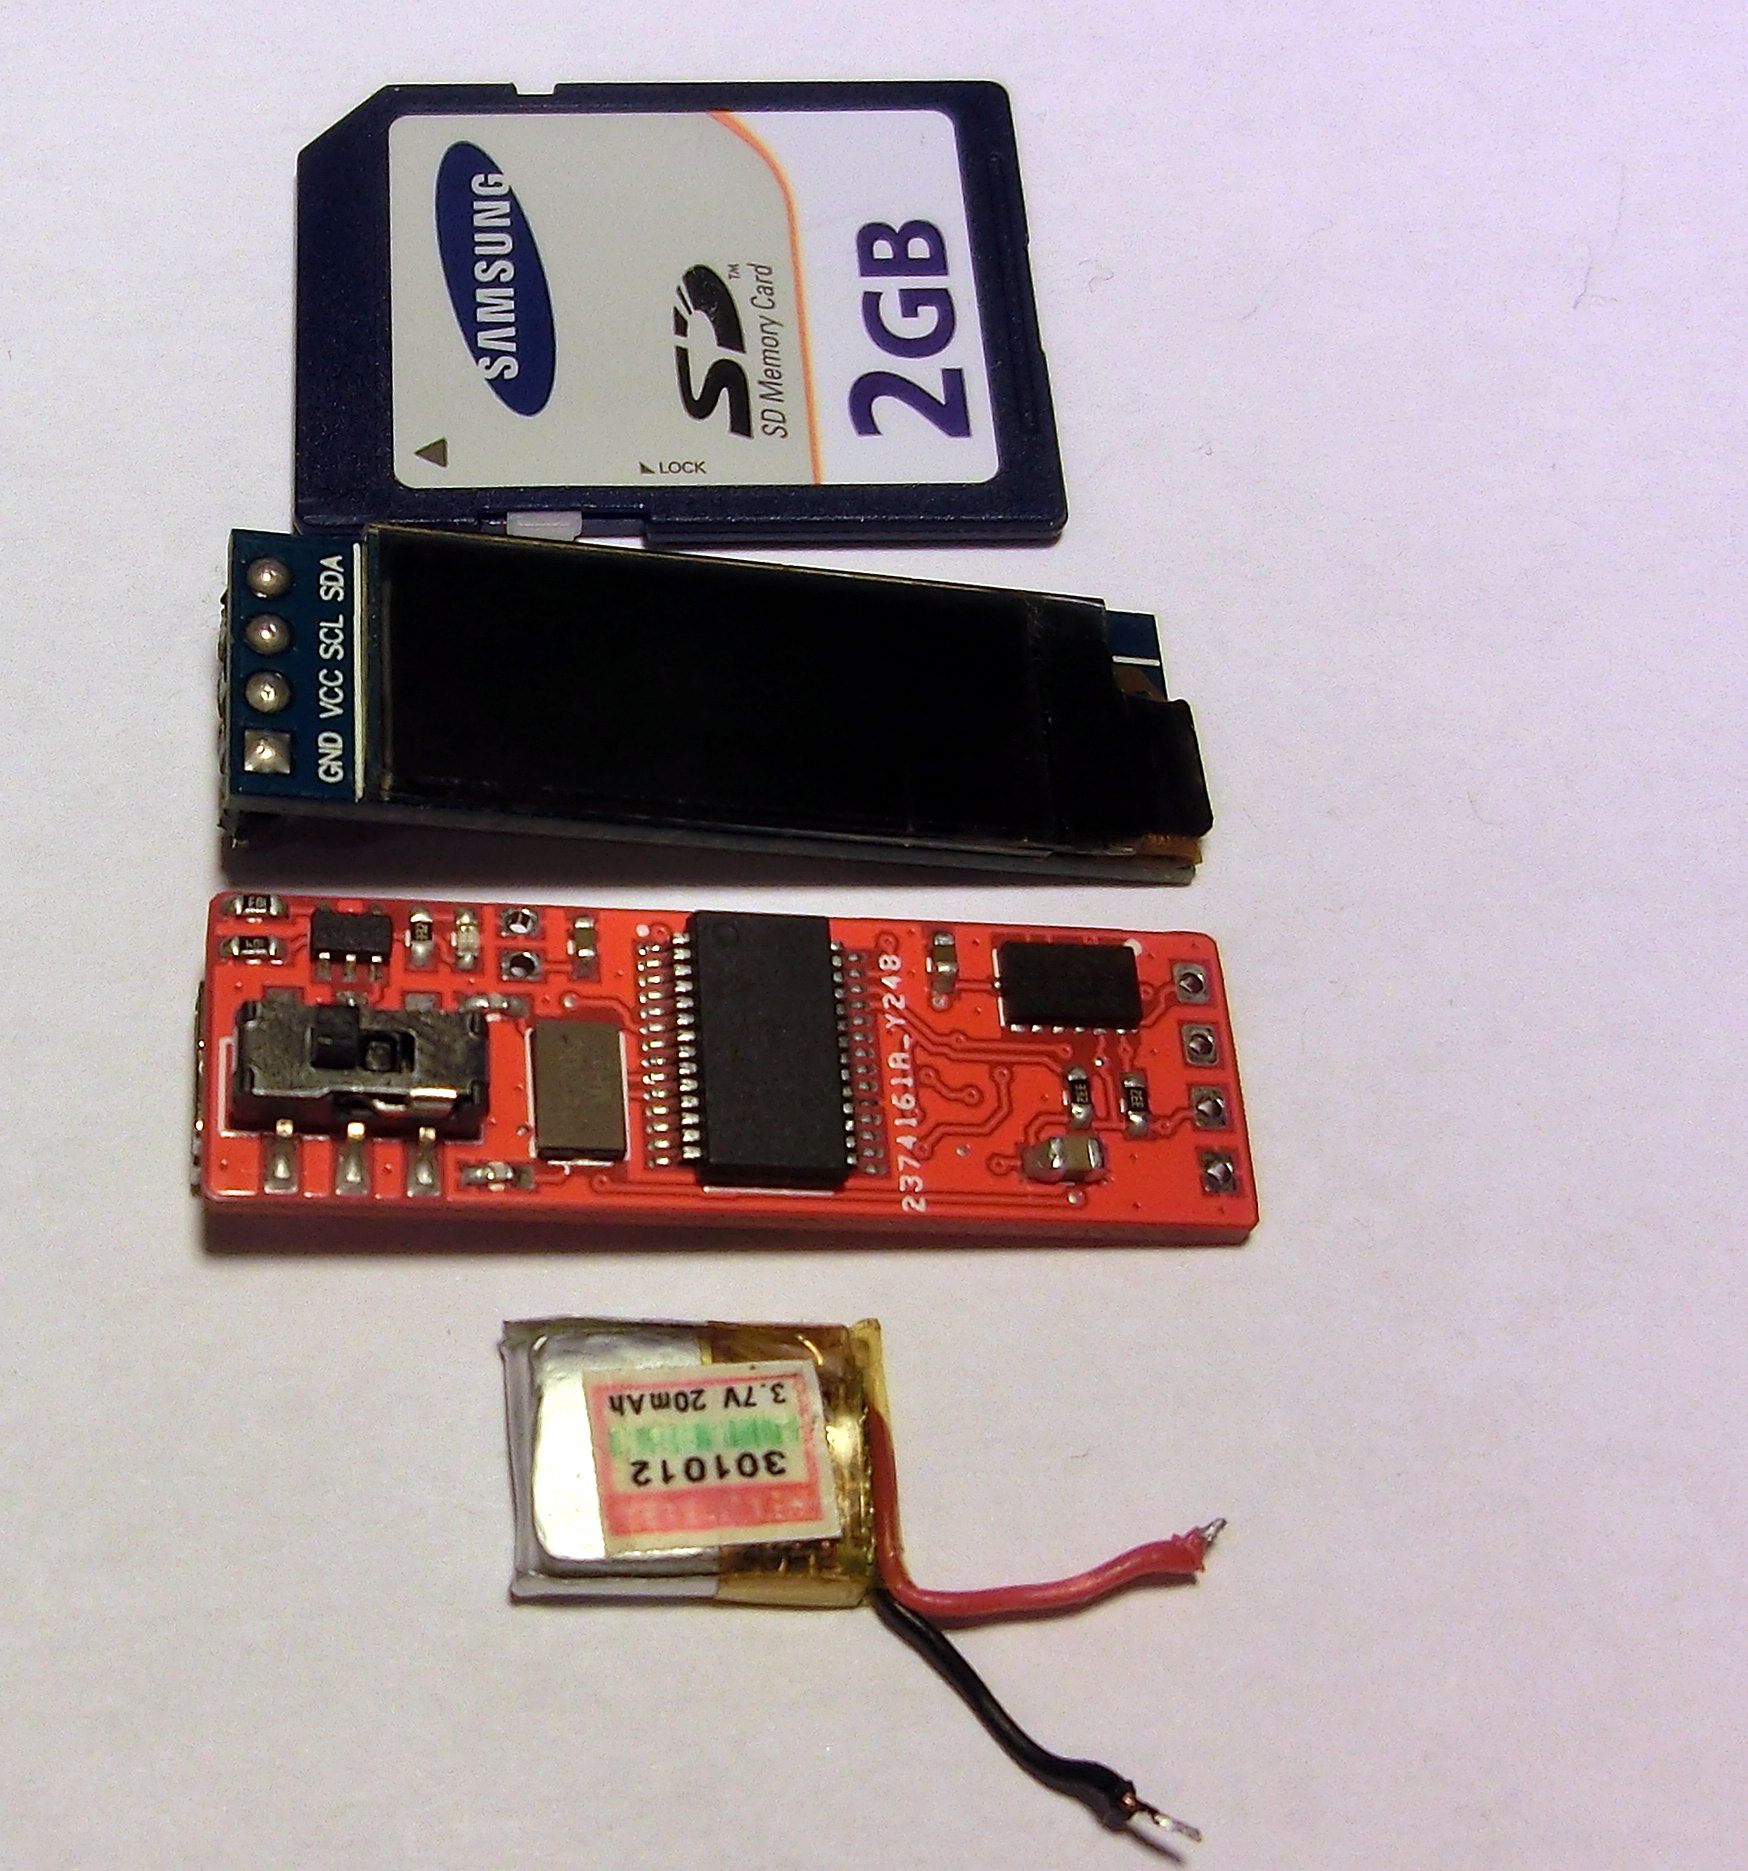
– 2MB built-in memory
– 820 seconds recording time from all sensors
– 40 SPS (25 msec between data points)
– Built-in LIPO battery
– Battery level indication
– Built-in USB LIPO charger
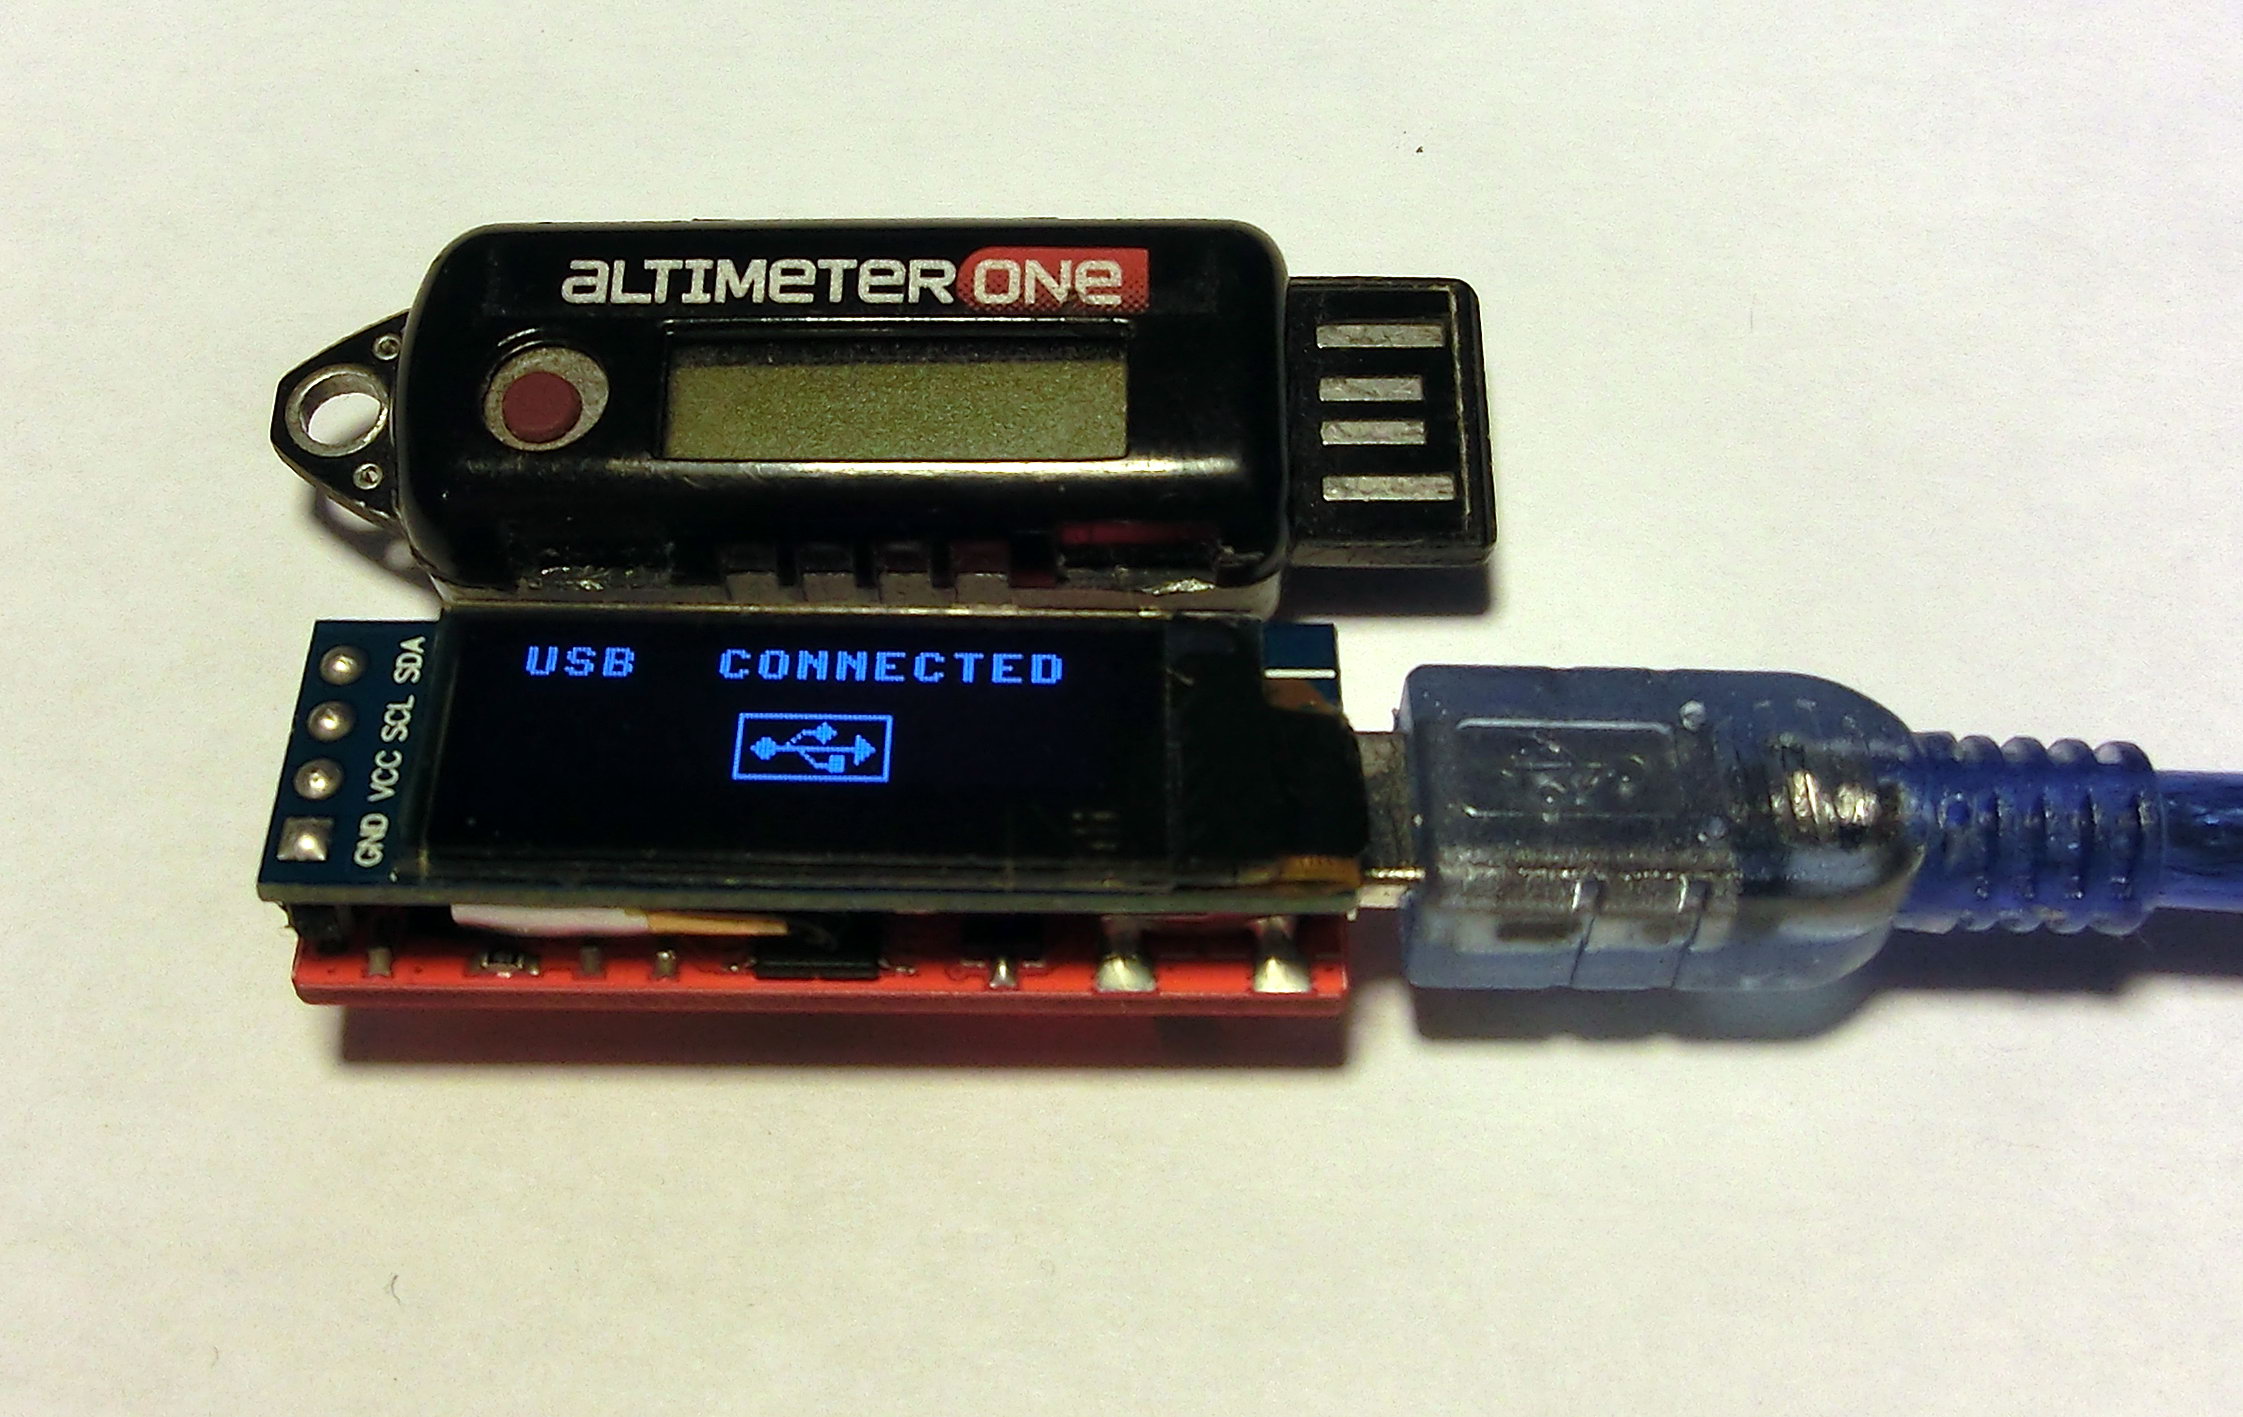
– USB port
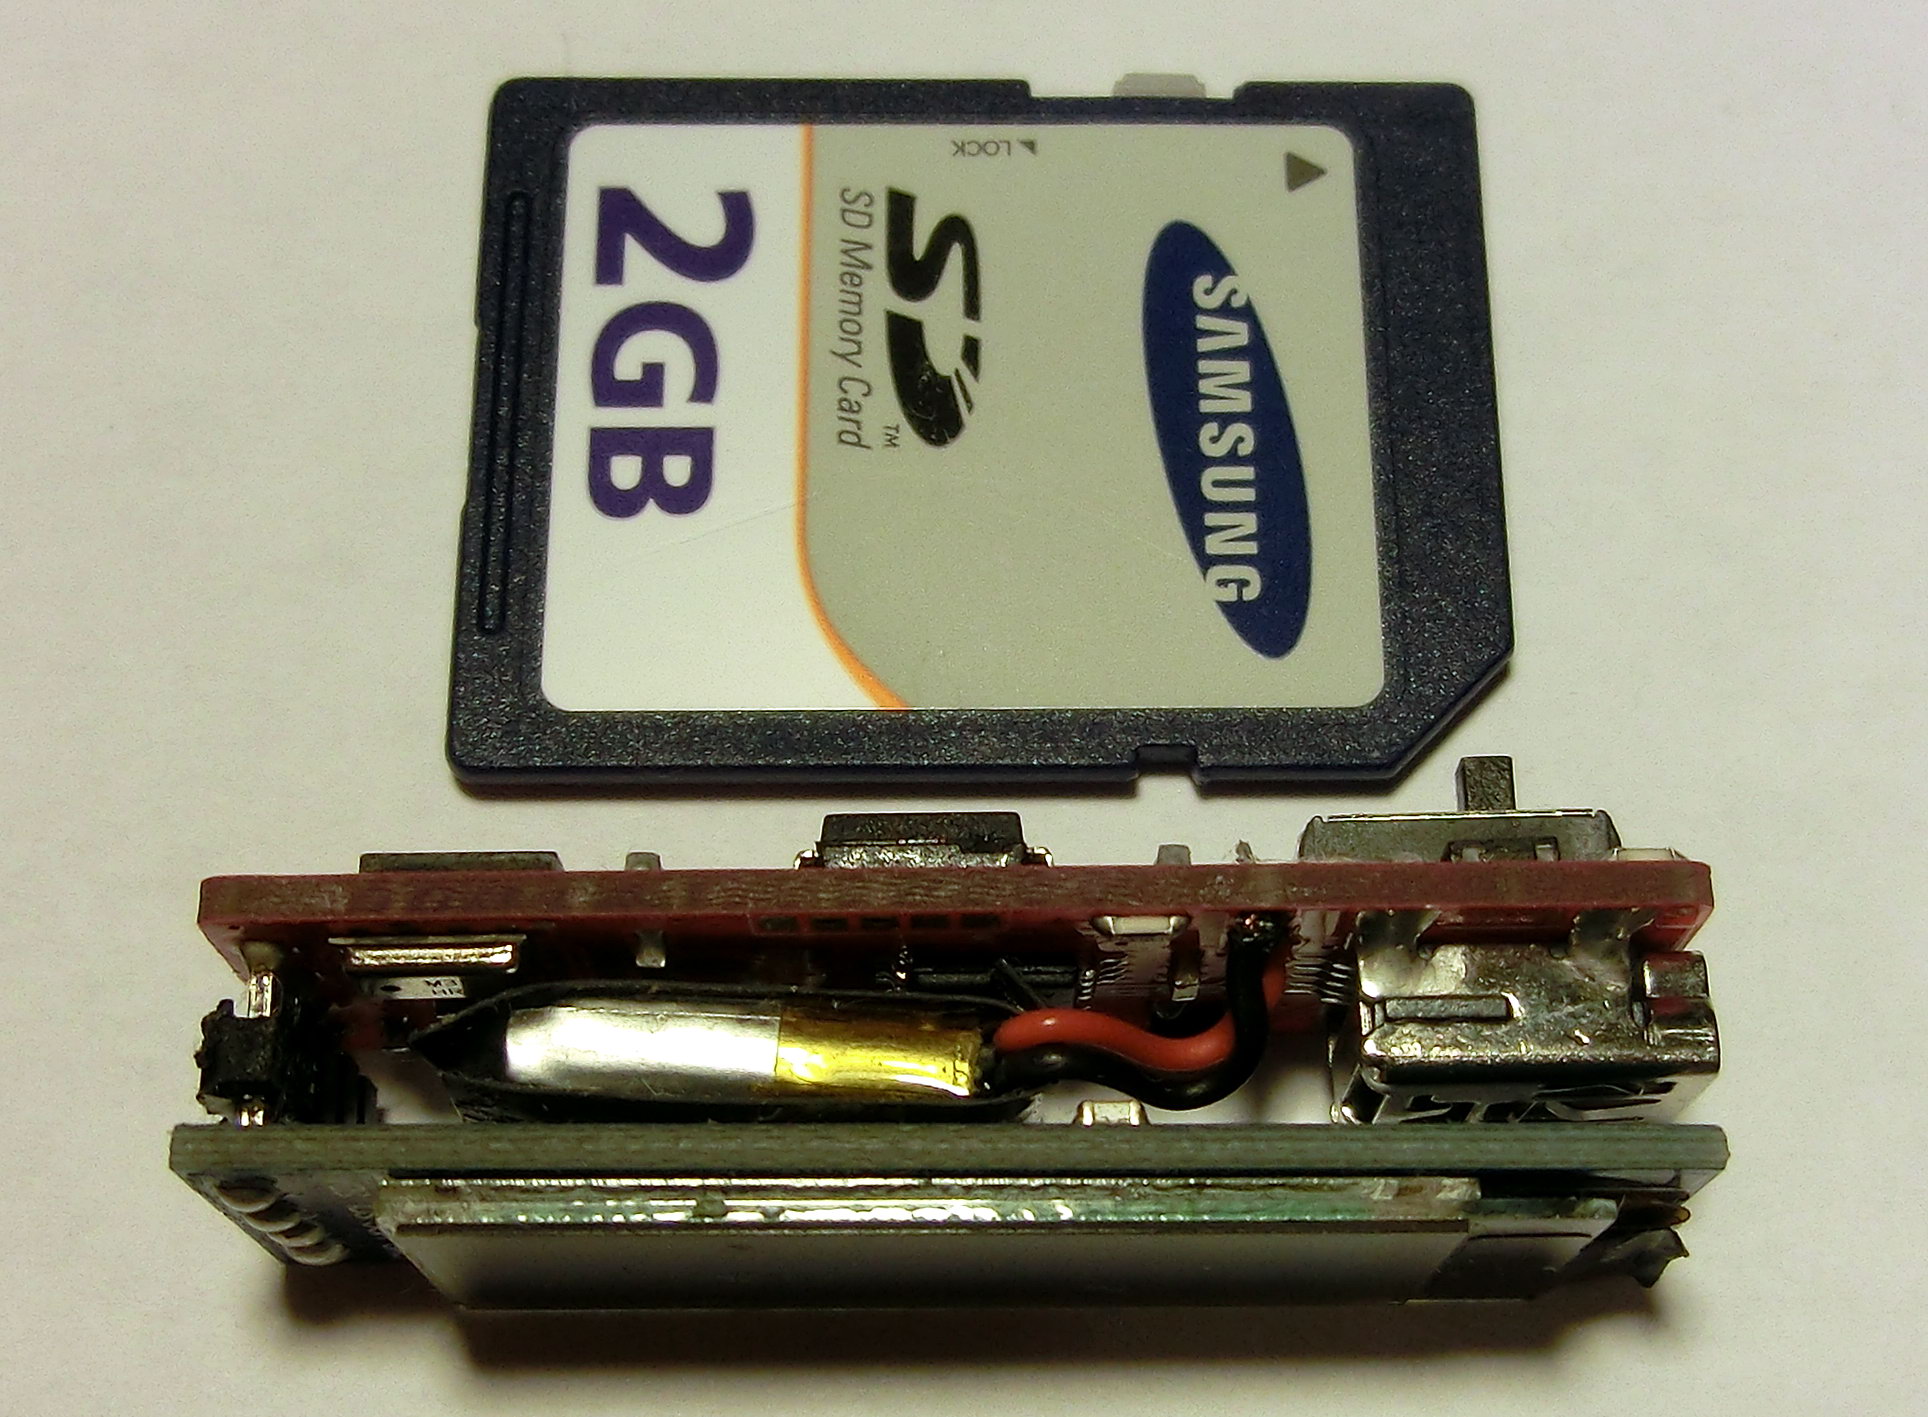
– Size 38x12x12mm (including battery)
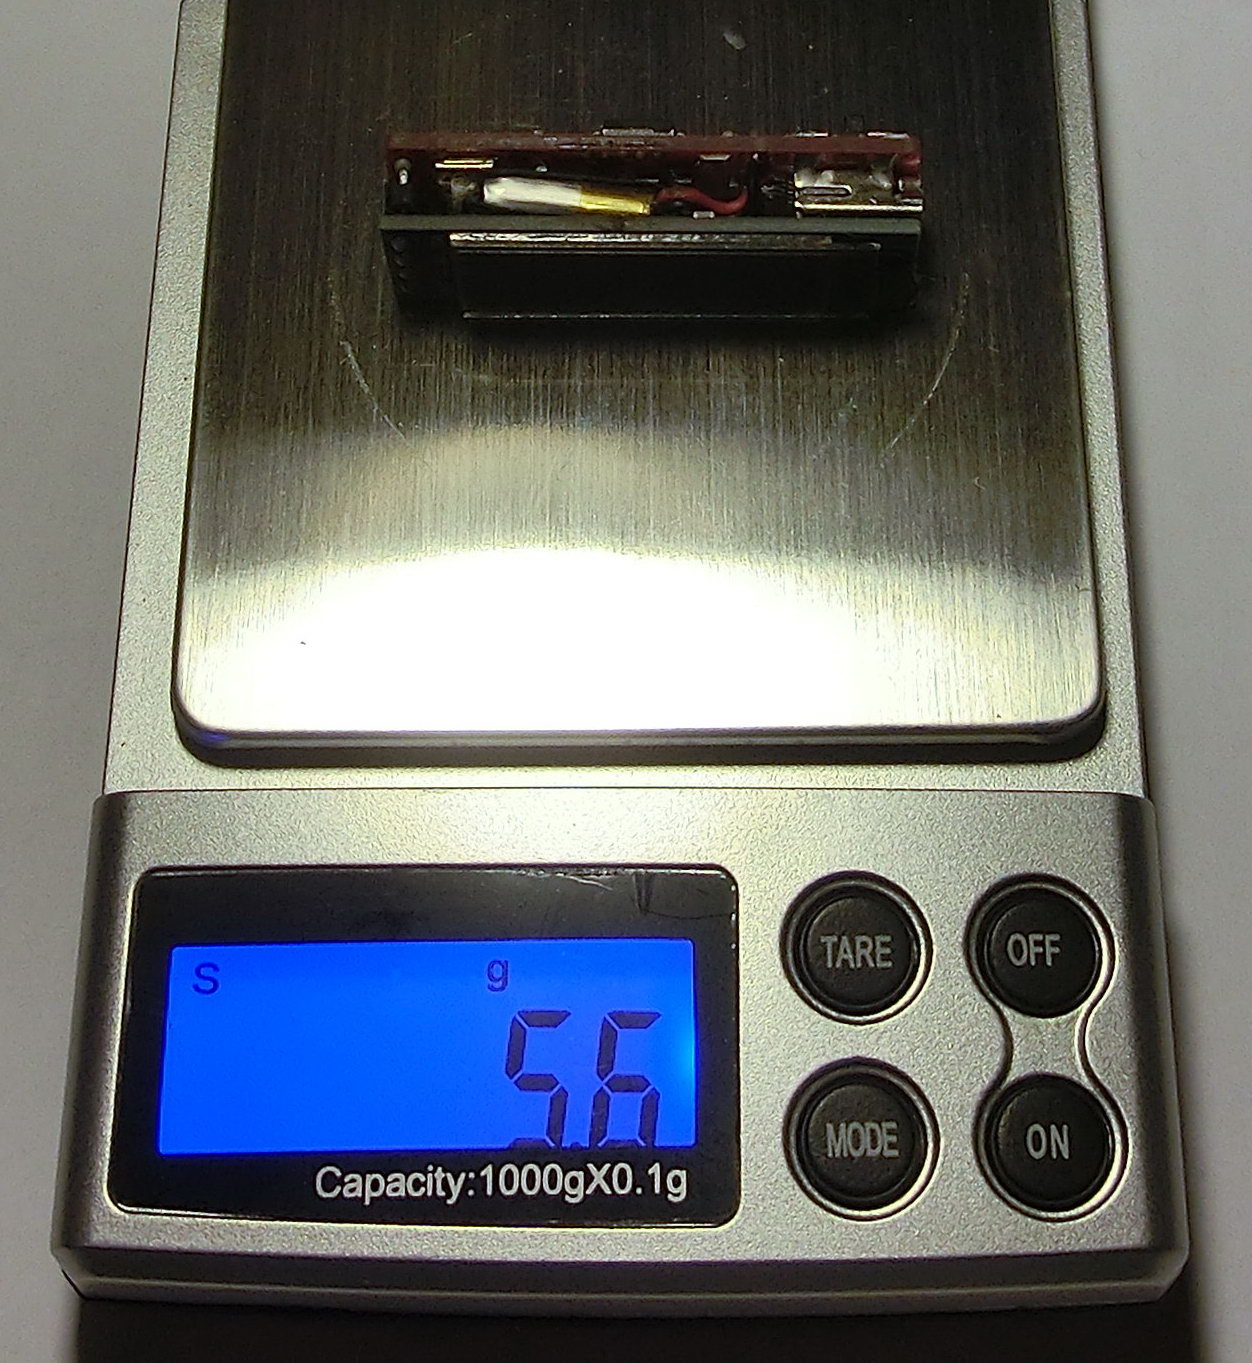
– Weight 5.6gr (including battery)
– USB bootloader – Firmware update through the USB
HARDWARE
From hardware stand point it is a simple design because all sensors are digital and the interface is through an I2C interface, including the OLED screen.
FIRMWARE
Most of the work was actually to write the new USB bootloader for the PIC18F26J50 and the libraries for the OLED display. That and organizing the firmware logic took me a while but at the end I am very pleased with the results.
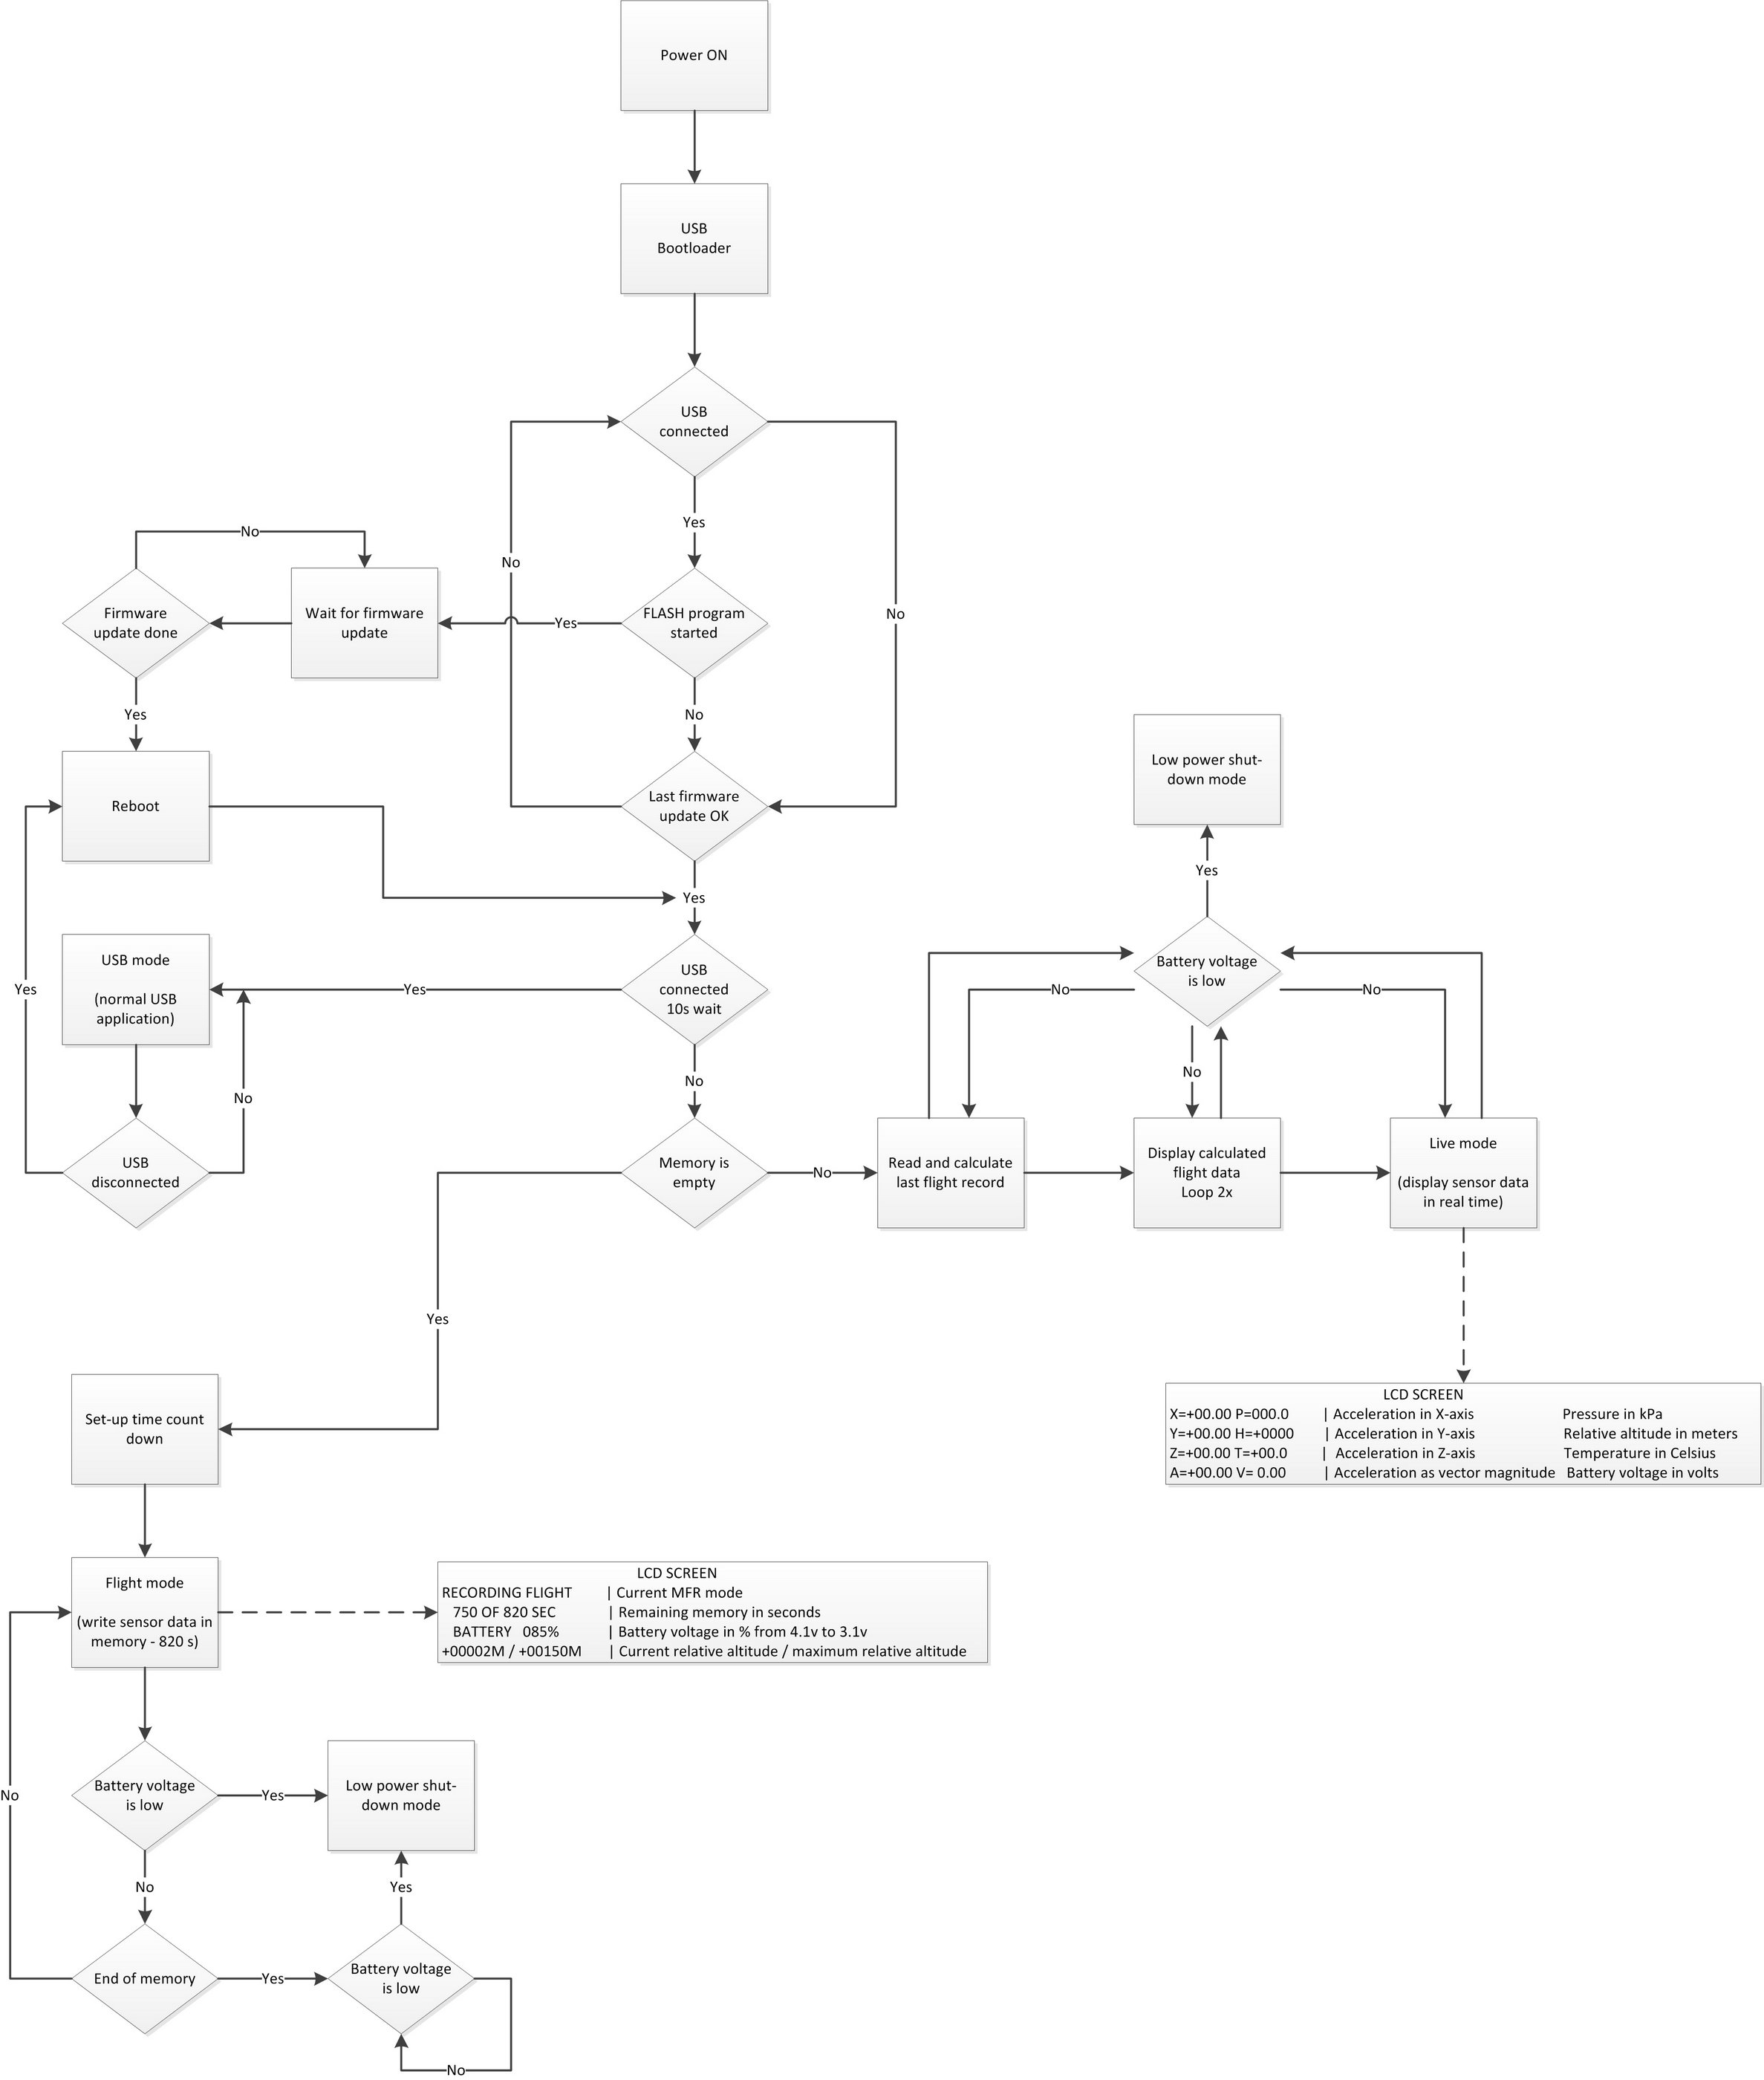
The USB bootloader resides in a protected memory area and is independent from the main firmware program which means that even if something goes wrong during the procedure of updating the firmware for example USB connection is interrupted, it is no problem the re-upload the firmware and “reanimate” the device. Firmware is normally updated via a special boot-time program which must be started and the USB port connected at power-on time. If this is the case the MFR goes into memory FLASH mode.
The bootloader firmware will also check if the last firmware flash attempt went well if not it will go automatically in firmware update mode.

Otherwise the firmware continues to either normal USB operation if the USB is connected or to normal flight mode.
* Normal flight mode
First the memory is being checked if there is a data record present i.e. if the memory is empty or not.
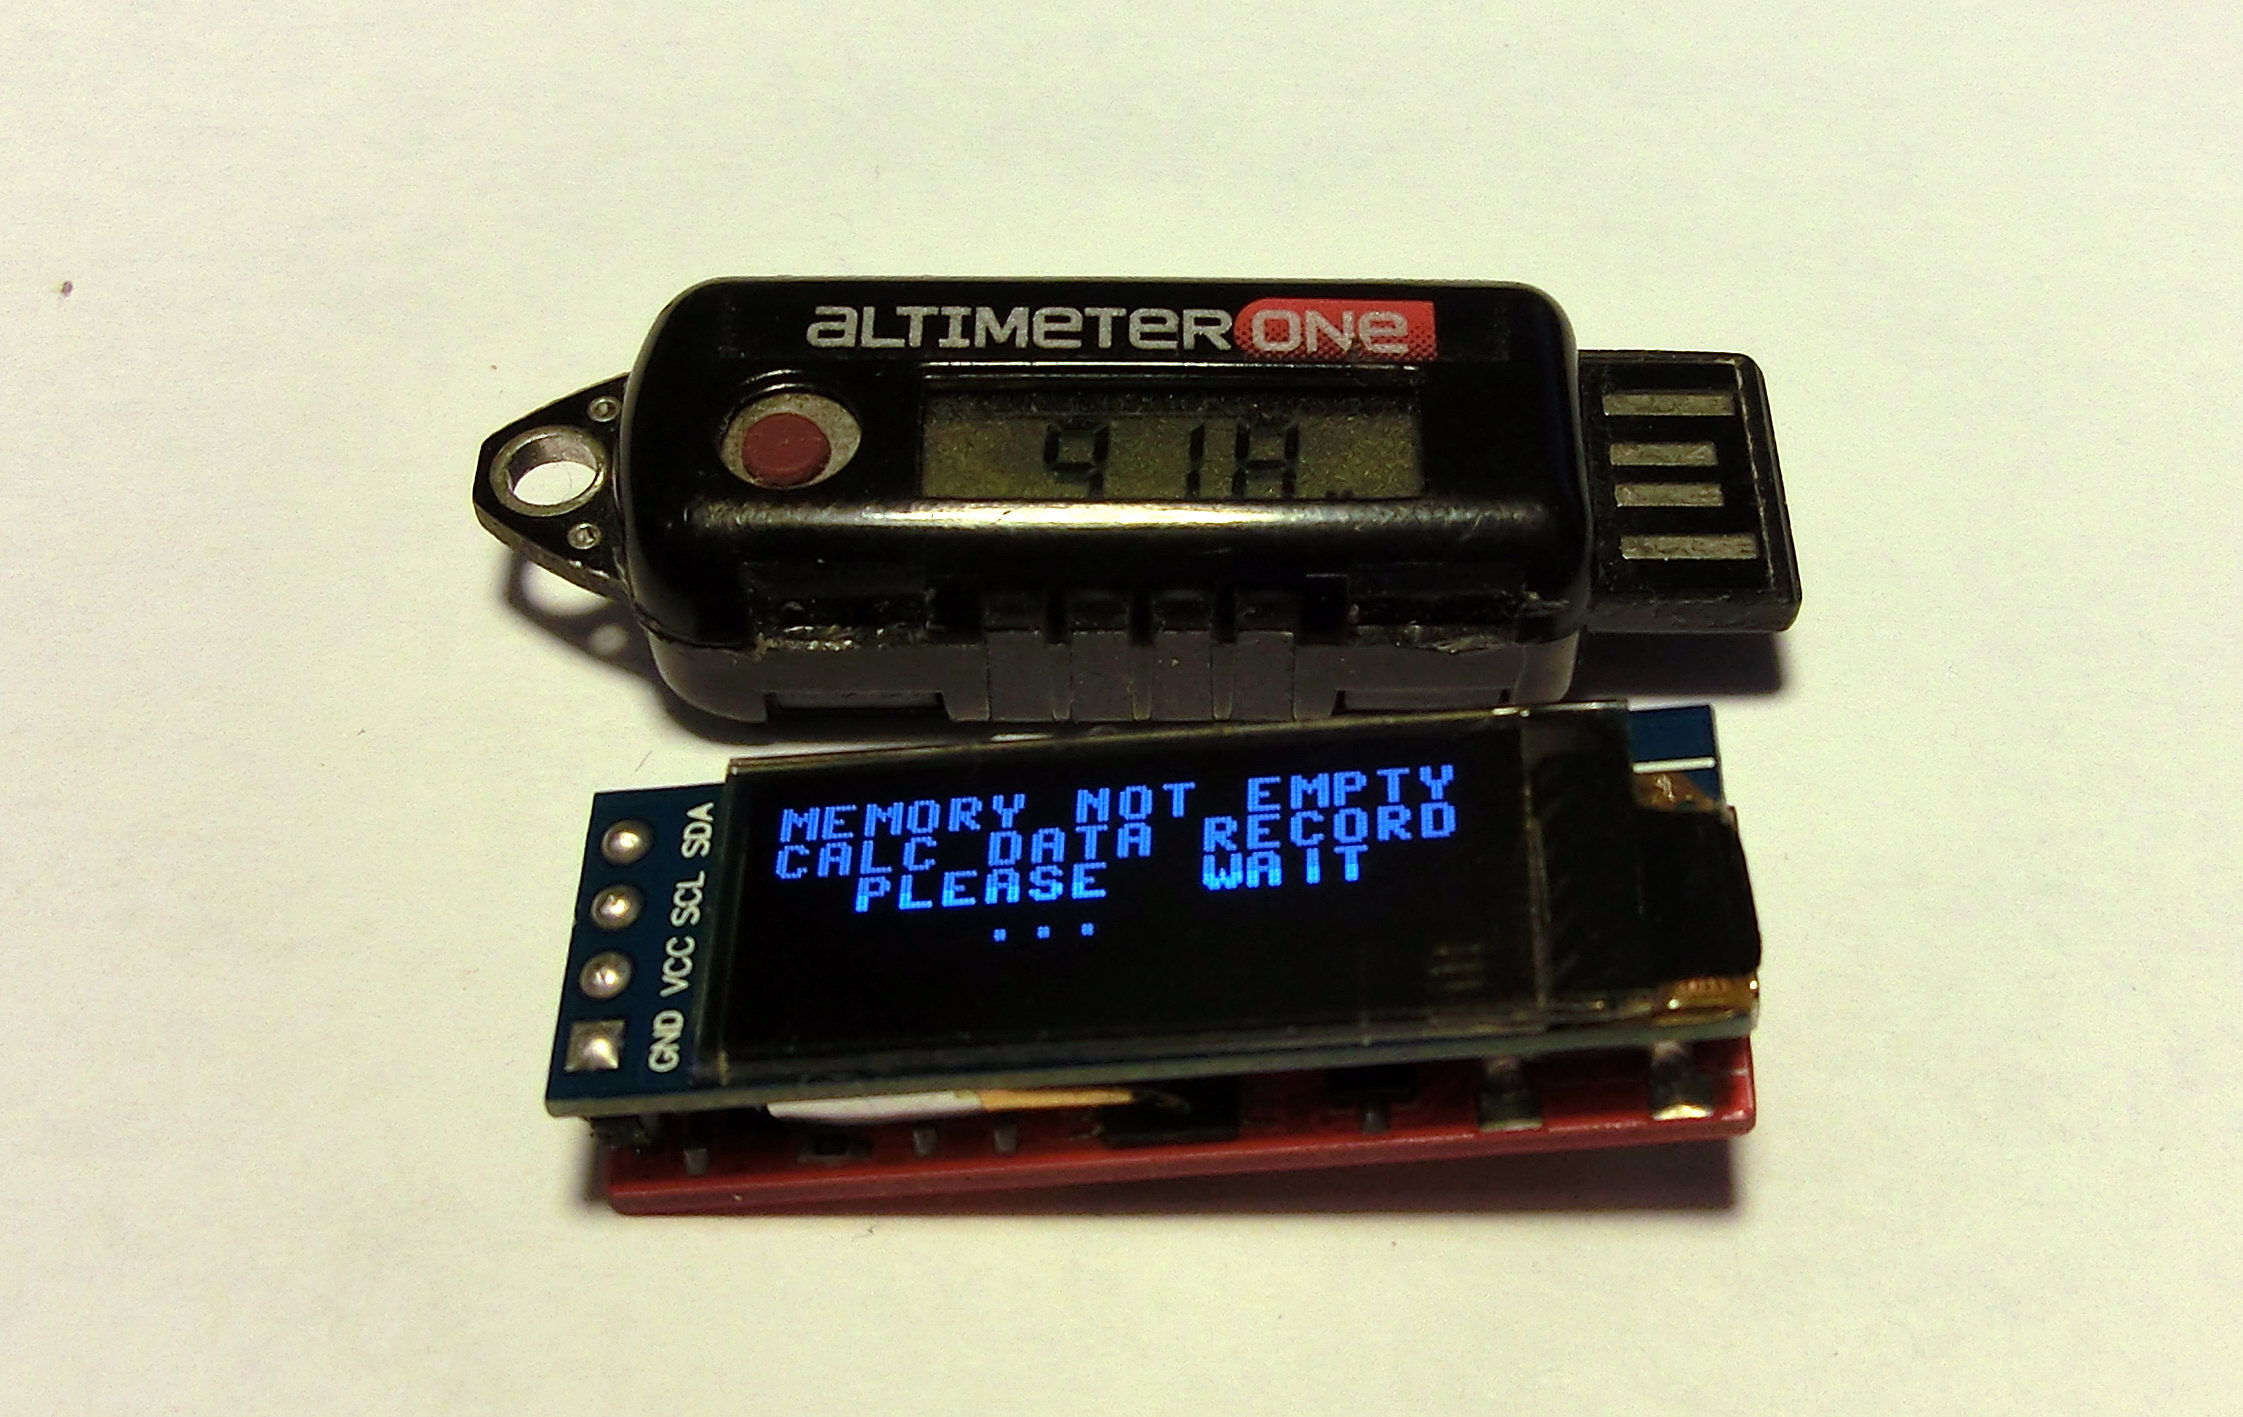
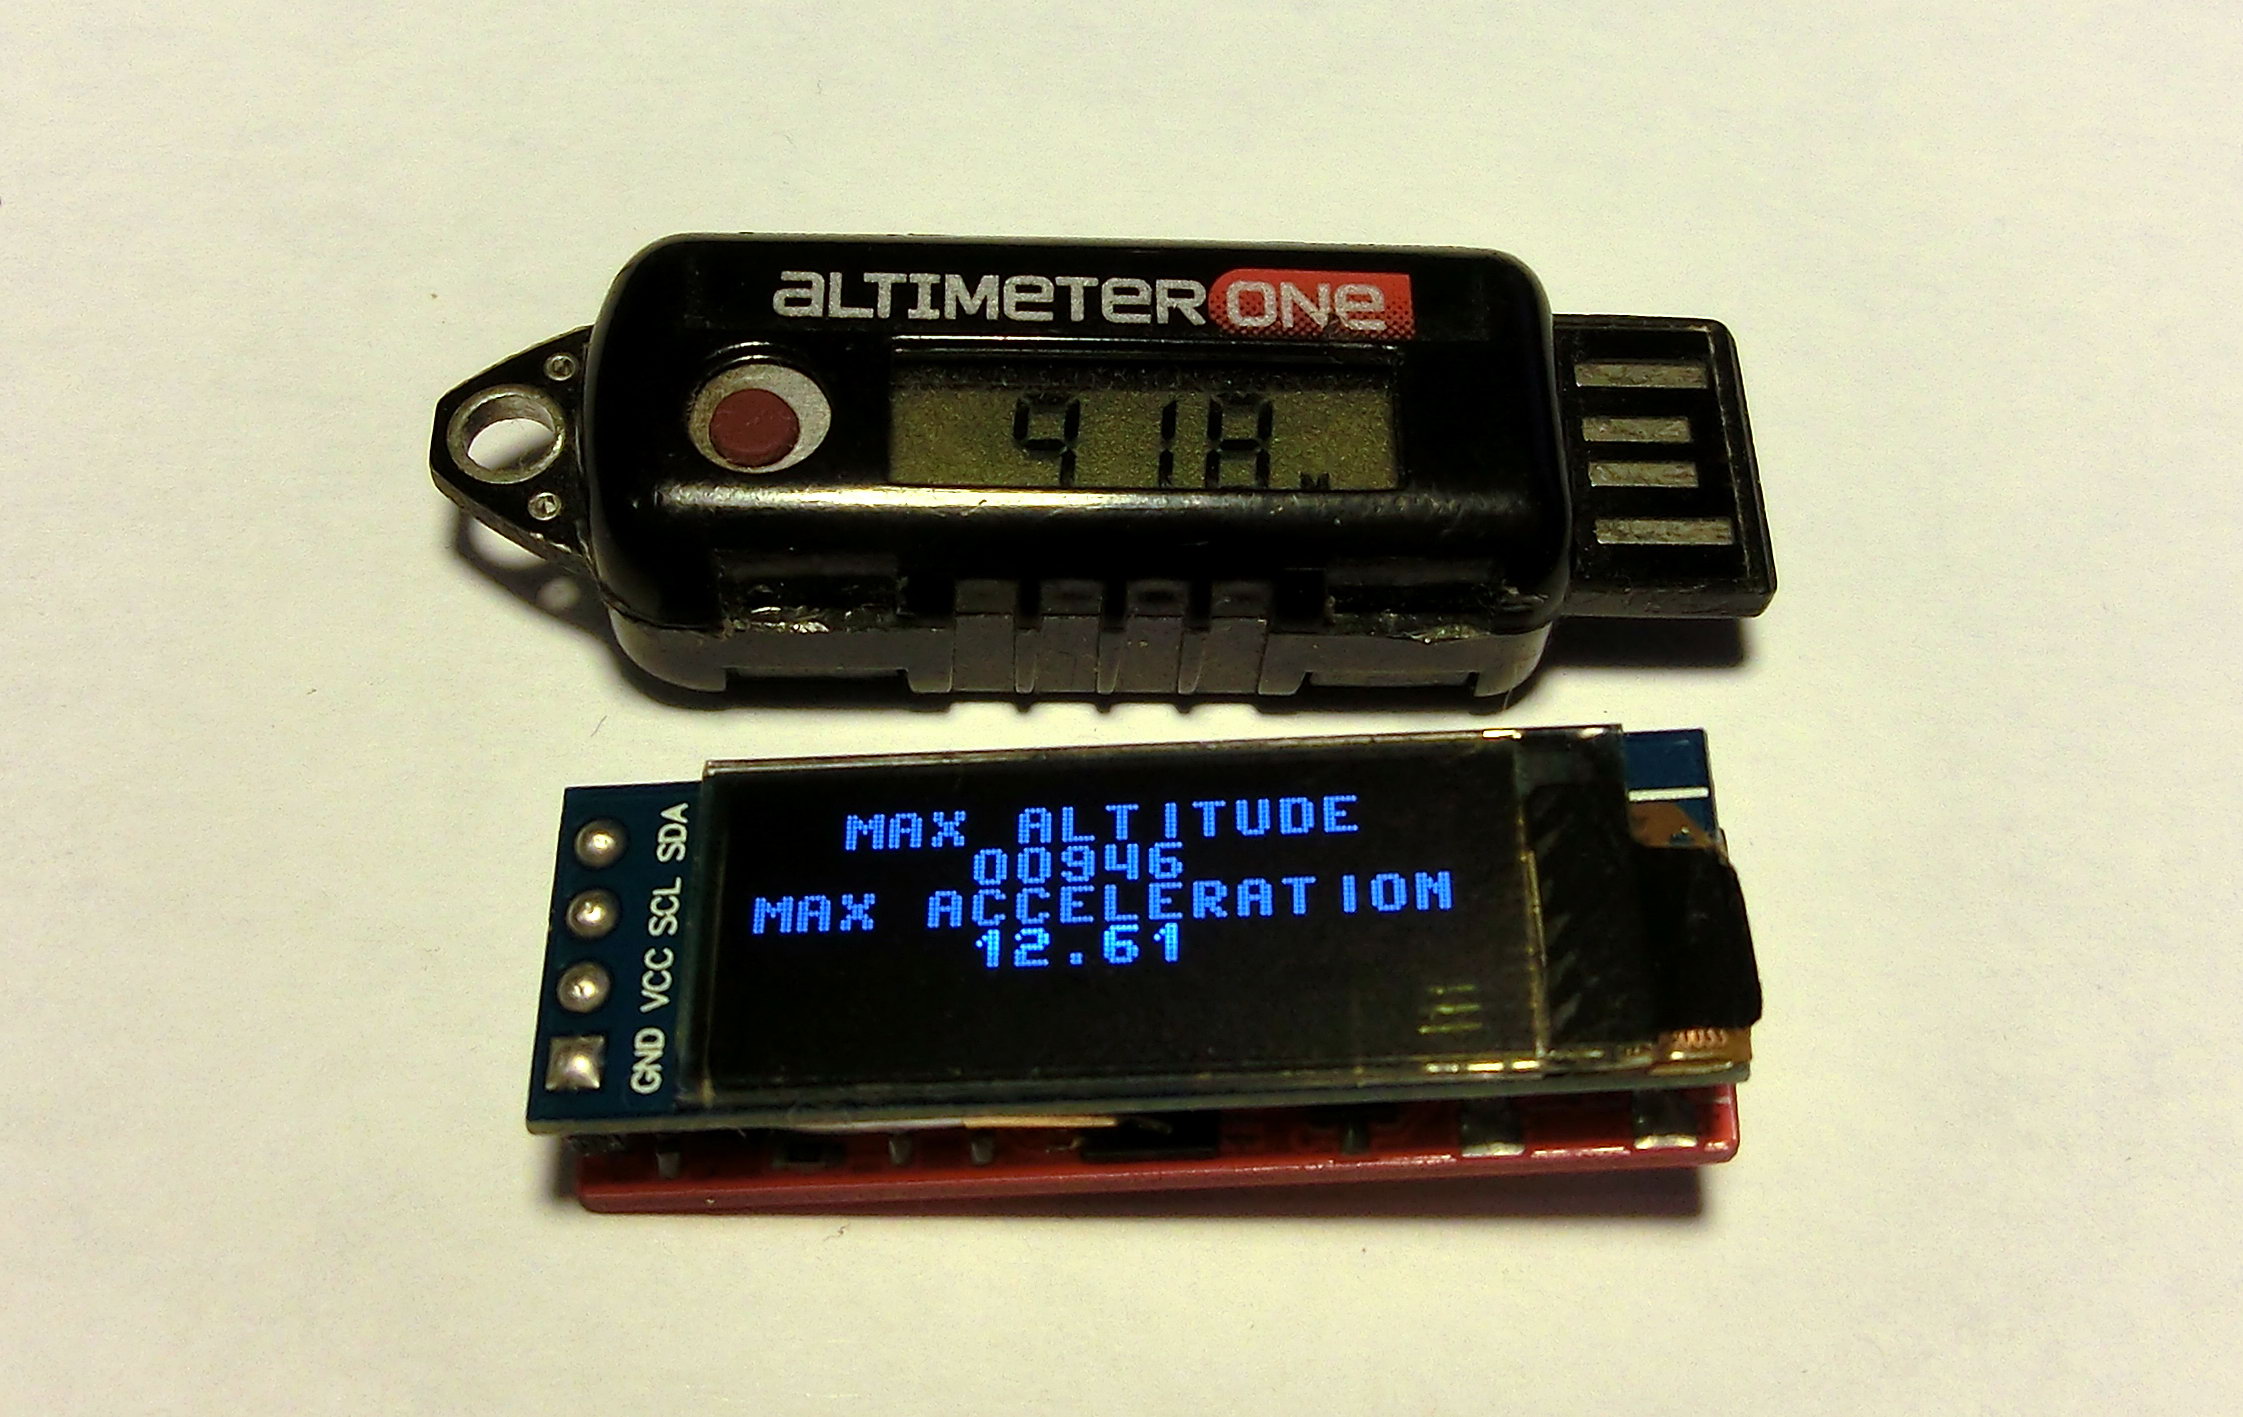
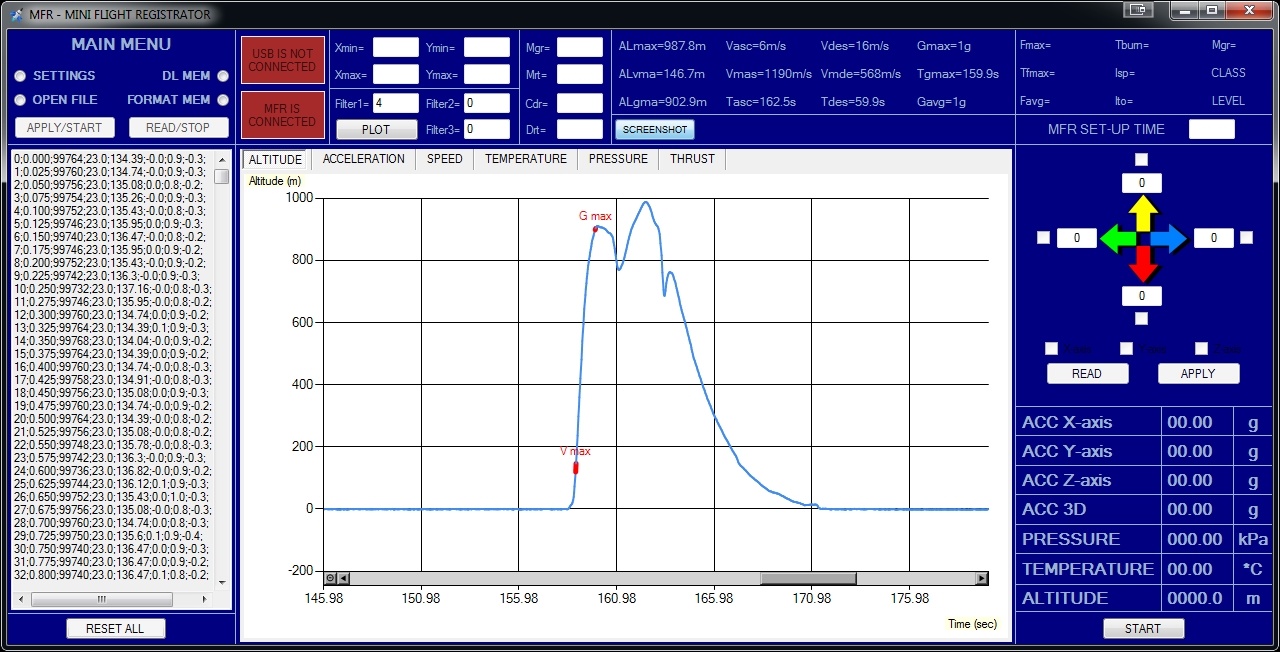
If there is data in the memory banks, then the MFR will read it and calculate and display flight trajectory data like maximum altitude, maximum acceleration, burn-out acceleration, flight time etc. Some of this functionality is still under development and needs debugging but it will be done in the next firmware releases. This data metrics will cycled two times on the screen.
After this the MFR will go in real-time mode and pressure, relative altitude and acceleration data will be displayed in real time.
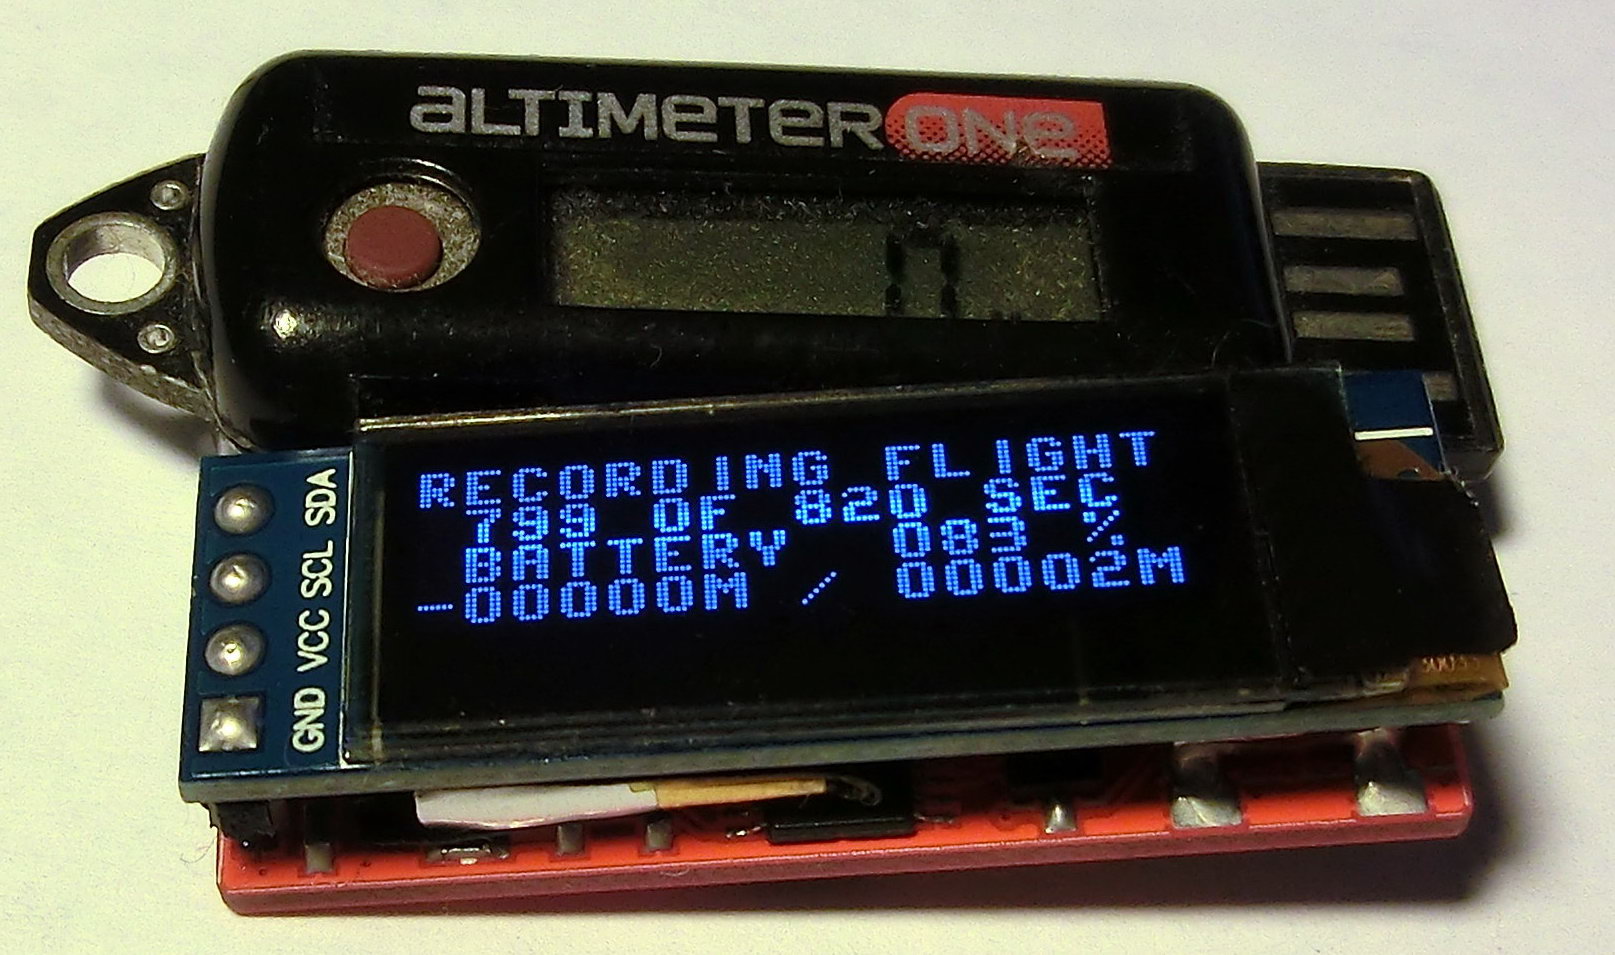
If the memory is empty, then the device goes into flight recording mode and after waiting the predetermined “preparation” time which is set up via the USB interface, MFR will start recording the sensor data while displaying the current altitude relative and the maximum registered relative altitude. Calculations for the relative altitude are based on the difference between the absolute altitude at start time and the current absolute altitude. Also on the OLED display you will see information about the remaining empty memory expressed in seconds recording time and the battery voltage level.

I tested the MFR together with Altimeter ONE and I noticed that Altimeter ONE has slow reaction time while monitoring for altitude (pressure) changes to register the rocket lift-off which leads to missed few meters at the basic level. With other words if the lift-off is too sharp it will show lower maximum achieved altitude. This is not a problem for MFR as the basic absolute altitude used to calculate the relative altitude is taken at record start time, which is right after the preparation countdown. On other hand if the preparation time was set-up too long then with MFR you can have missed the lift-off while waiting for countdown. Since the recording time is 820 seconds or almost 14 minutes this can be easily avoided with shorter countdowns.
** USB mode
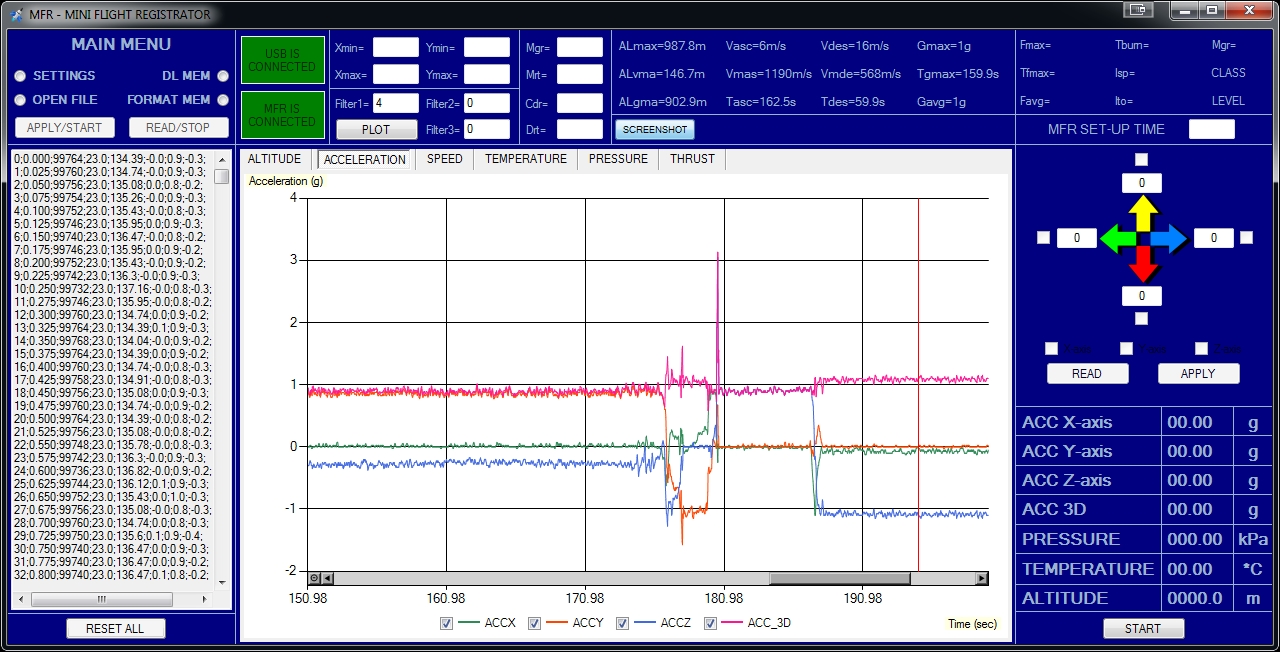
In USB mode you have the options to:
– download the flight log
-open and visualize the sensor readings
– format the memory (in order to start a new record, the memory has to be empty)
– set-up the preflight count down timer
– calibrate the acceleration sensor
– display the sensor data in real time
Also based on the rocket description mass, propellant mass, drag coefficient etc. you can recreate the motor thrust curve. For this purpose, using the typical interface layout for my programs, I created the user interface application.
Finally it would have been nice to make a suitable plastic casing for the MFR but my 3D printer broke a month ago. I don’t really need a 3D printer now so I will wait a bit until the SLA and DLP printers gain more popularity and of course the prices become more appealing.
* Please note that not all functionality is ready and available yet and will be added in future firmware and software revisions.
** This hardware and software are FREE to copy and use FOR NONPROFIT USE ONLY in the hope that they will be useful, but WITHOUT ANY WARRANTY; without even the implied warranty of MERCHANTABILITY or FITNESS FOR A PARTICULAR PURPOSE.
*** Currently I don’t have the possibility to launch rockets therefore I plan to assemble about 10 units and give them away to help with testing and developing. This is to say I will send you a flight recorder and in return whenever you can fit it in your rockets it would be very helpful for me to have the flight logs so I can finish and test the remaining functionality. Also would be good if you can report any bugs that you notice so I can fix them and issue a new firmware (and/or software) revision which you can flash in the MFR using the USB interface.
MAIN FIRMWARE 1.01
(this is the end user firmware which is uploaded using the USB port)
*Last Update Nov-29-2019
BOOTLOADER FIRMWARE
(this is the first and one time only firmware for which a PIC programmer is required)
MAIN APPLICATION 1.02
(this is the normal USB application)
FIRMWARE UPDATE APPLICATION
(this is used only for firmware updates via the USB port)
PCB CADCAM FILES
(this is a GERBER file archive which is used for PCB manufacturing)
This looks like a fun project. I fly a JollyLogic Altimeter 3 pretty regularly and I am excited about having an open source version to play with. If you need a tester, sign me up!
Hello John,
It would be very nice if you can help testing these altimeters. I can certainly send you one or two units to play with. I will be finishing the extra units in a week or two.
Can you message me via the contact form for further information.
Regards.
Pingback: This Pint-Sized Flight Recorder Is Perfect for Gathering Rocket Launch Data - PC Solution
Pingback: This Pint-Sized Flight Recorder Is Perfect for Gathering Rocket Launch Data • beat 10z
Cool project John! Are you making a parts list available for those of us DIYers that want to make our own?