
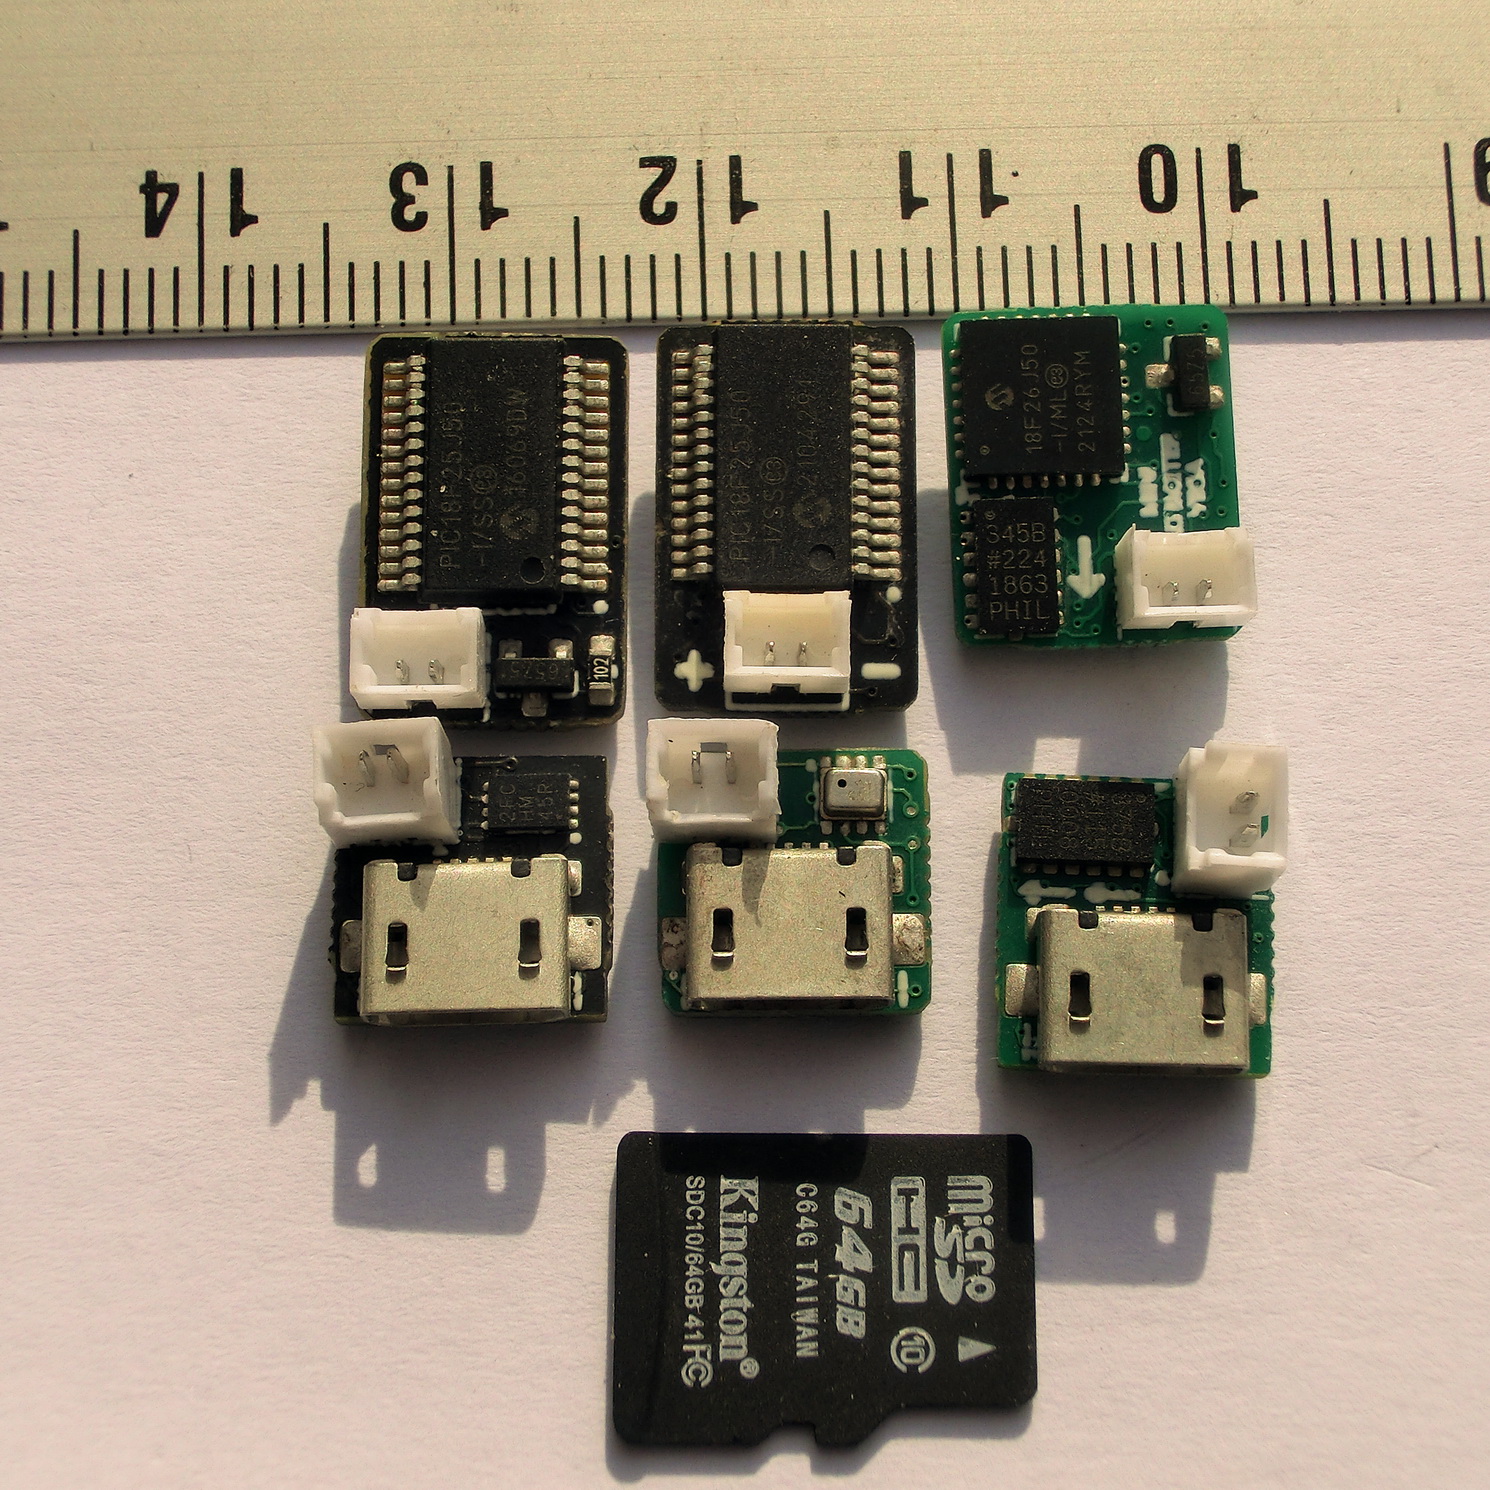
About a year ago I designed a micro altimeter for fellow FAI rocket competitors but due to some other commitments I didn’t get it finished. Recently I revived and finished the project, however I got surprised by the global chips shortage. Therefore I decided on making micro altimeters with whatever chips I’ve stocked in the past. This is a series of MICRO ALTIMTERS using different chips and sensors:
The common characteristics for all series altimeters are:
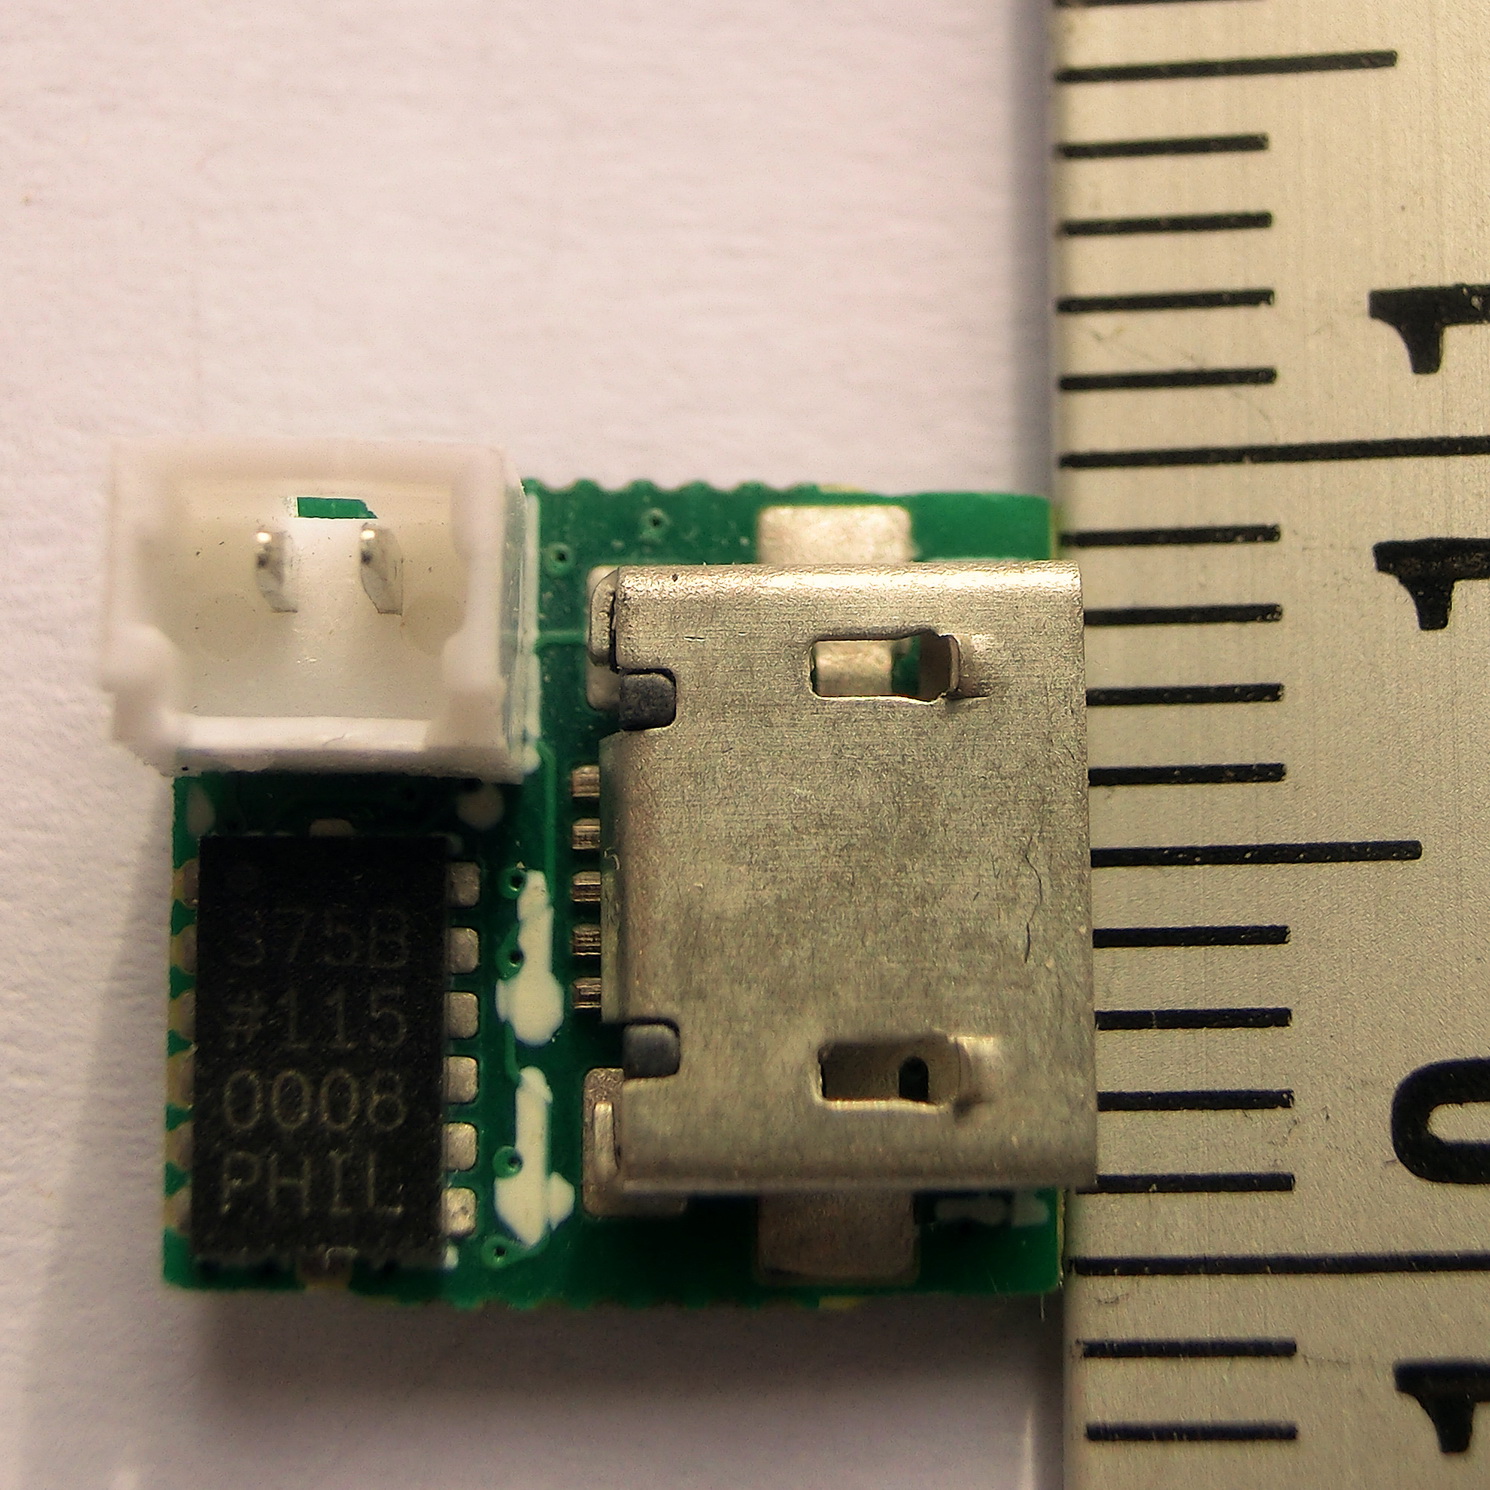
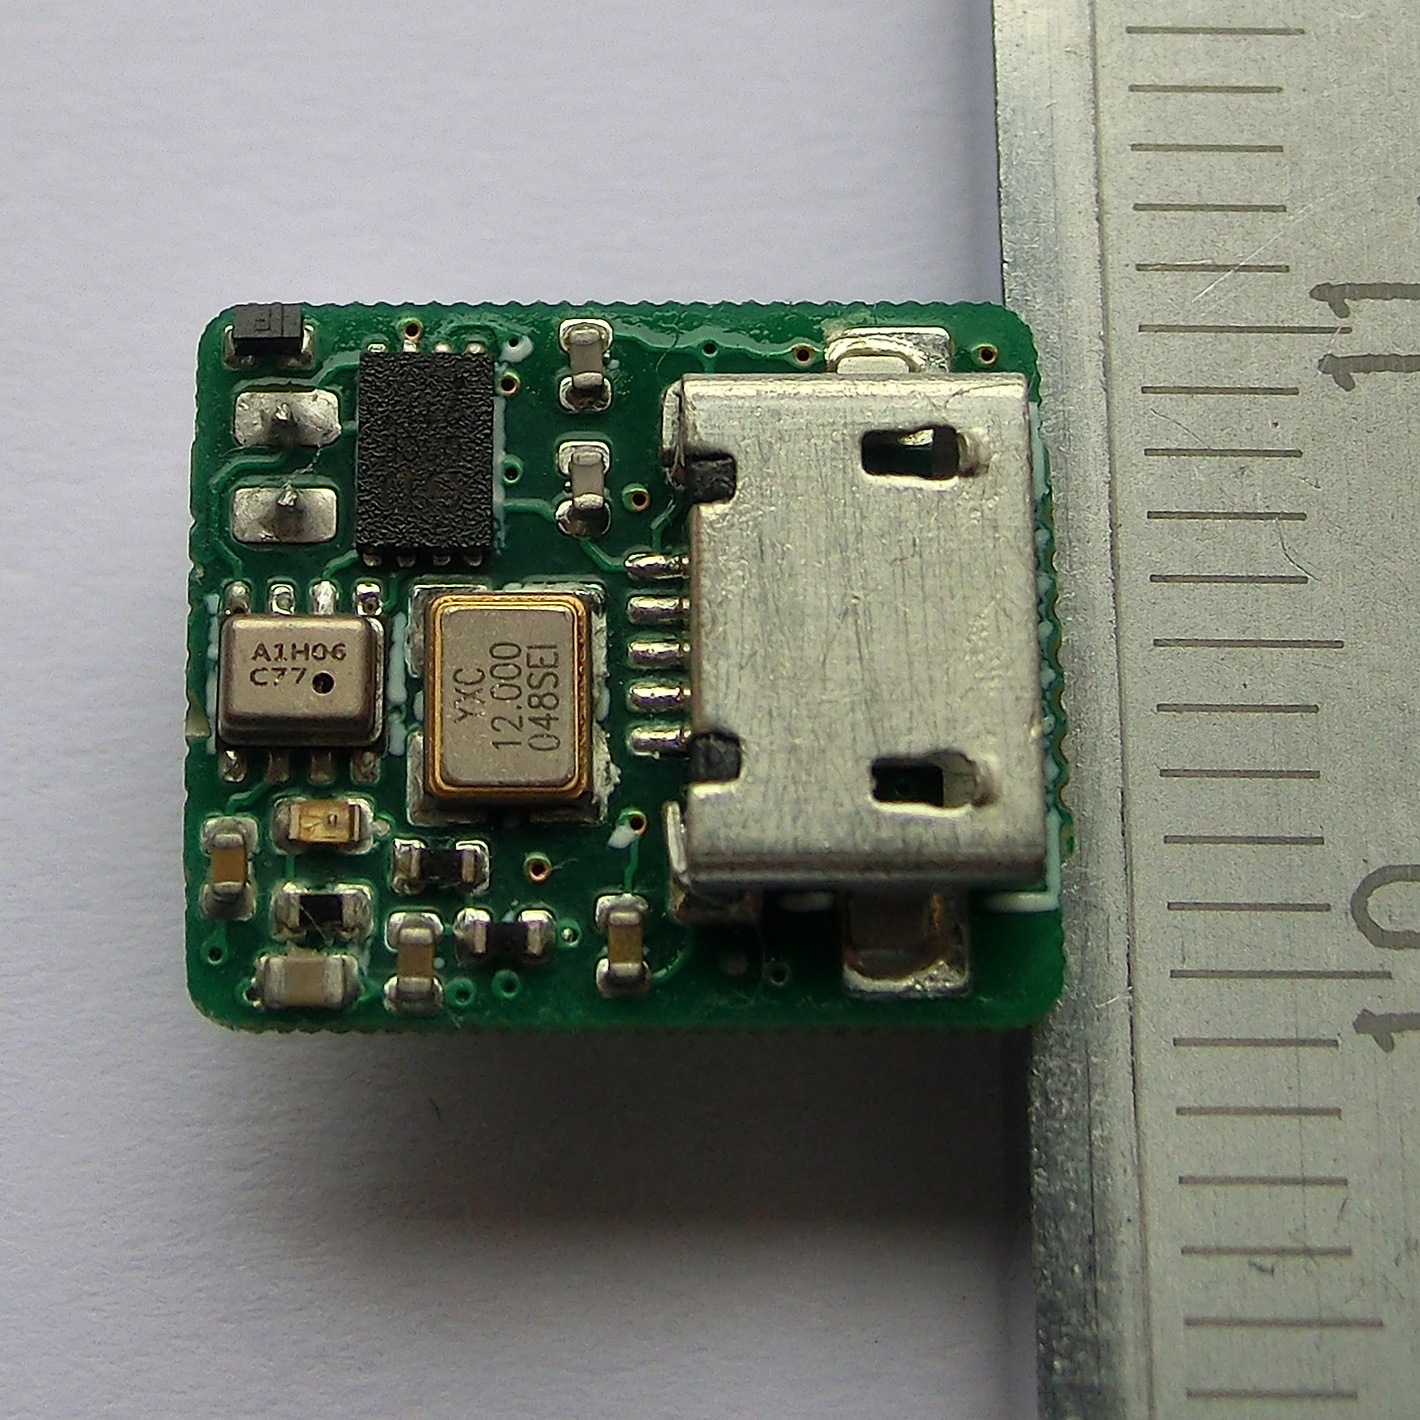
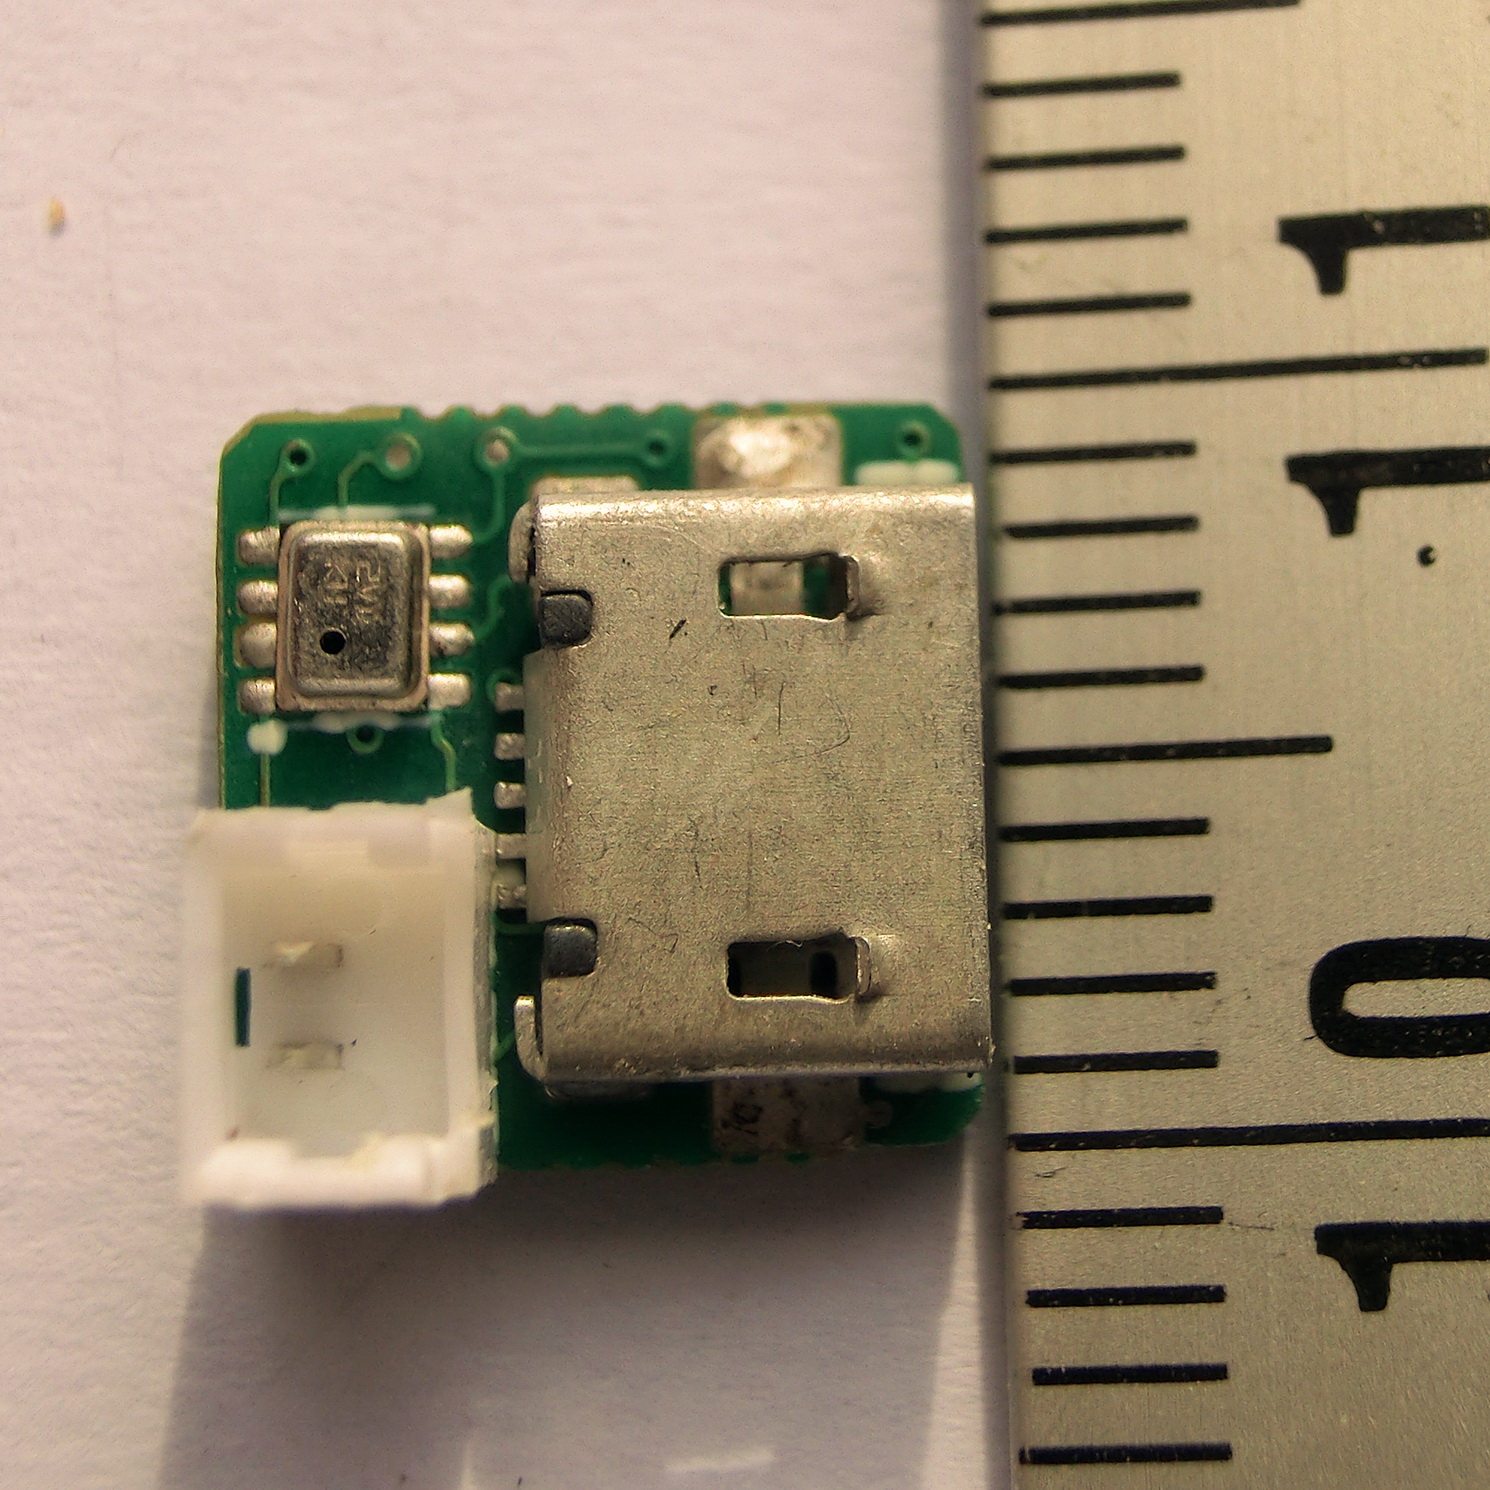
– Built-in micro USB port
– Built-in firmware update capabilities via USB
– Digital barometric sensor
– Temperature sensor
– LED status indication
– Built in memory
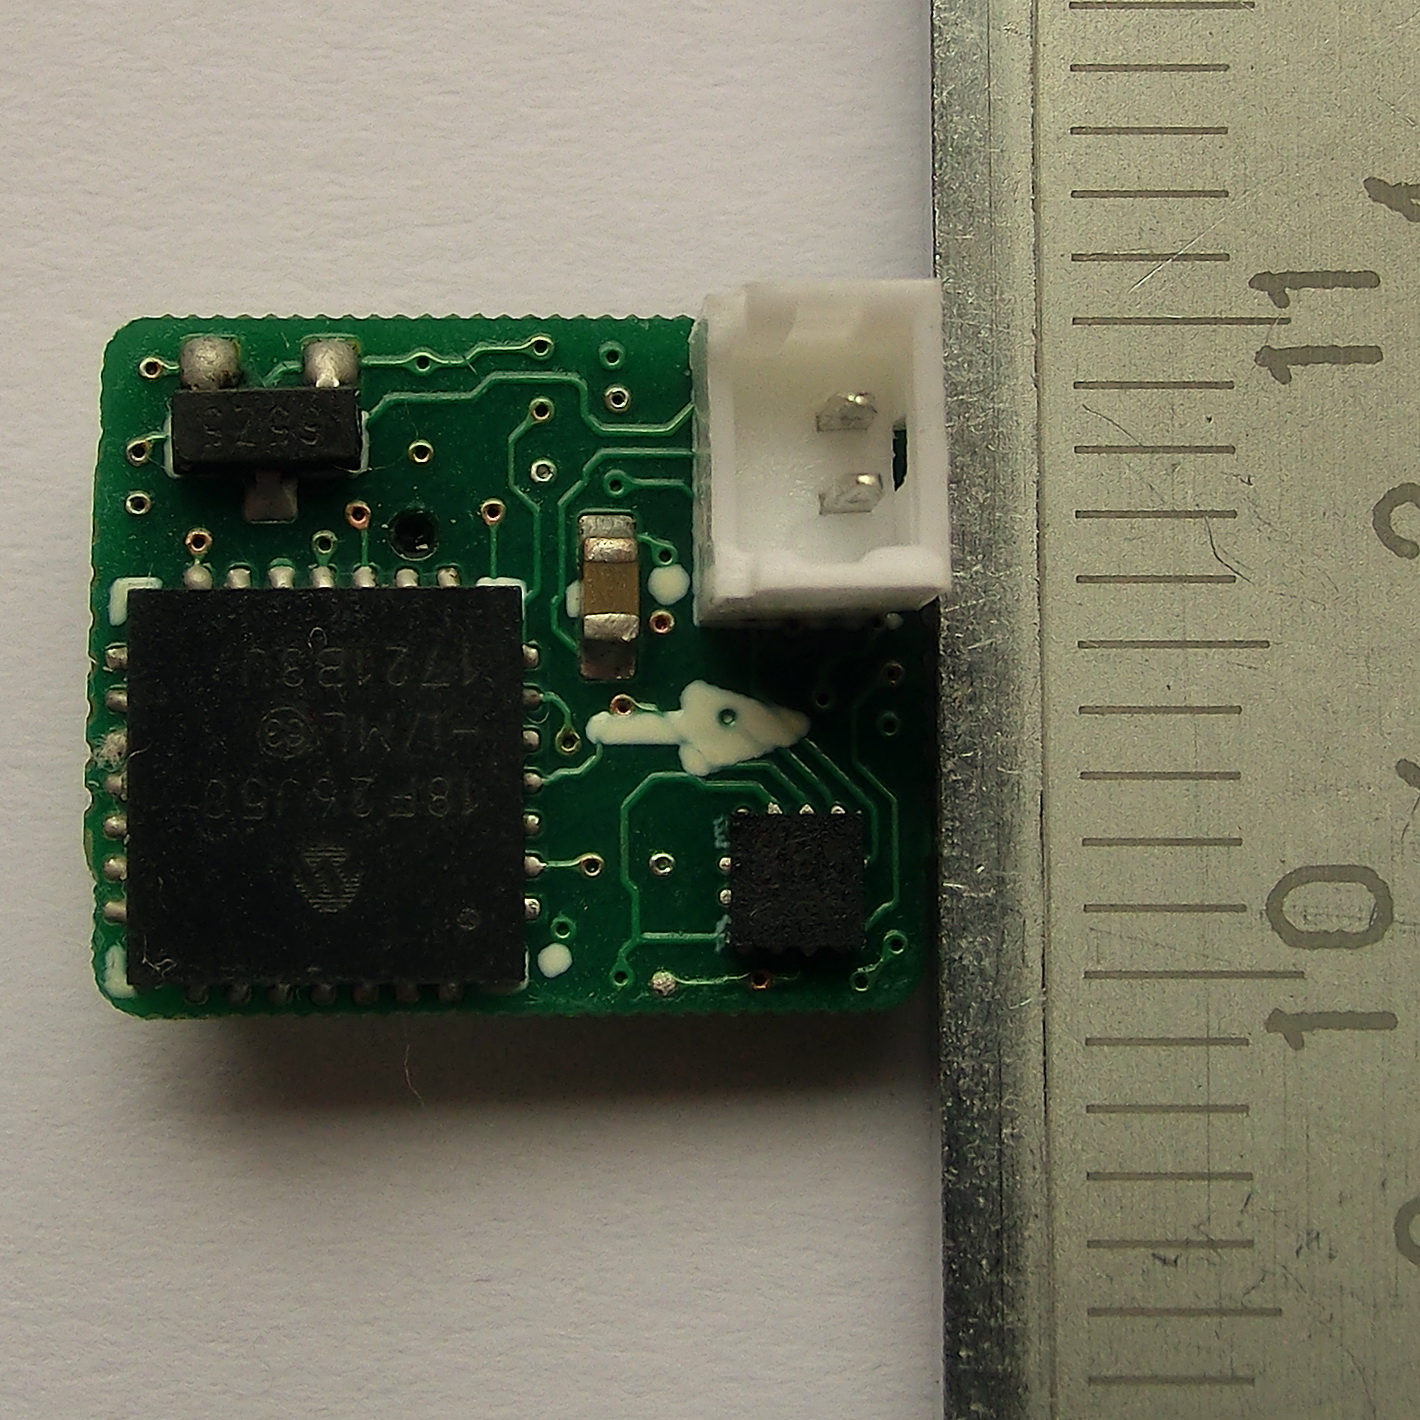
– 3.7v LiPo battery supply
– Battery level recording
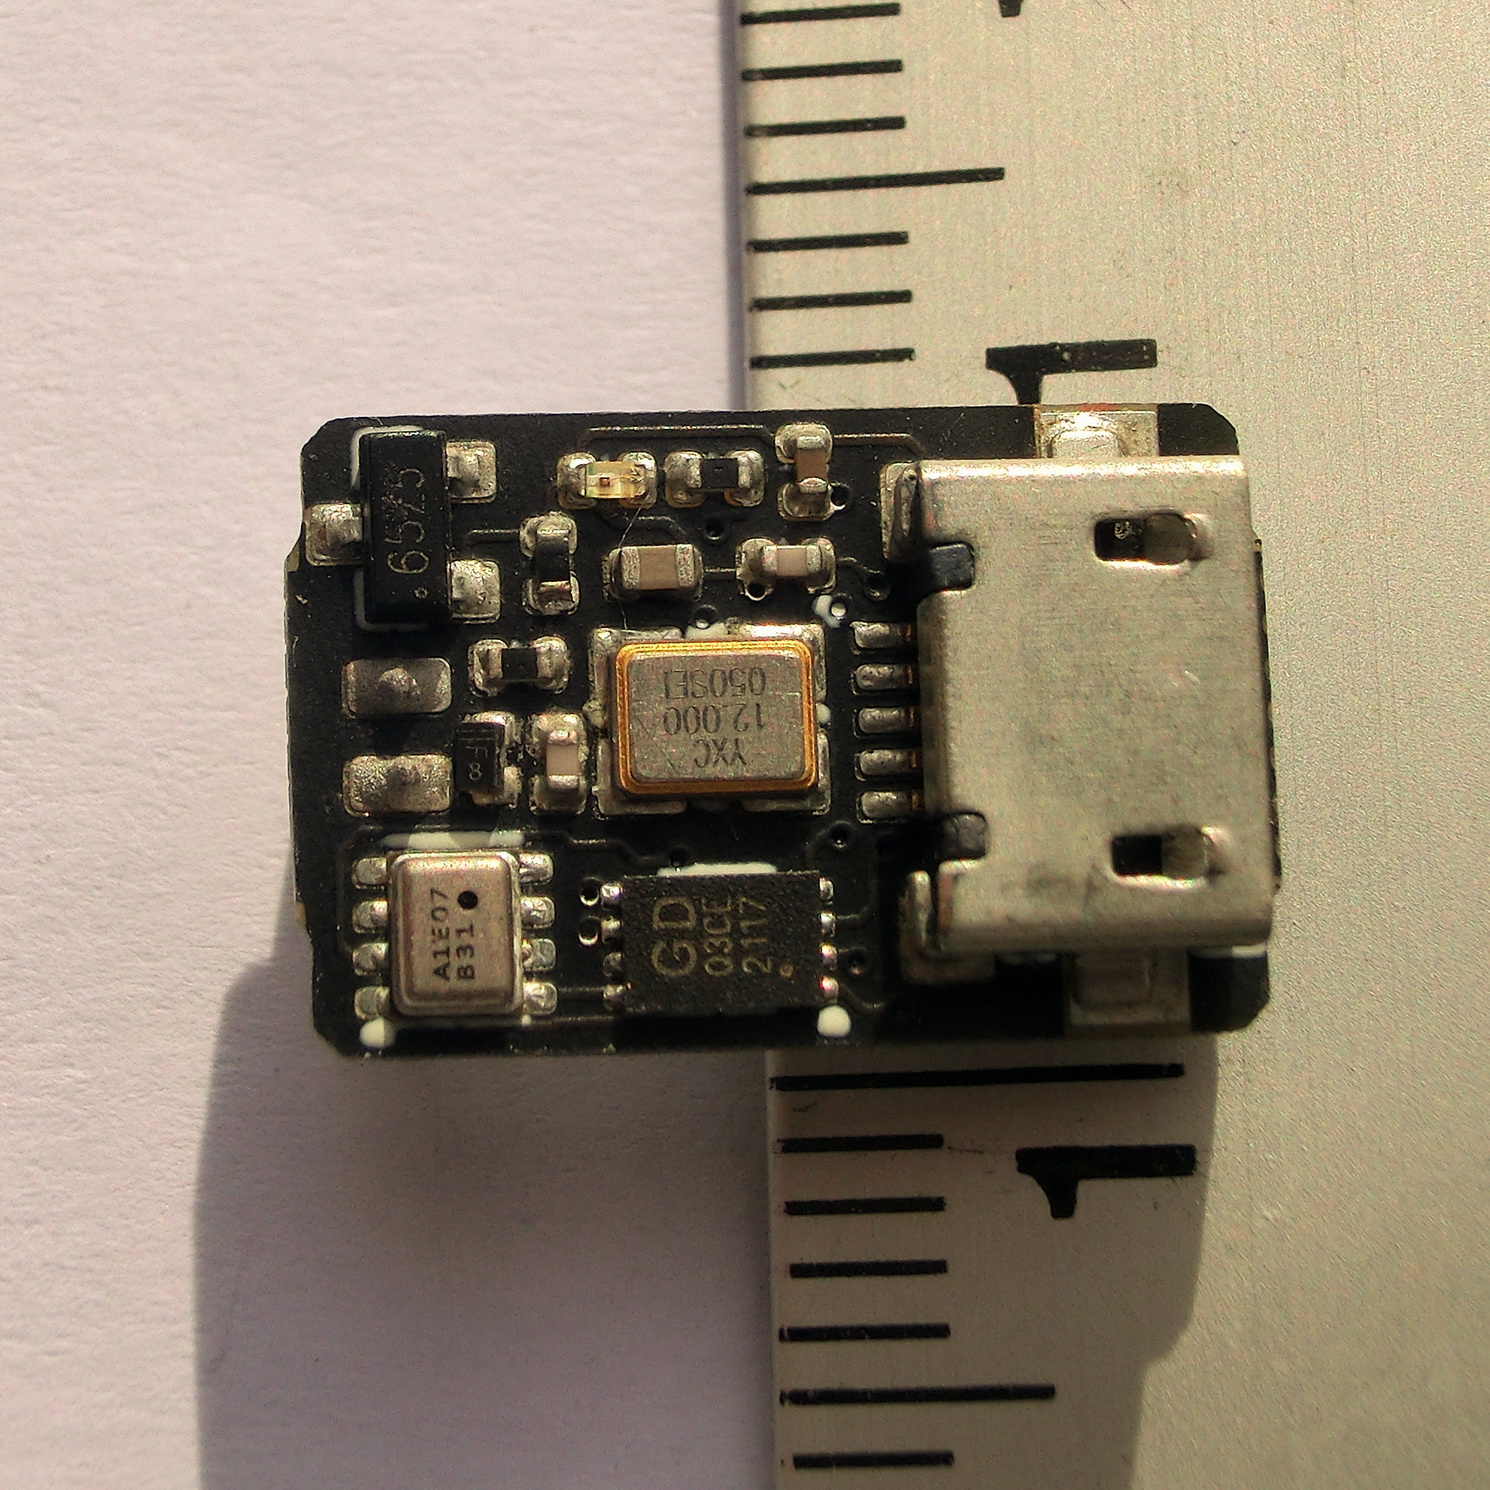
– Small size – from 10×10 to 11×13 mm
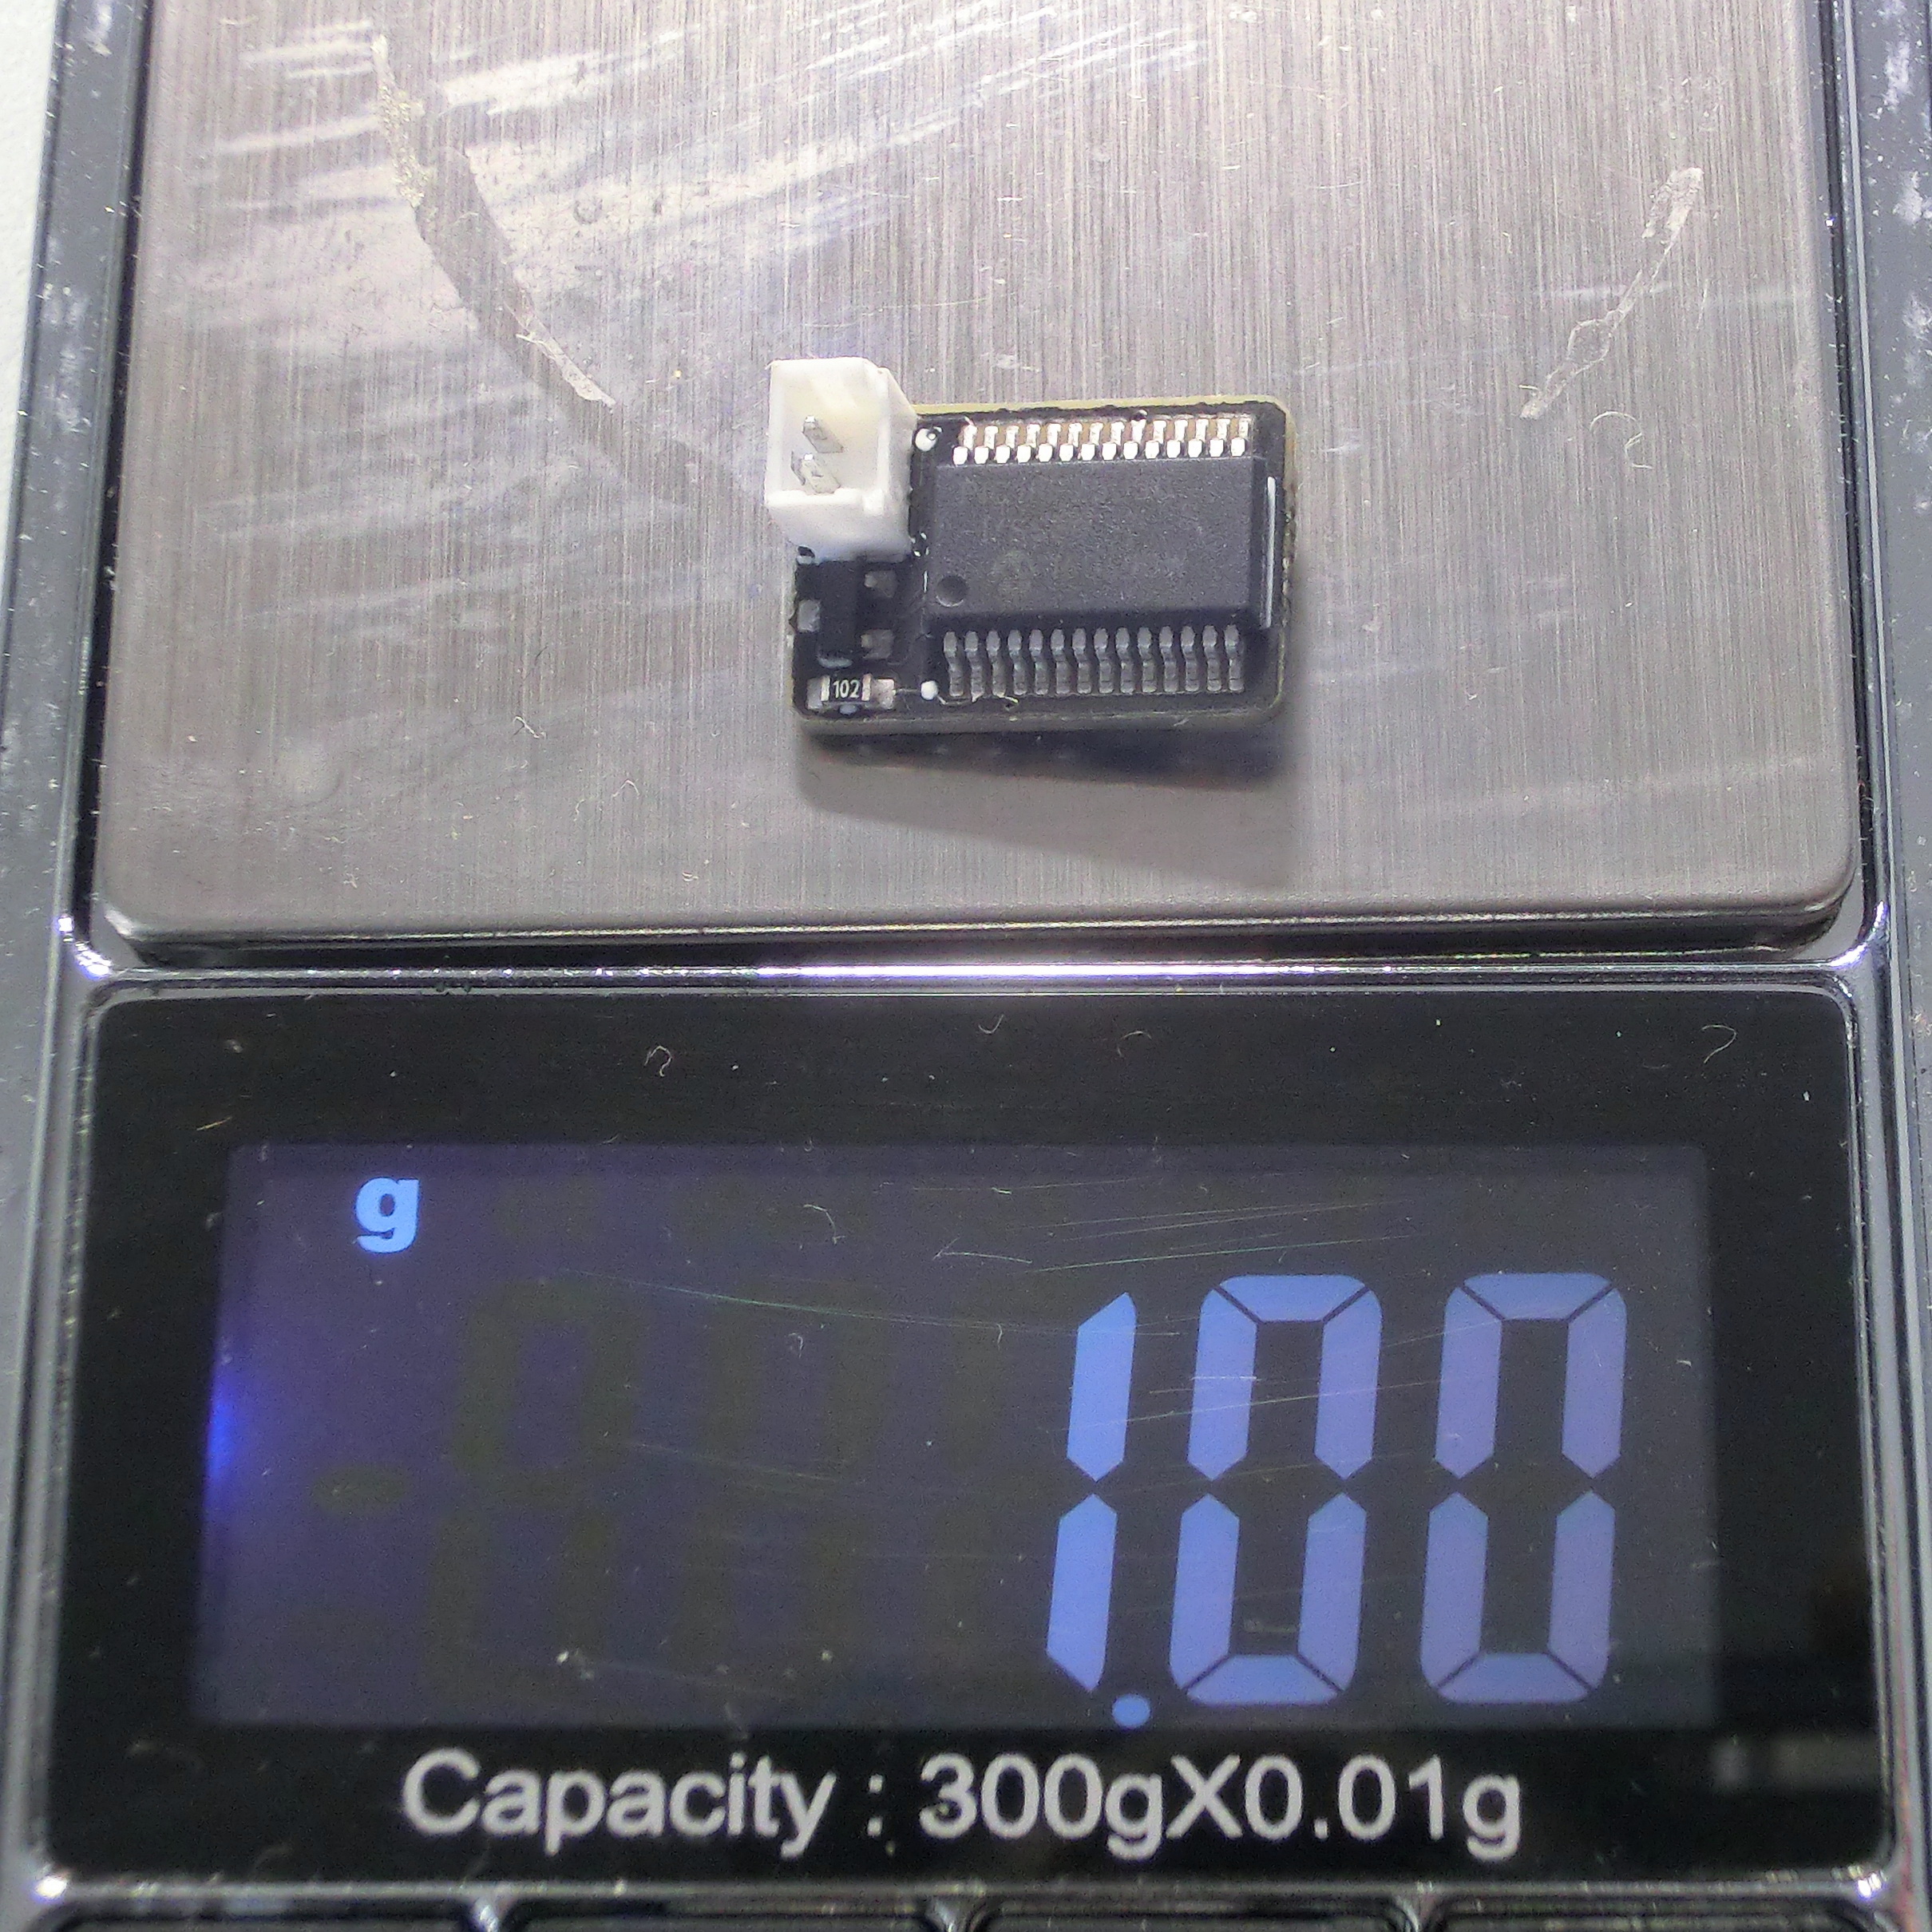
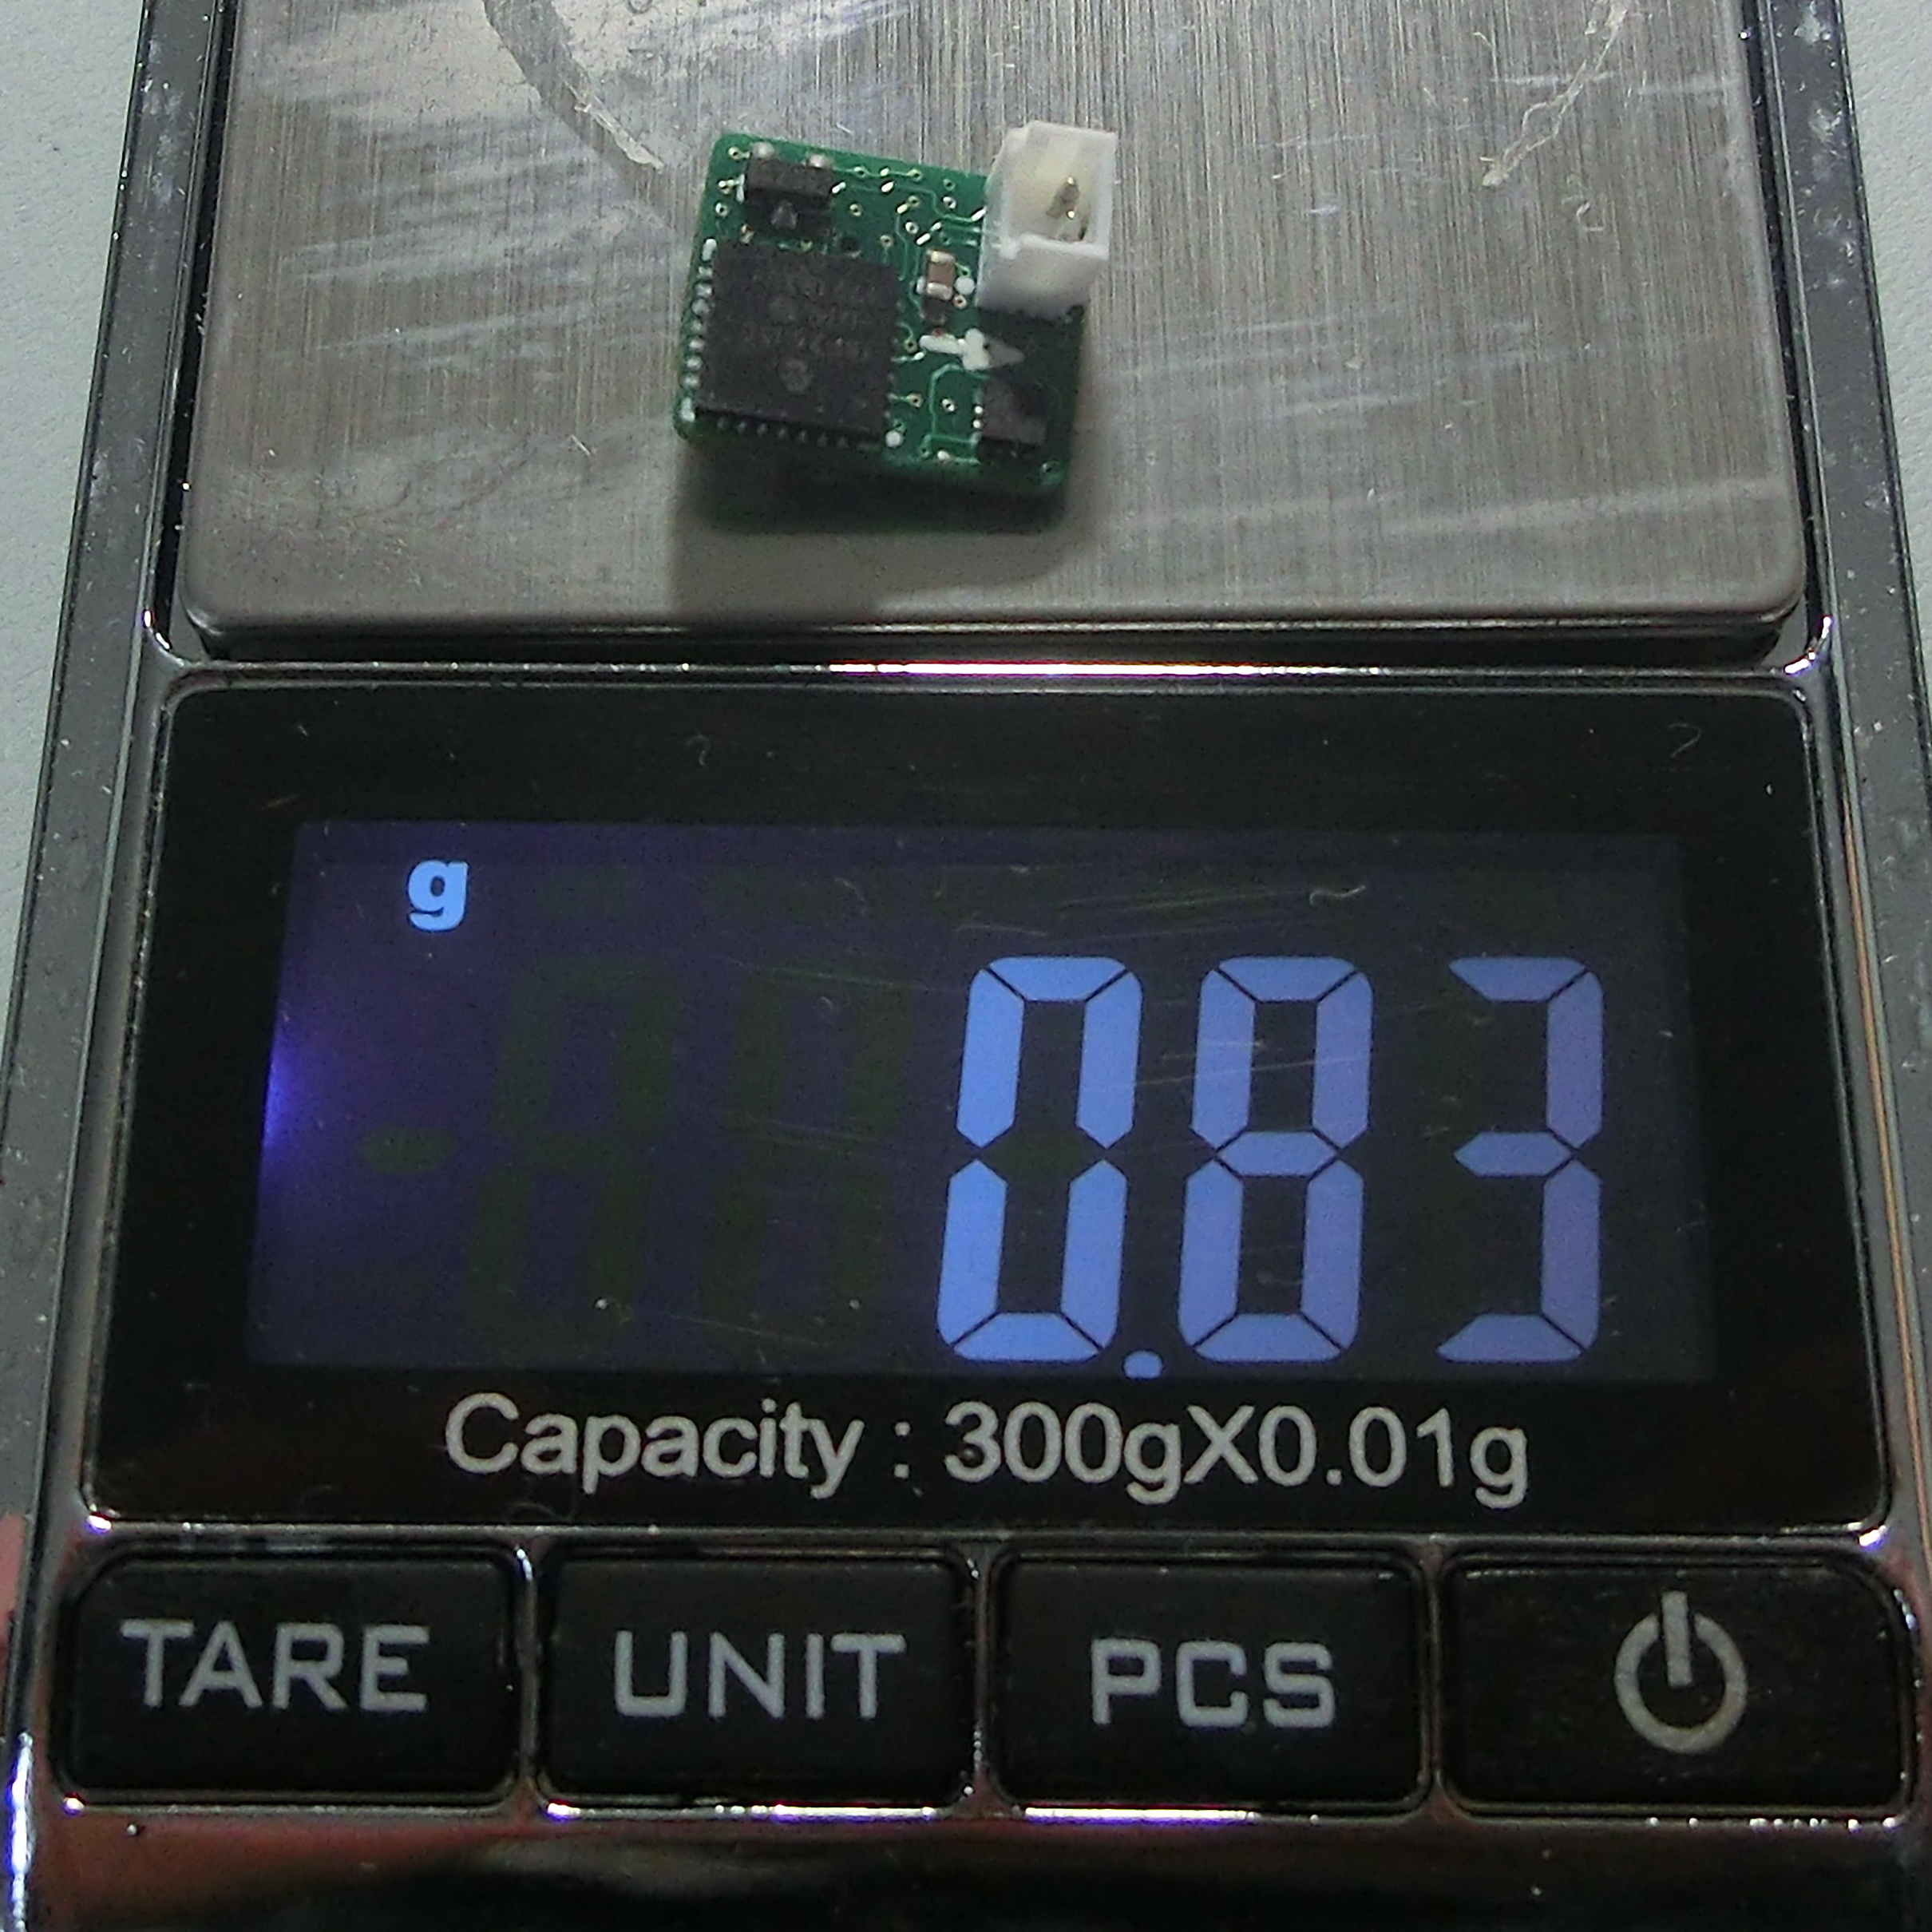
– Small weight – between 0.7 and 1.00 grams
– All devices use the same software
– Inexpensive BOM
– Built-in digital signature and serial number
– Preflight idle time set-up
– Total number of flights counter
Each device revision from the MICRO ALTIMETER VEGA SERIES, however, has a slightly different set of hardware and capabilities. Here’s a description on the specifics for each device revision:
REVISION 1.00
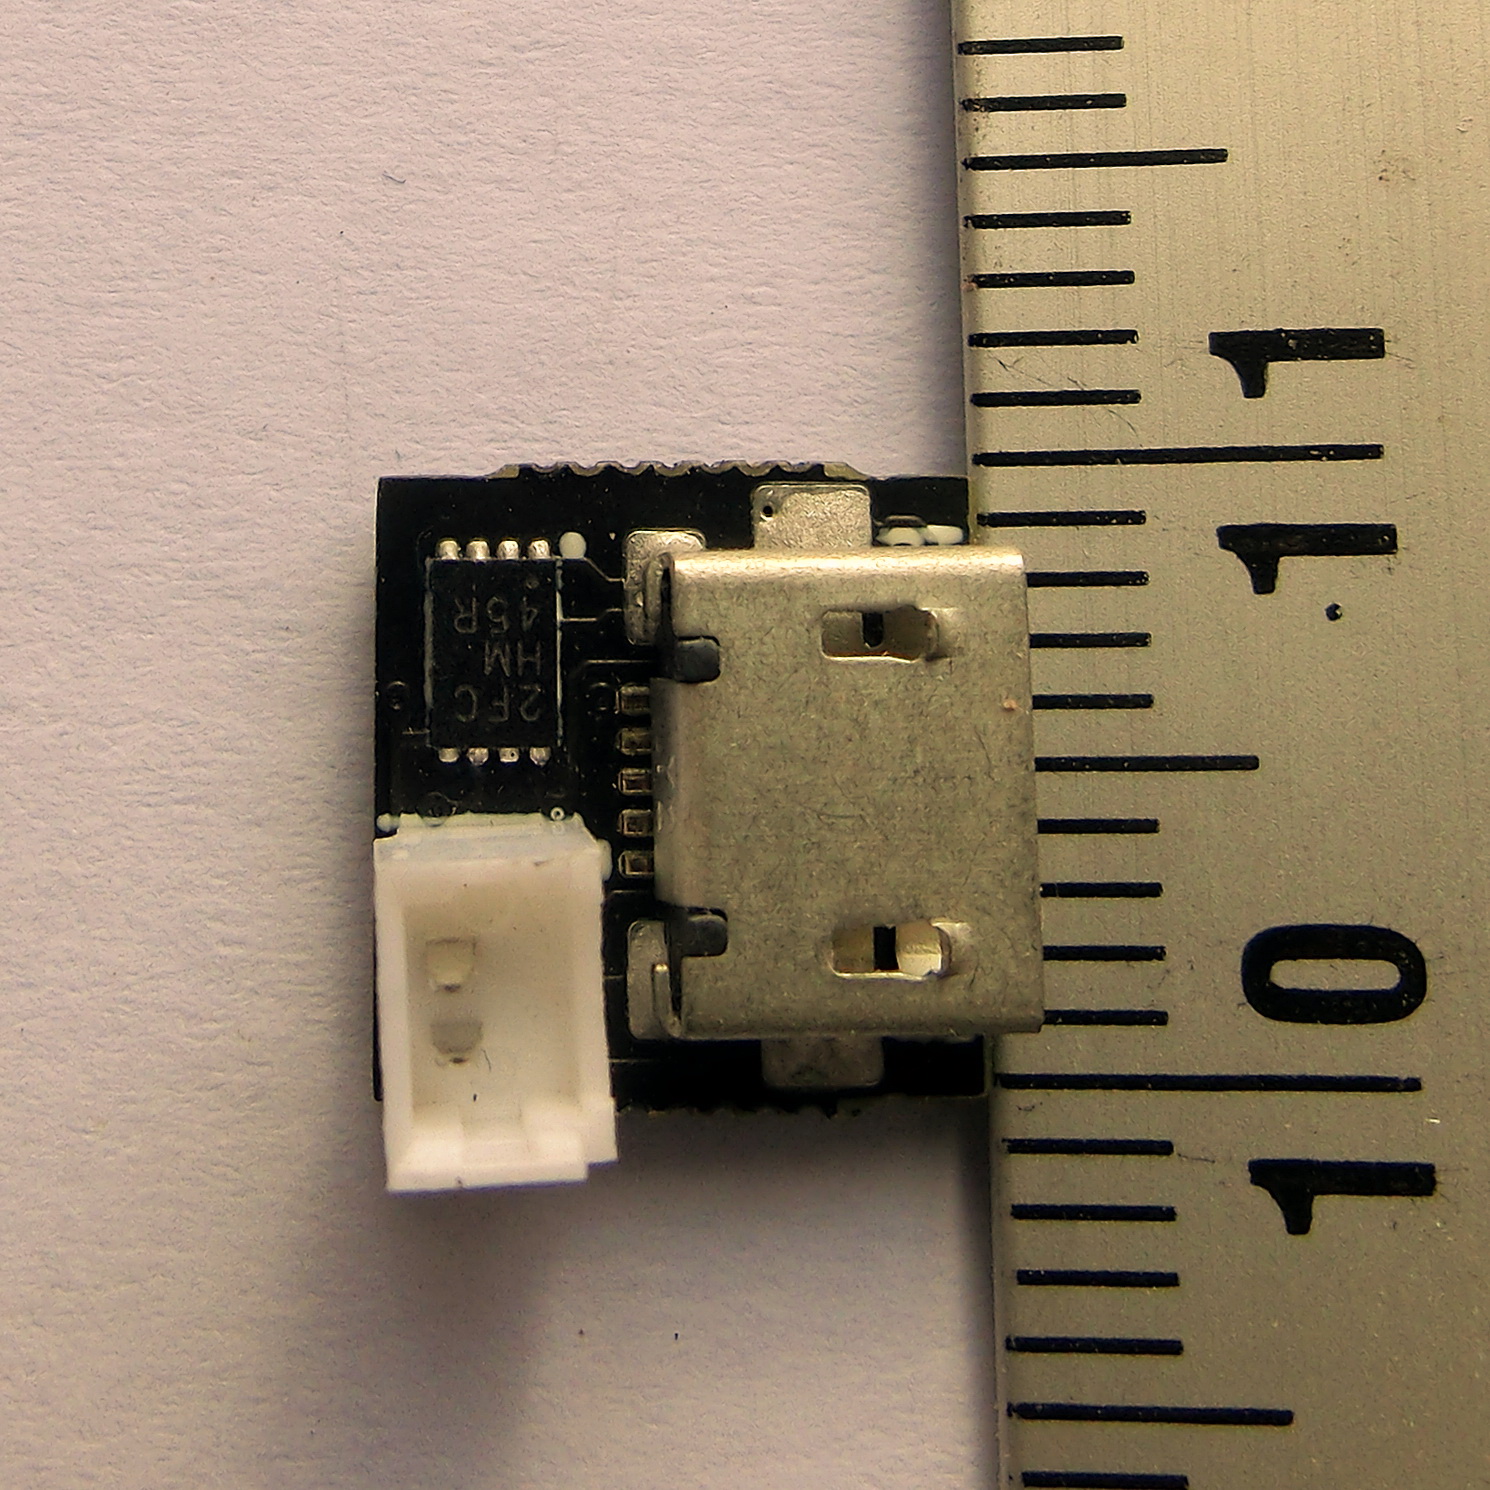
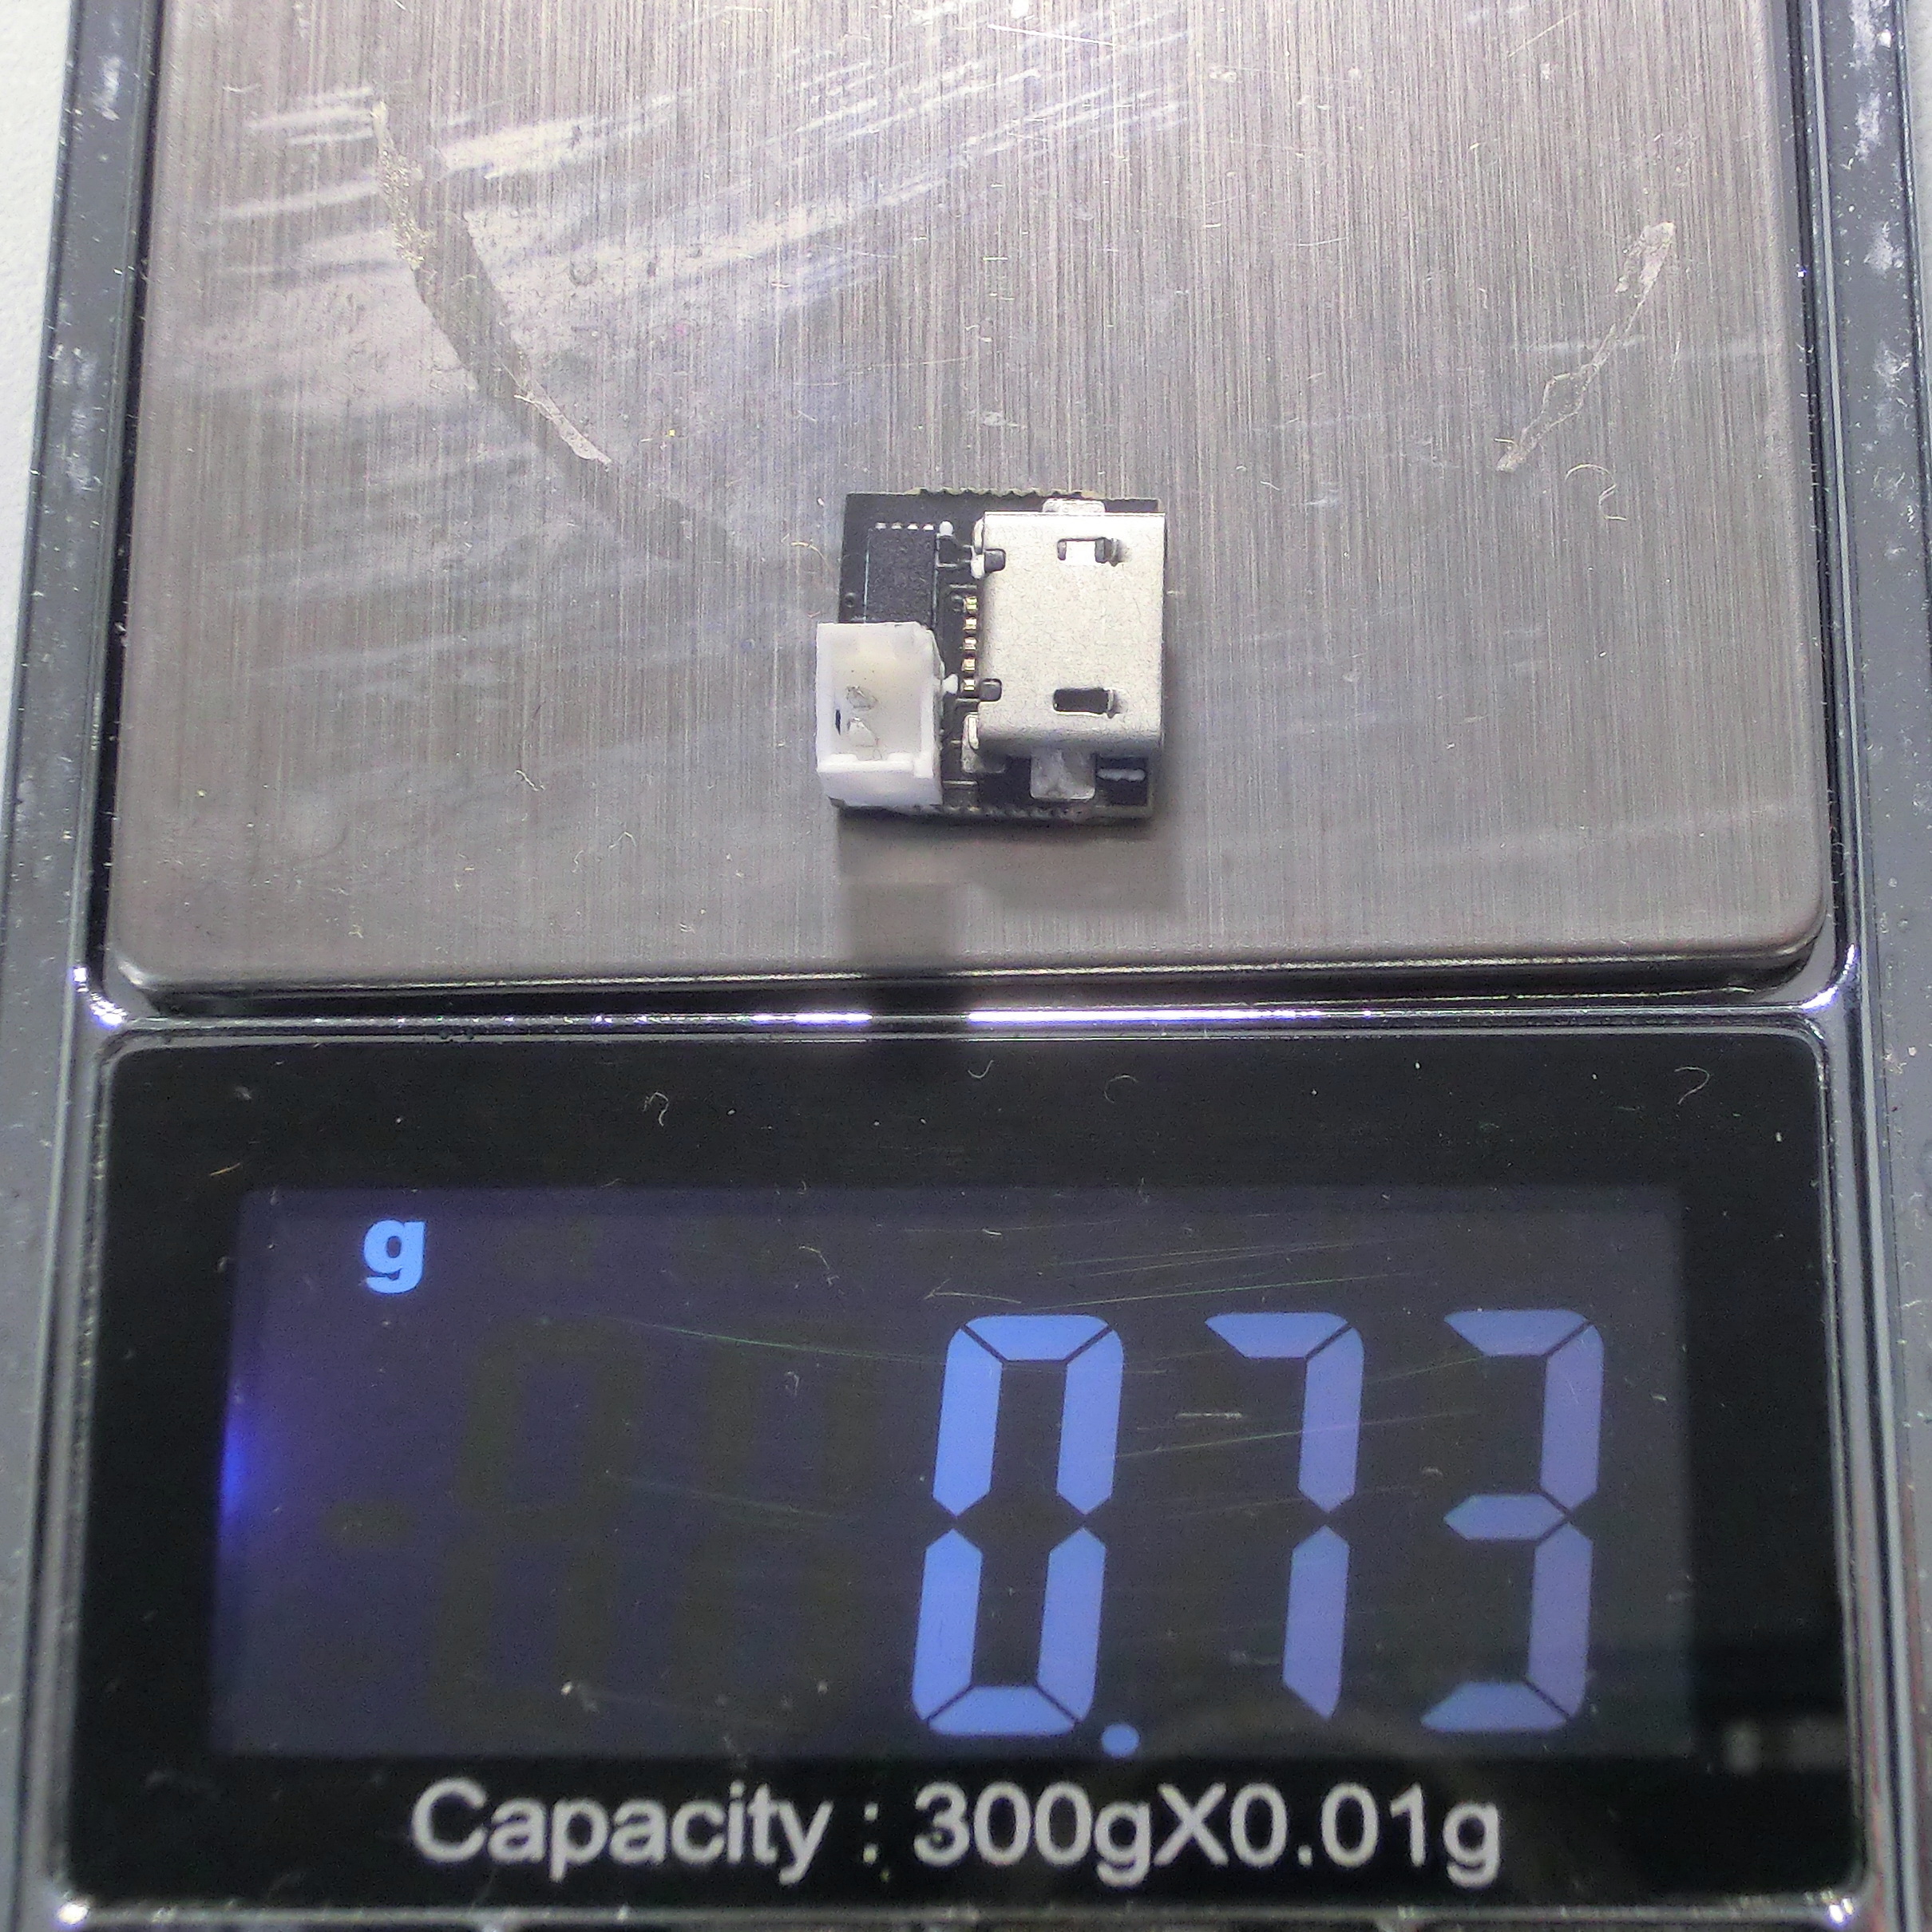
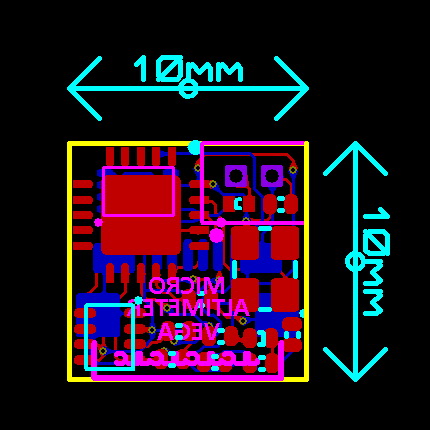
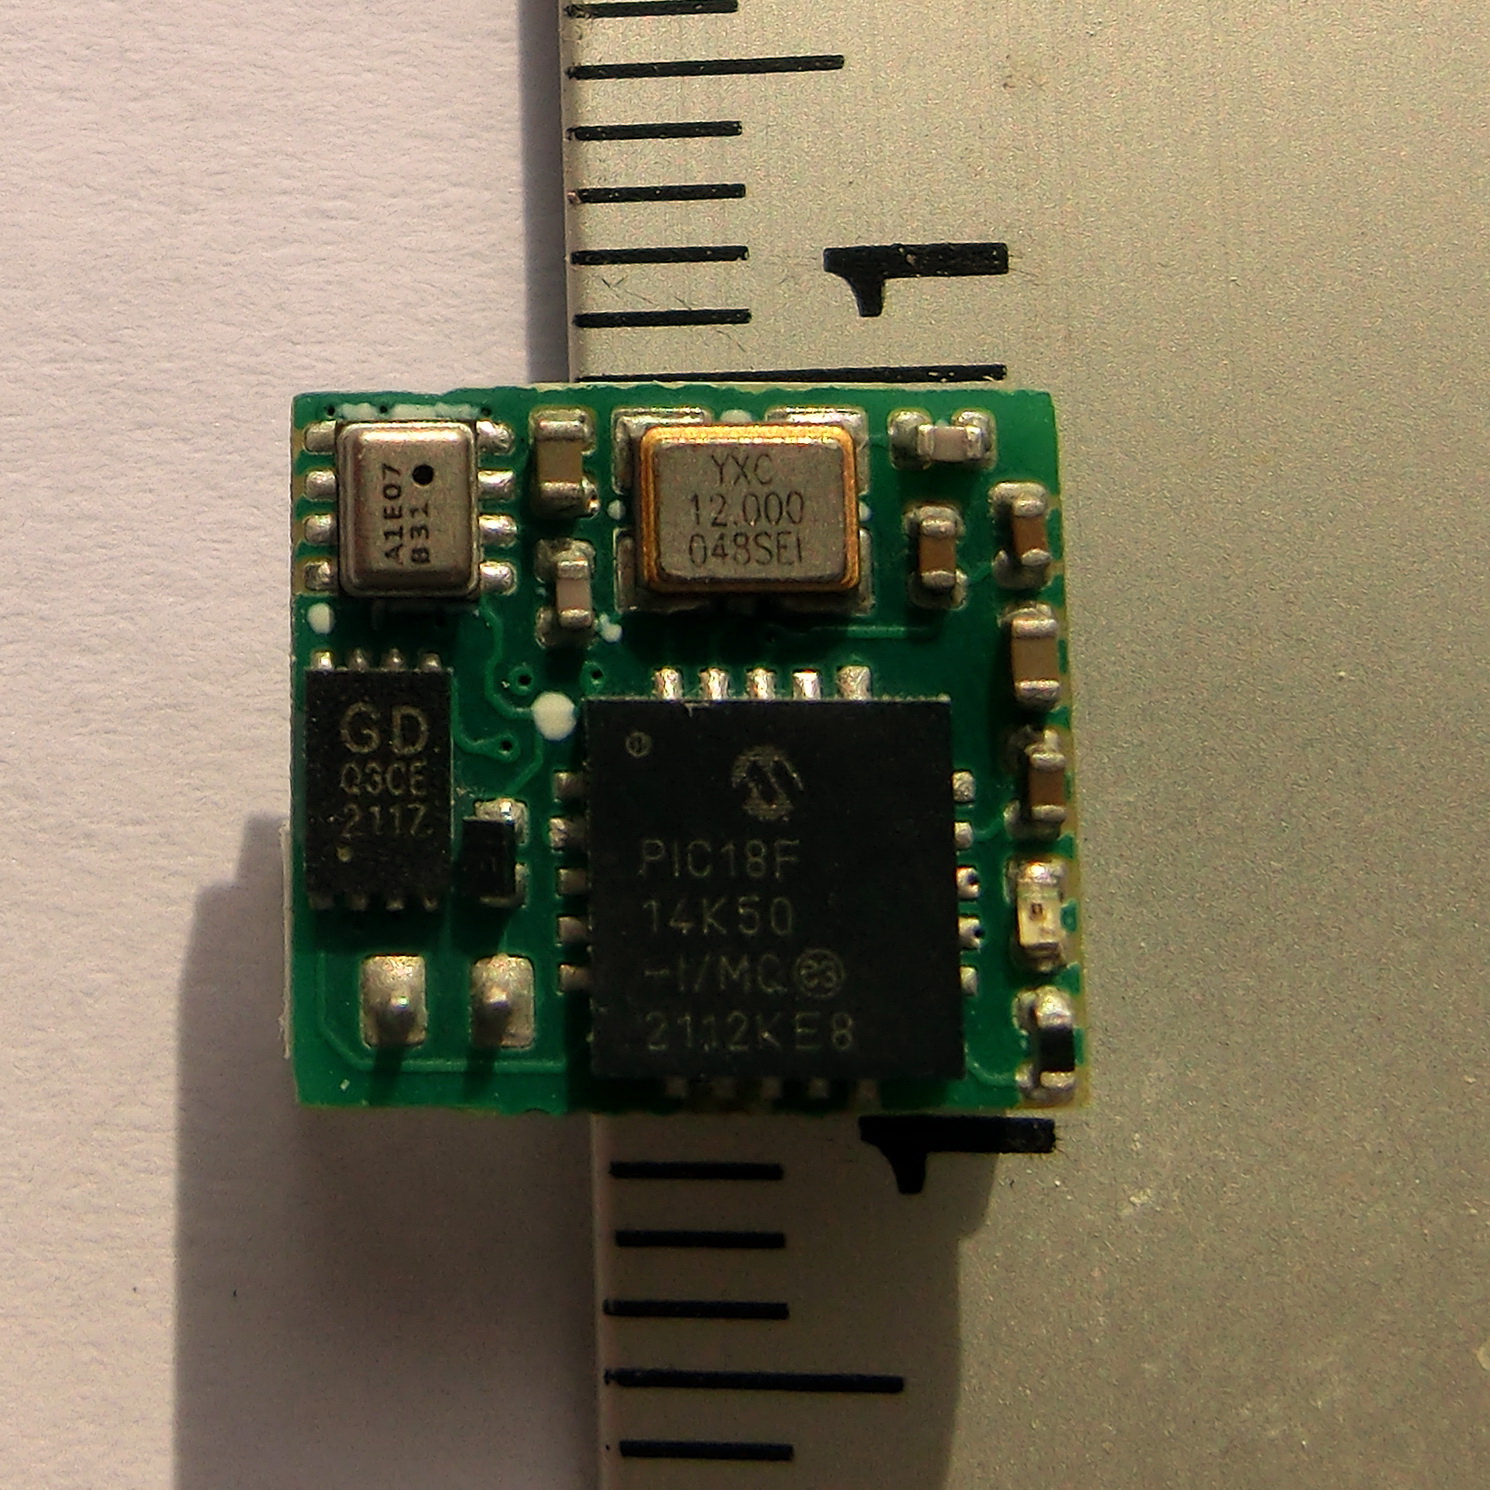
Size: 10 x 10 mm
Weight: 0.73 gr
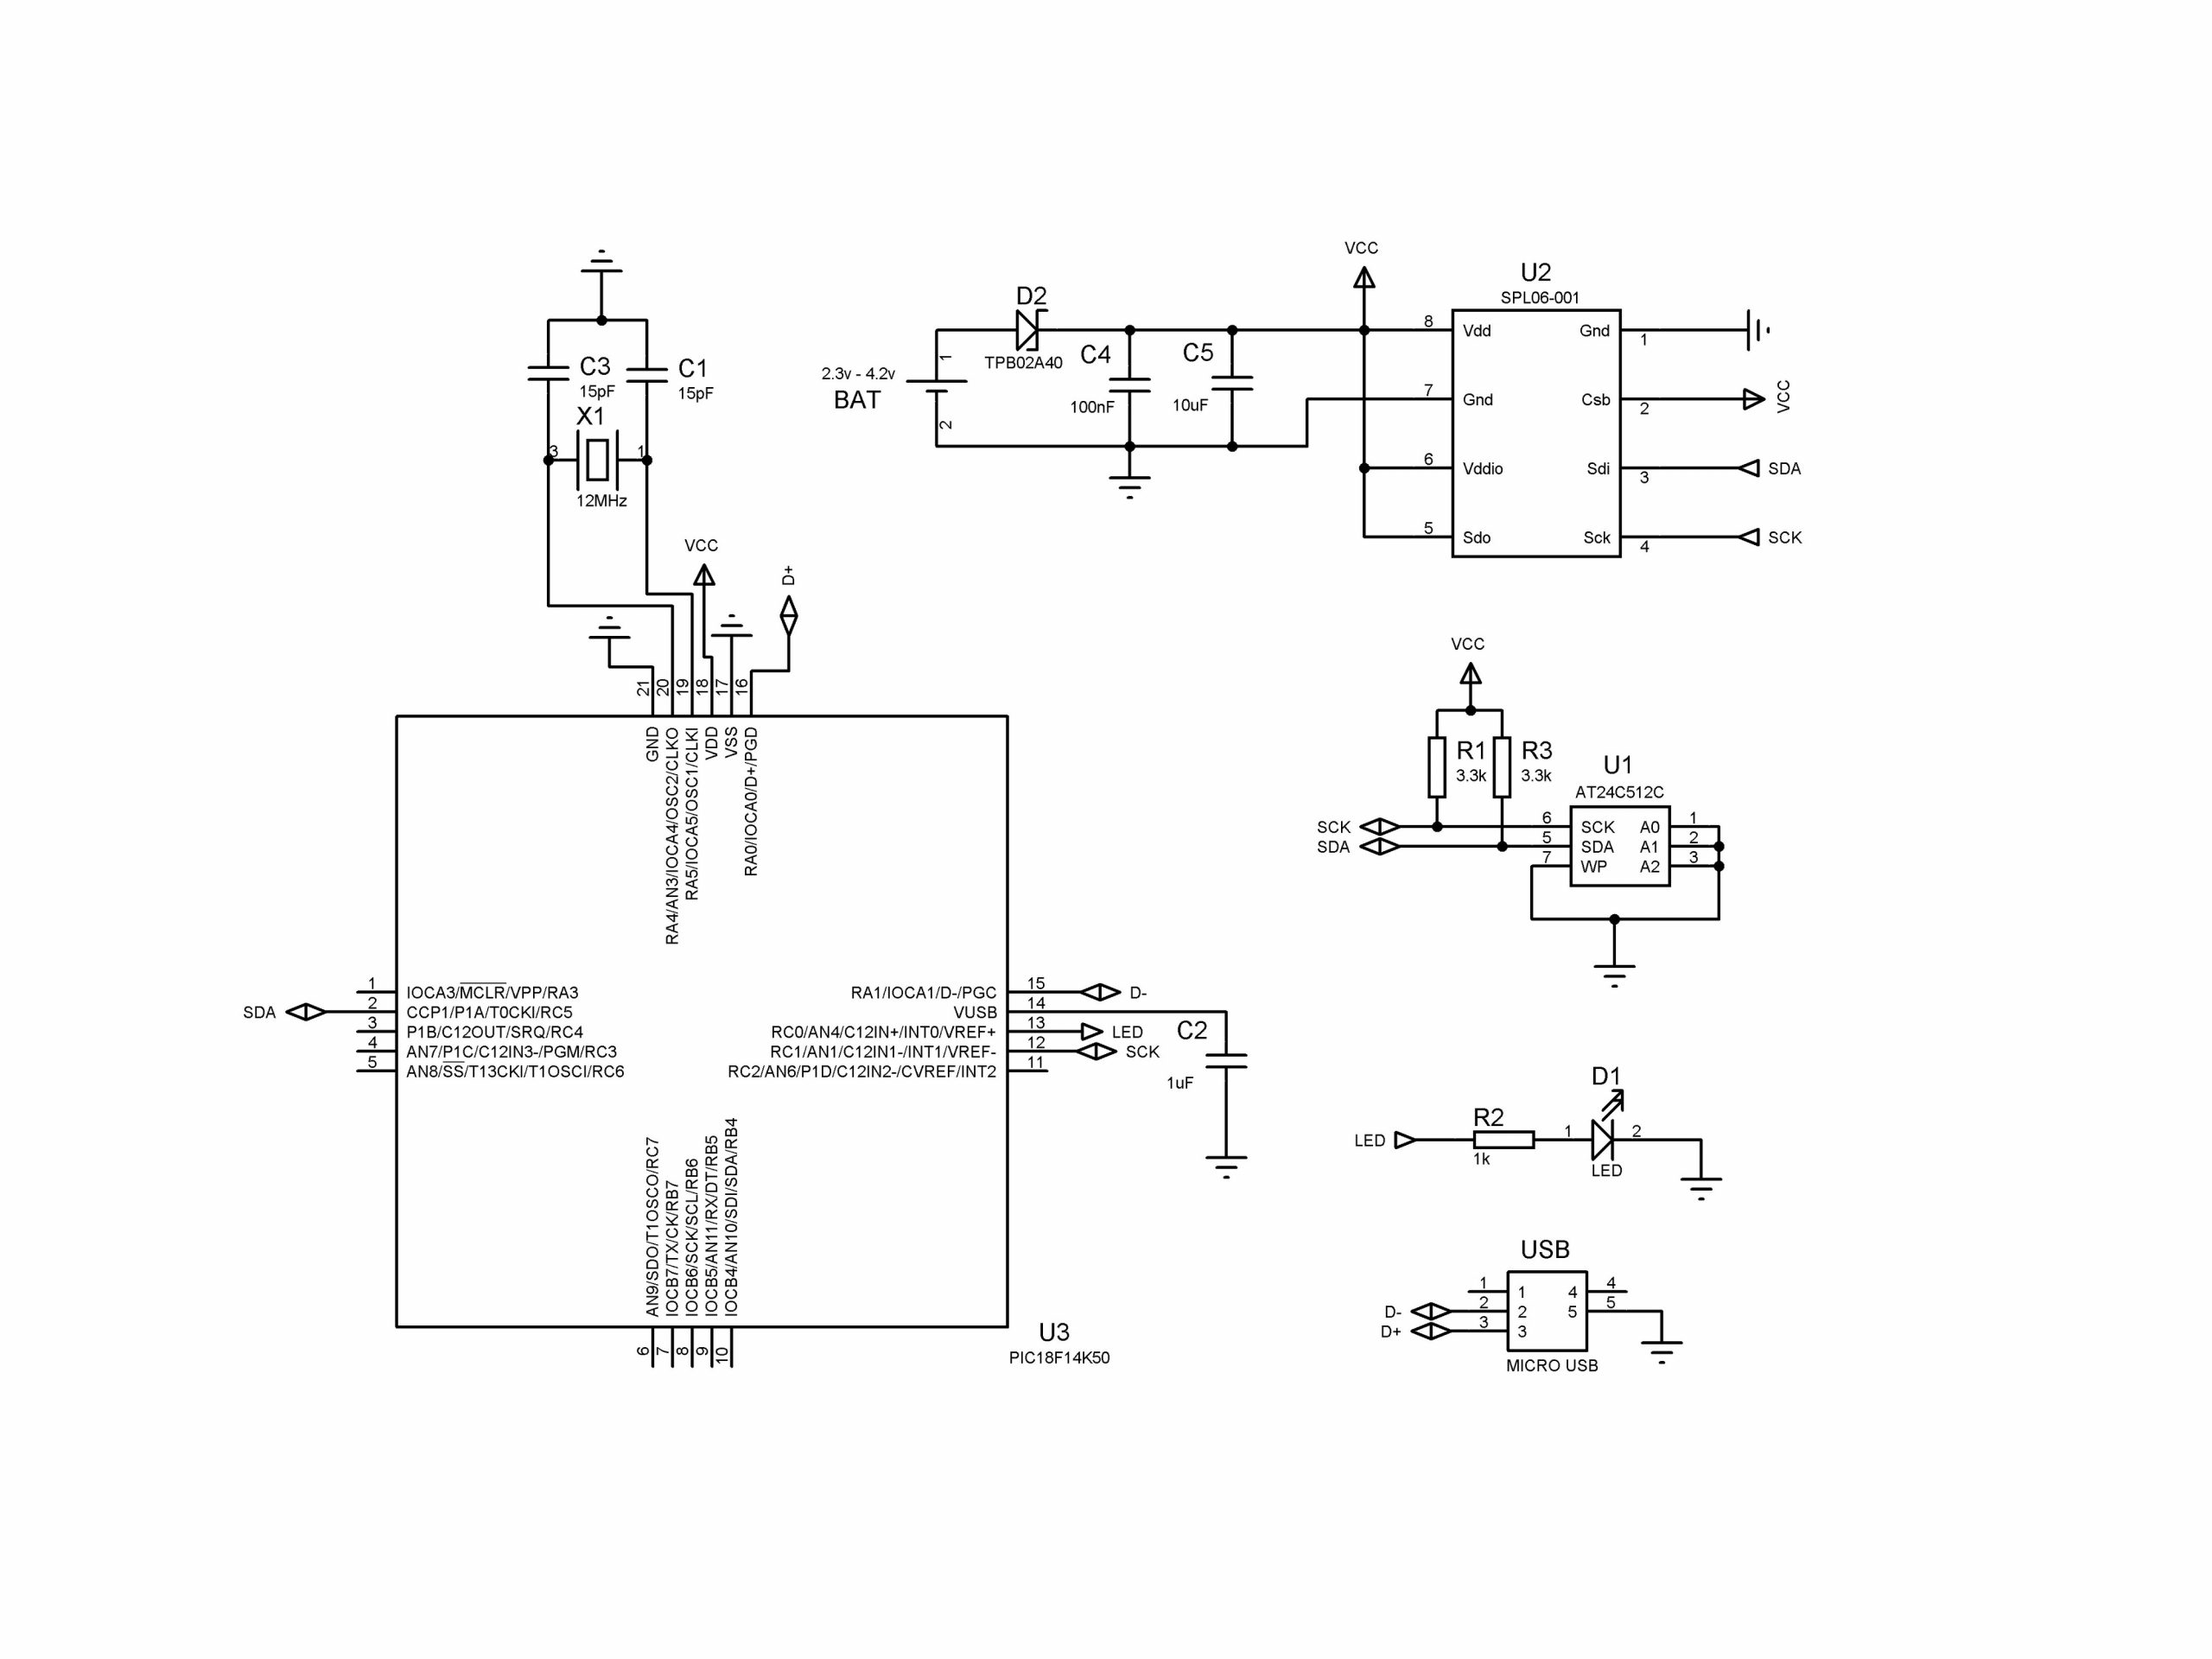
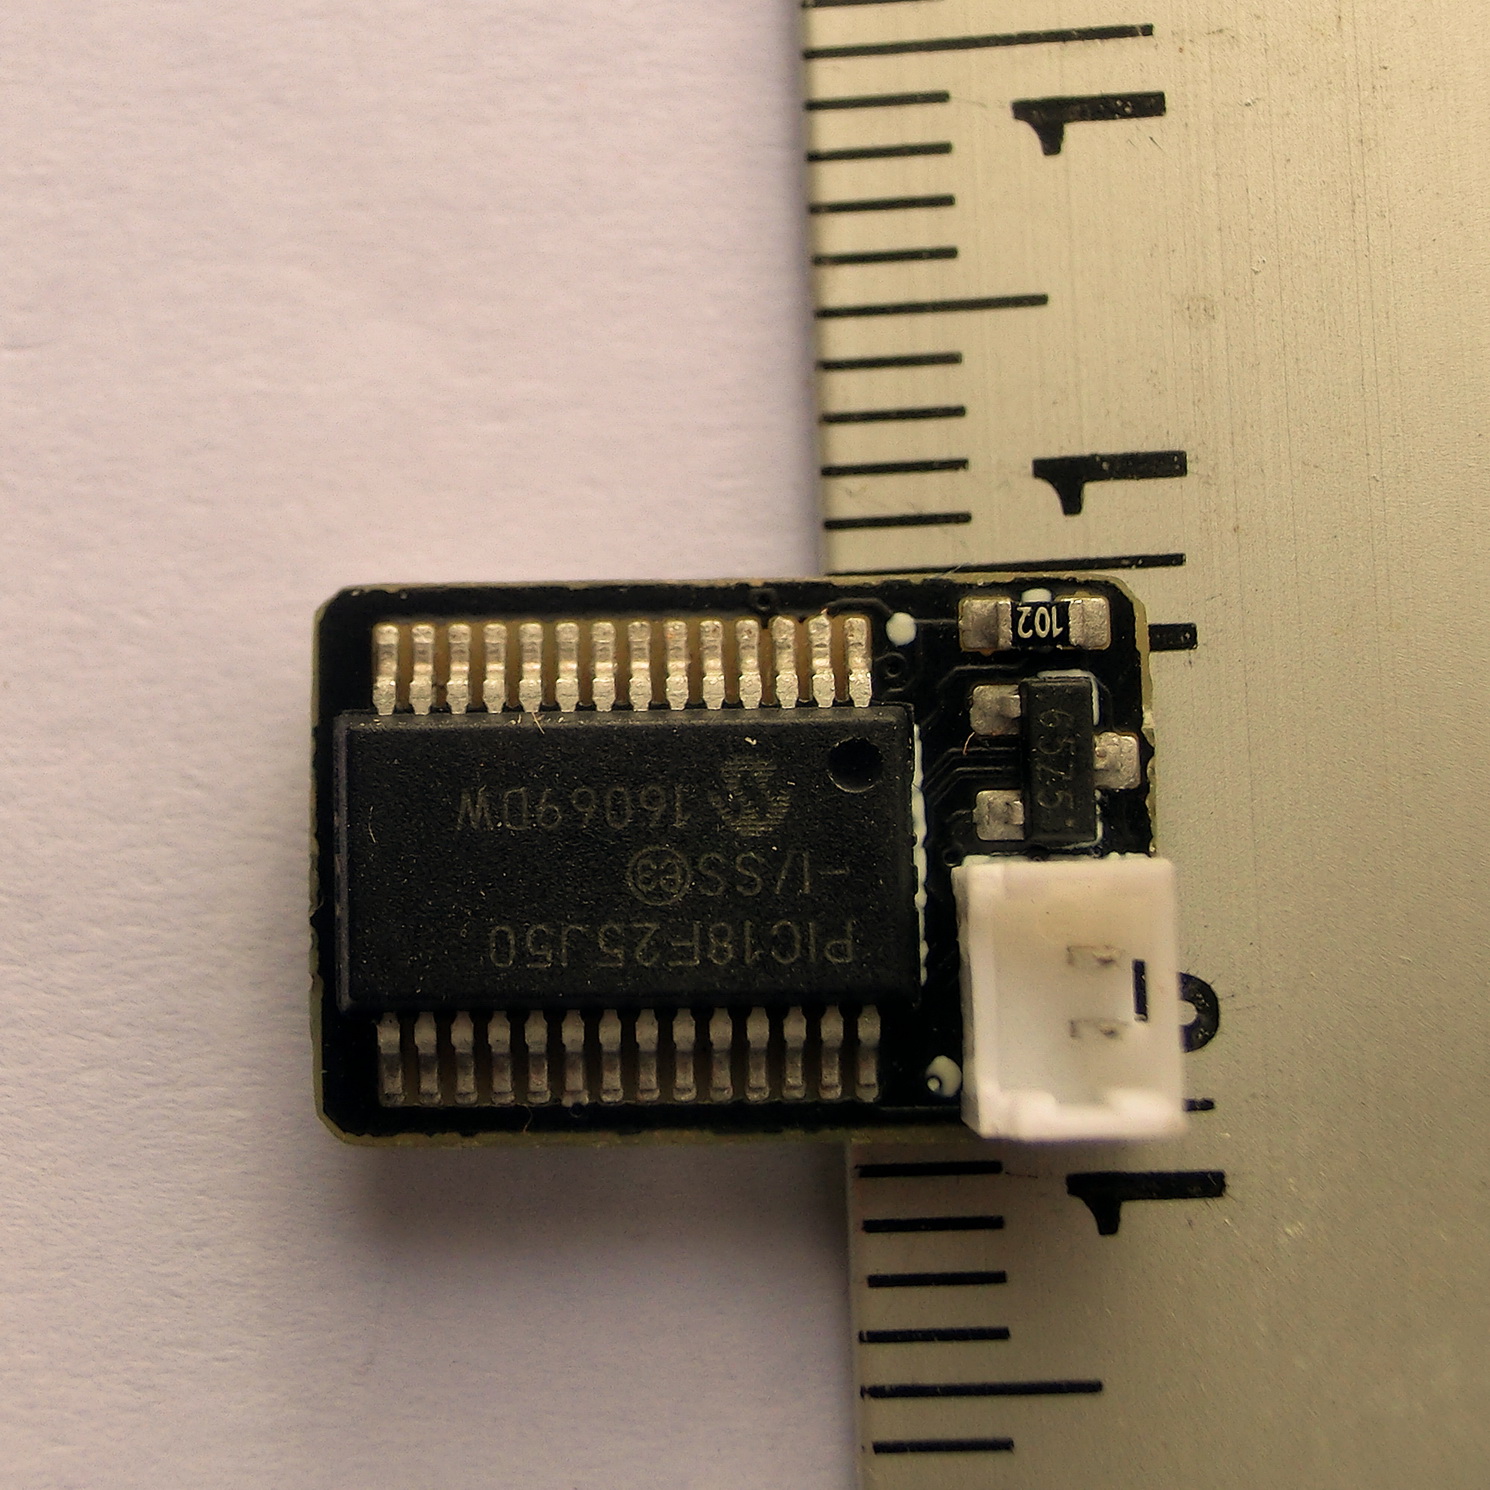
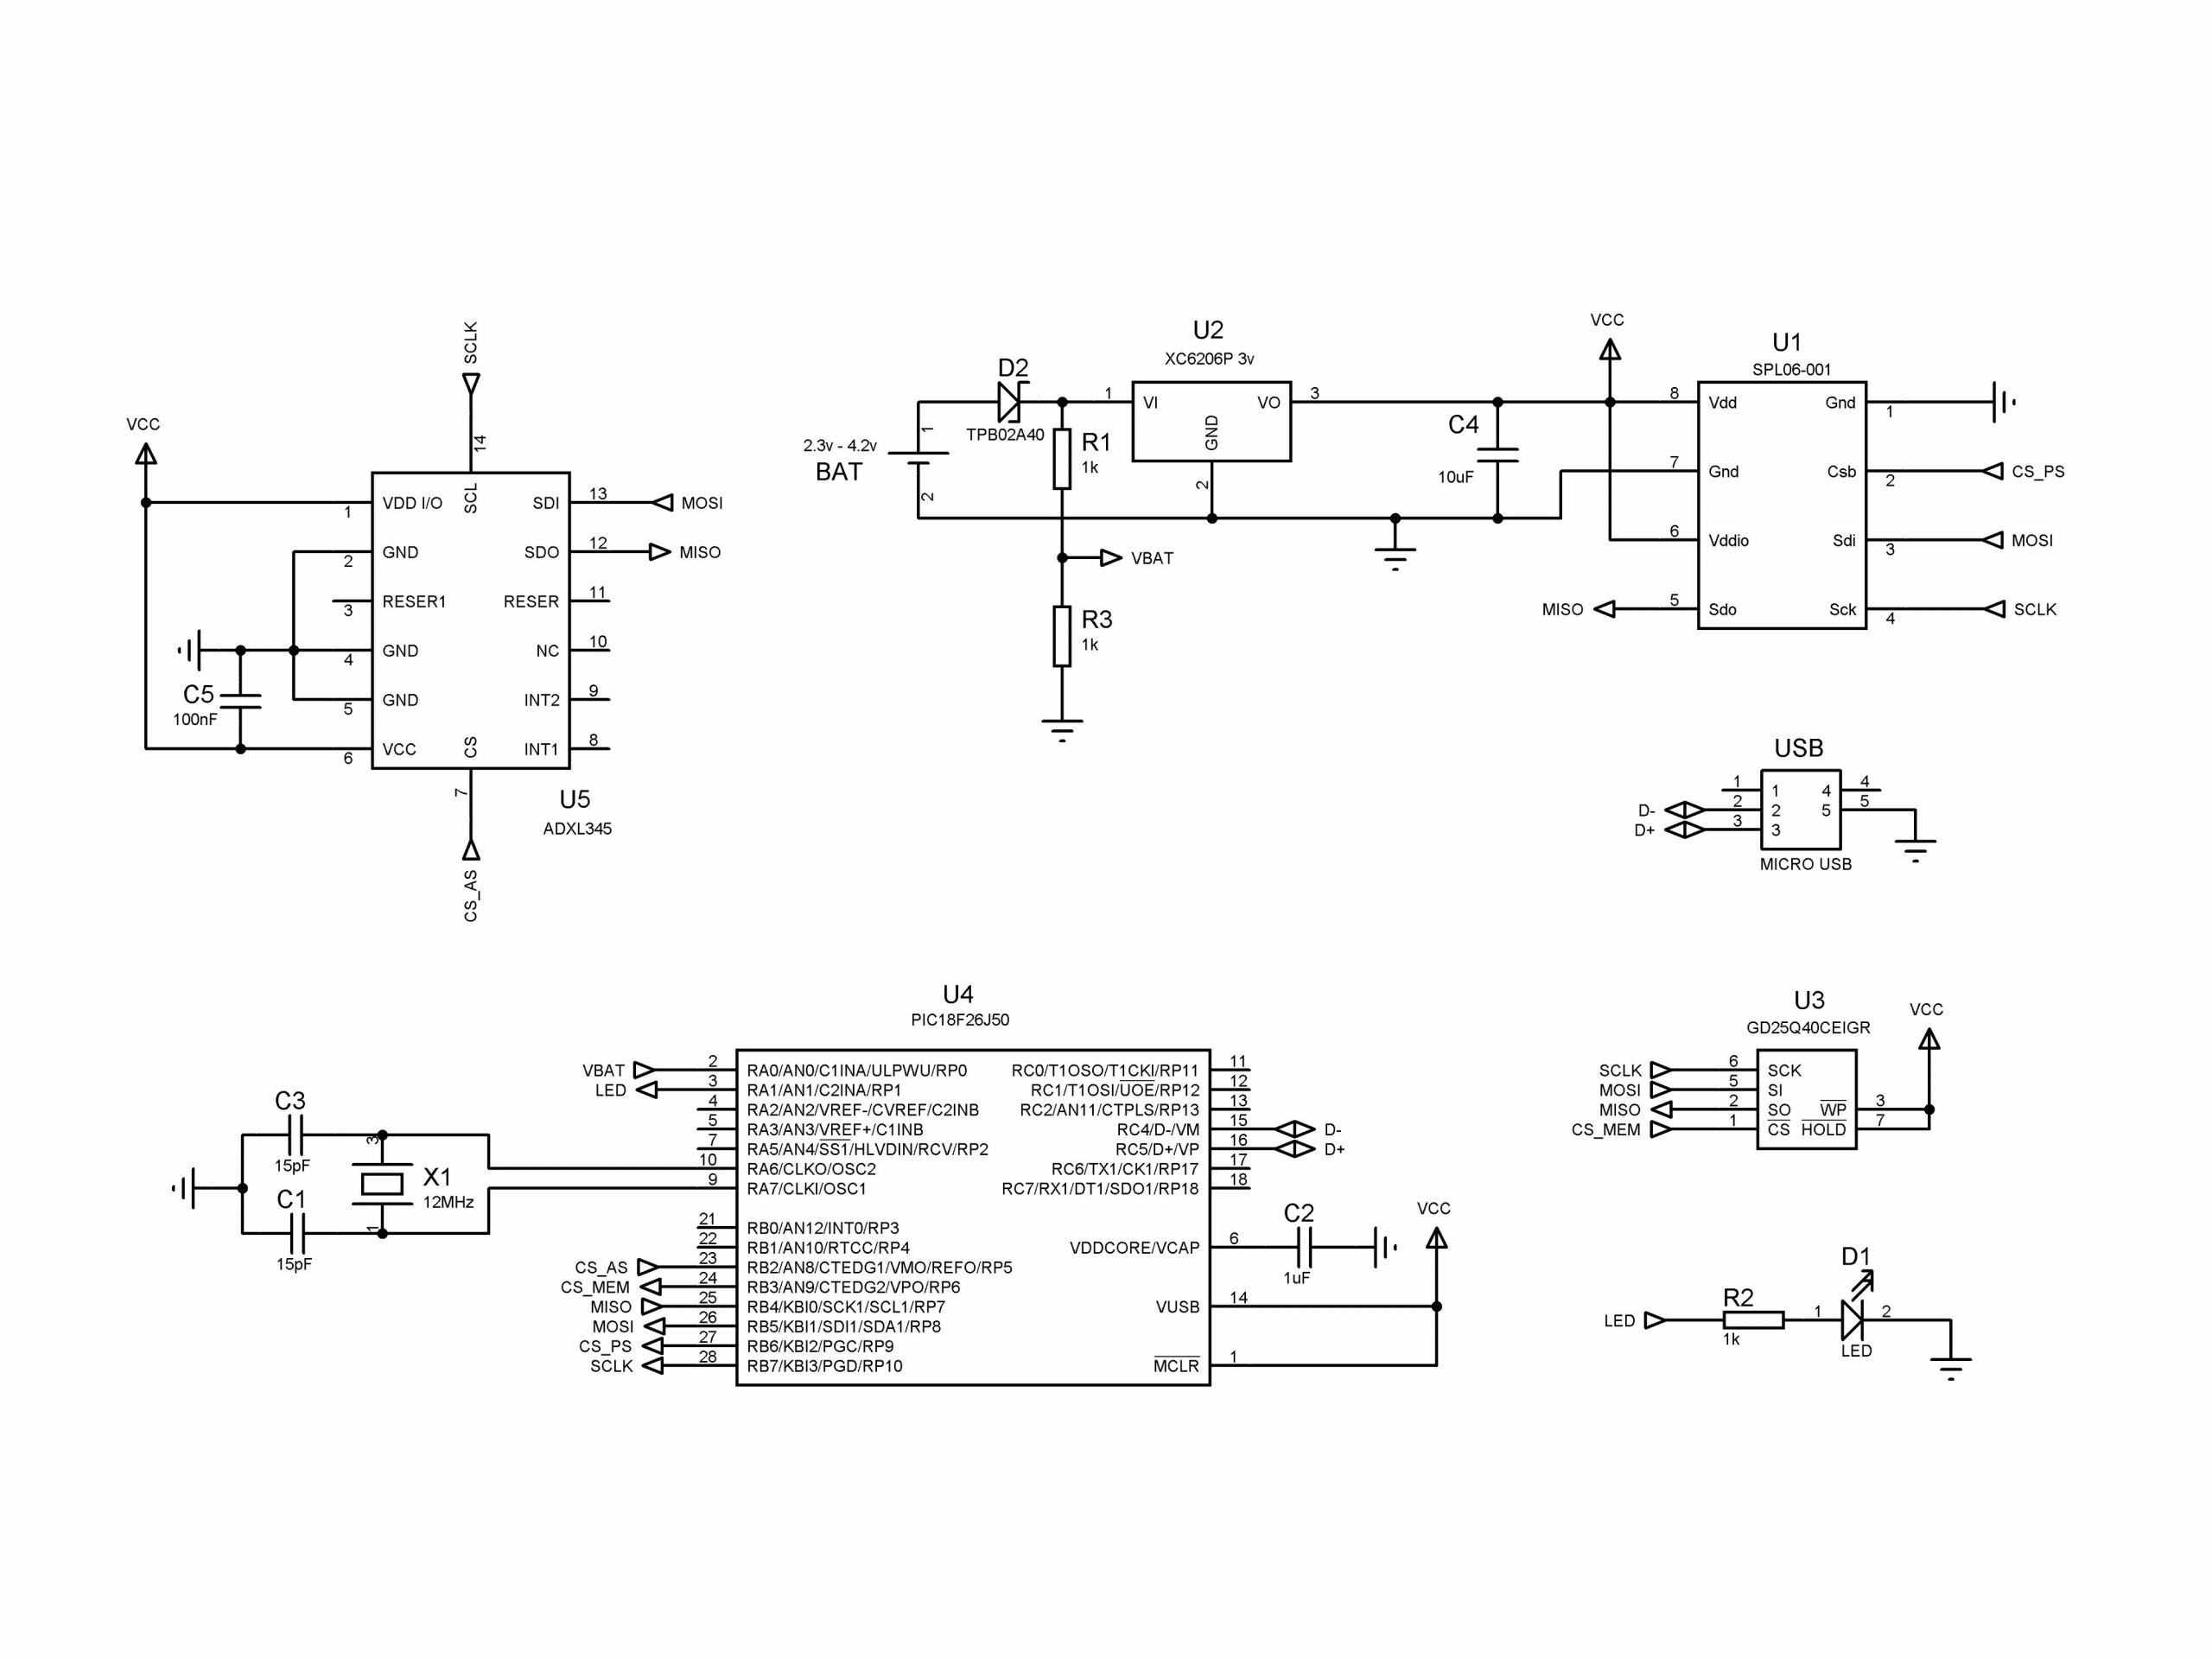
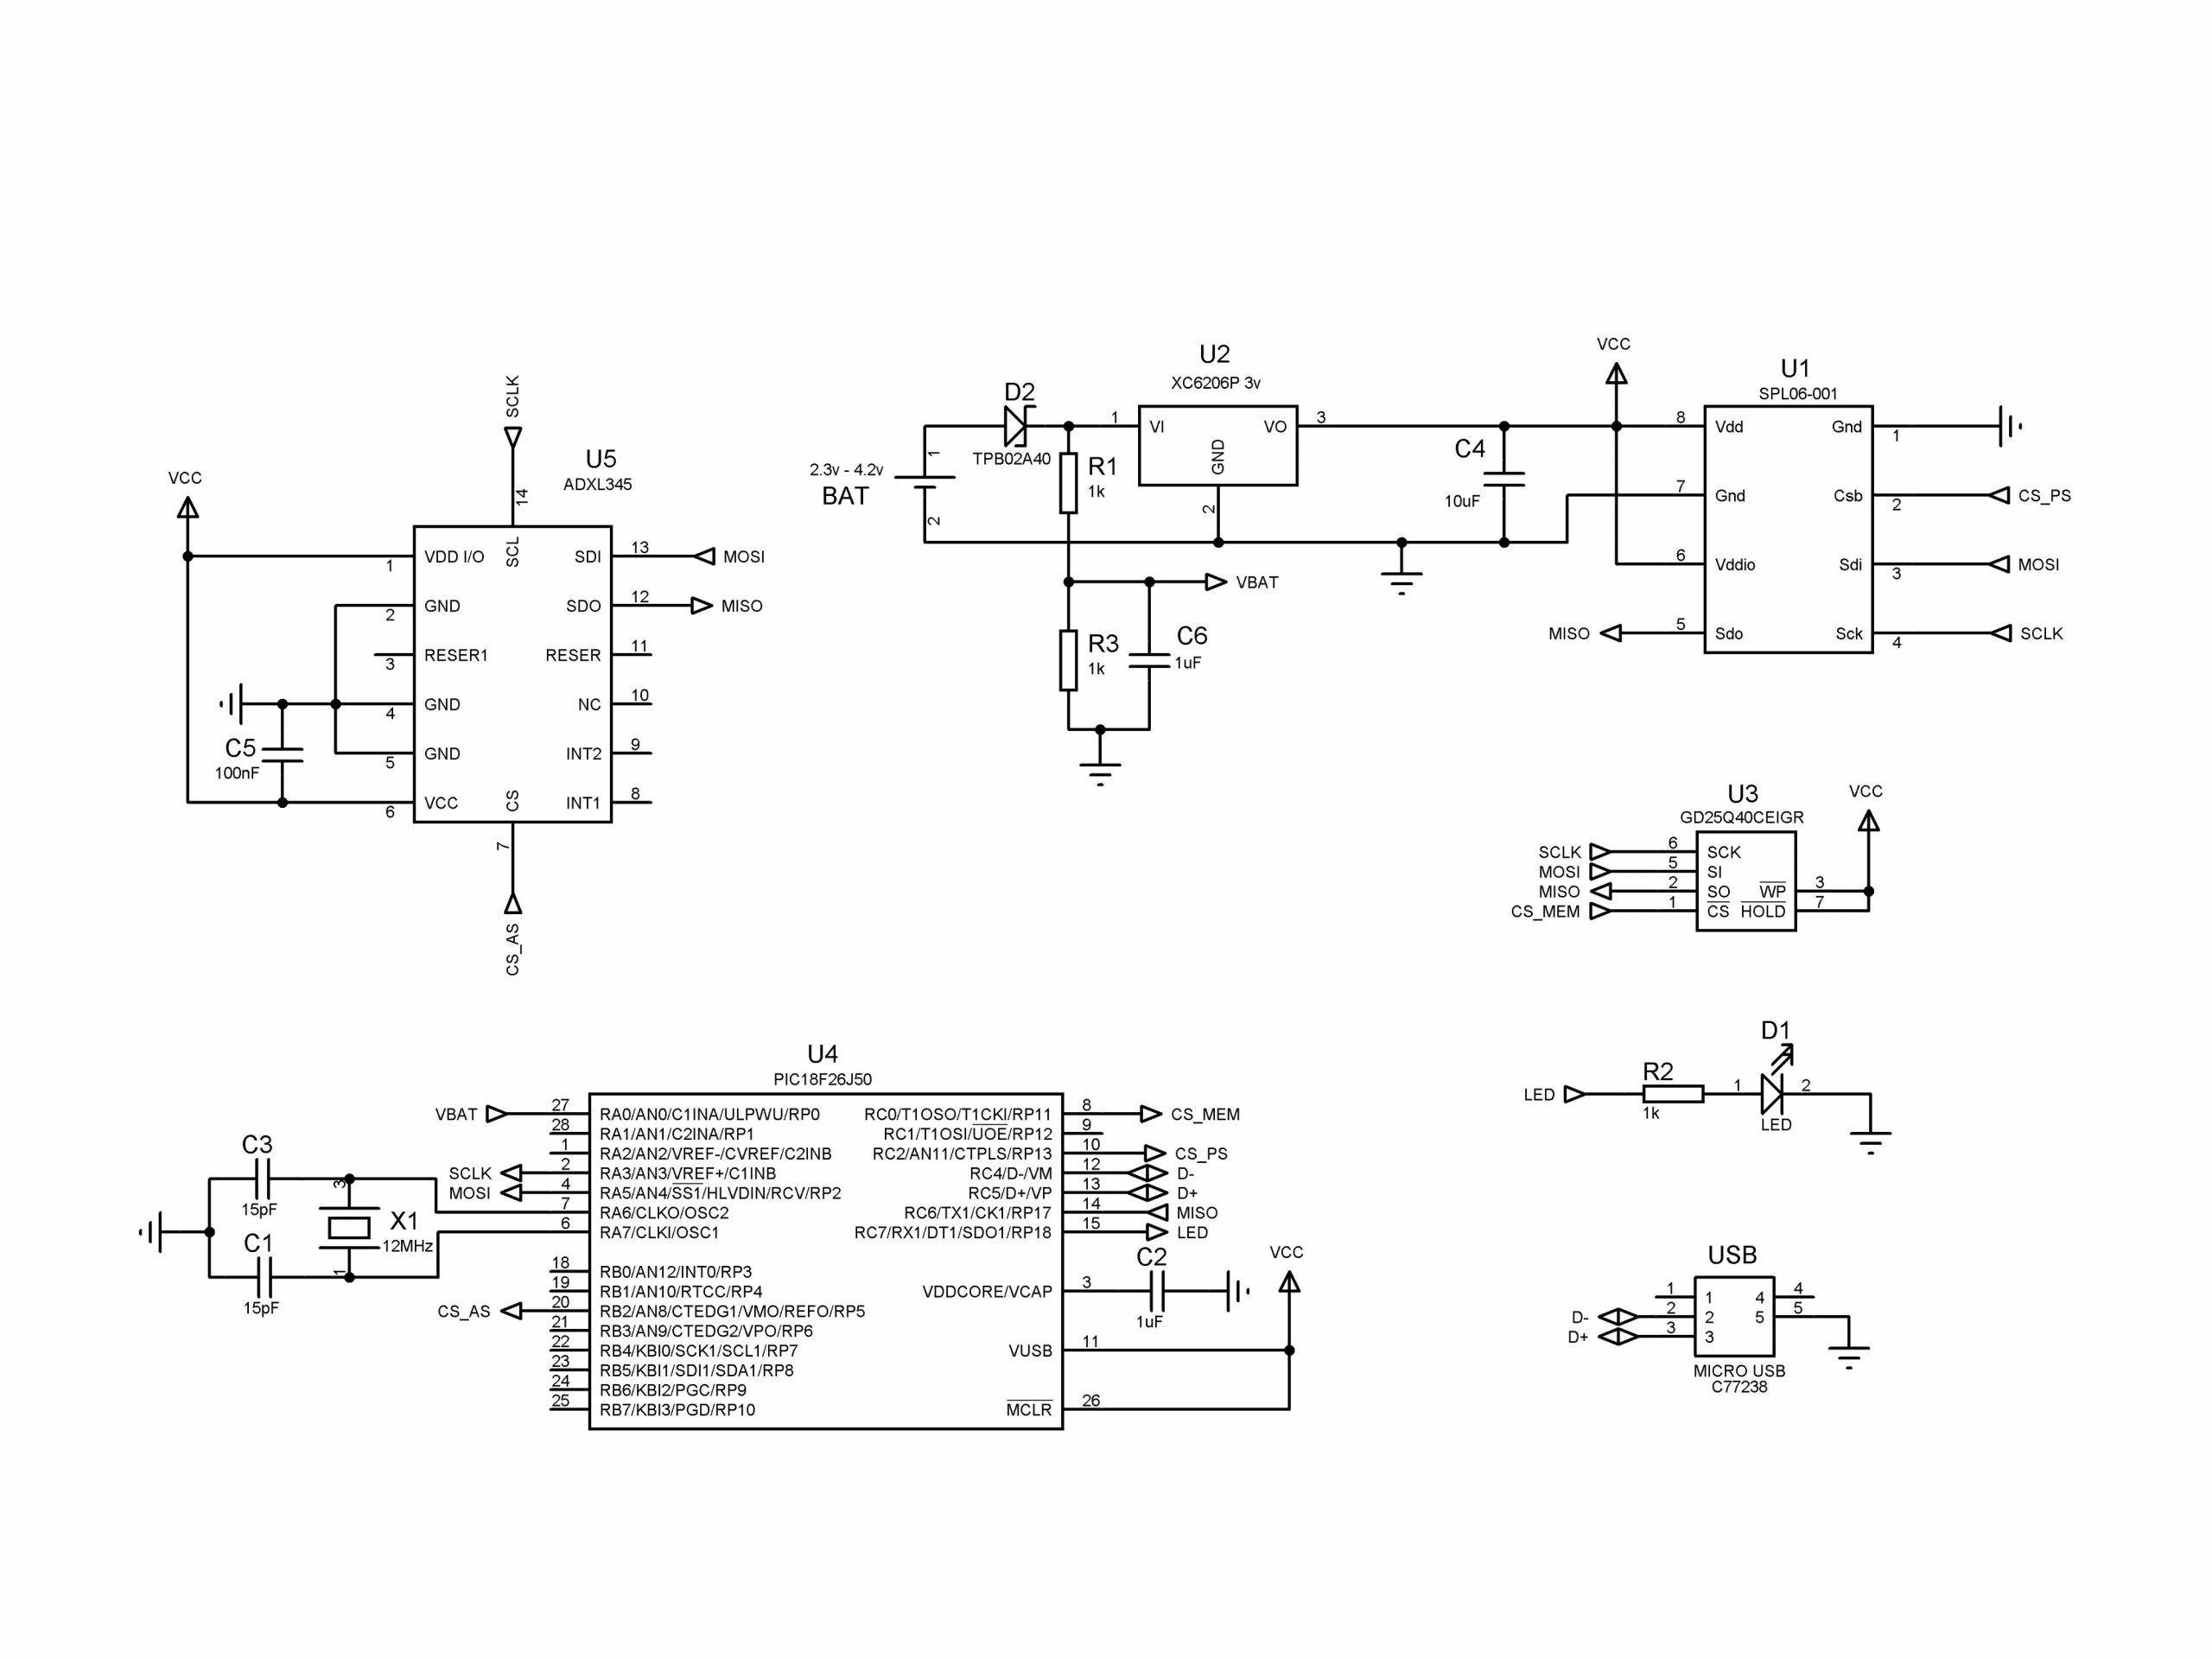
Barometric sensor: SPL06-001
3D Acceleration sensor: N/A
3D Acceleration range: N/A
Records per second: 25
Total recording time: 570 sec
BOM: 7.40 USD
REVISION 1.50
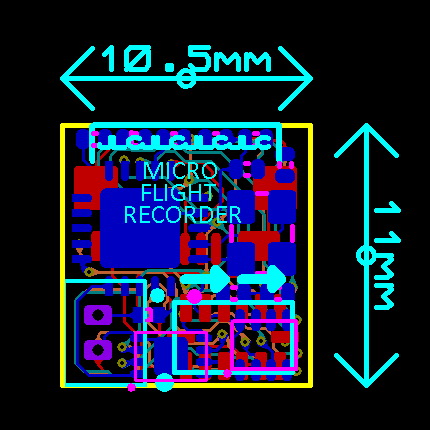
Size: 10.5 x 11 mm
Weight: 0.75 gr
Barometric sensor: SPL06-001
3D Acceleration sensor: ADXL375
3D Acceleration range: +-250 g
Records per second: 50
Total recording time: 650 sec
BOM: 19.10 USD
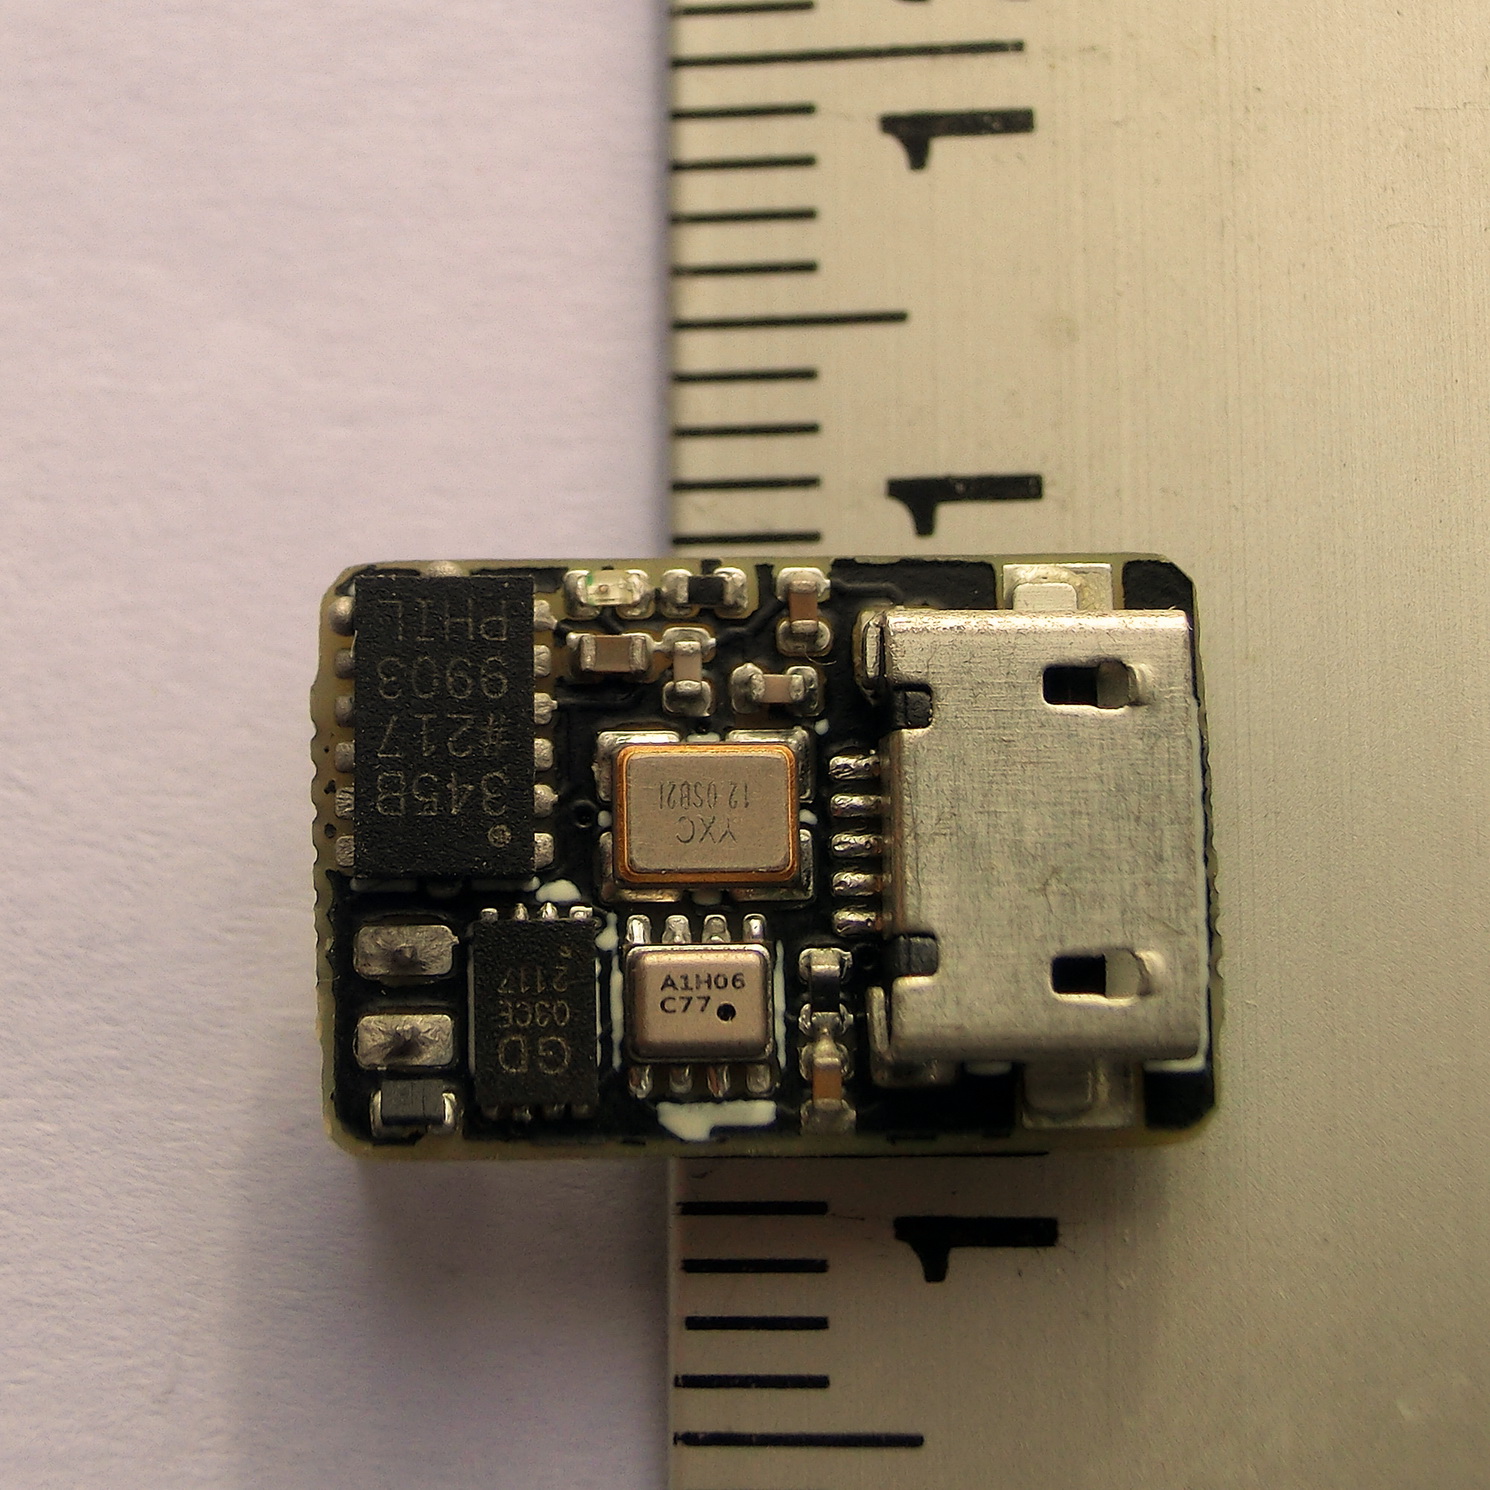
REVISION 2.00
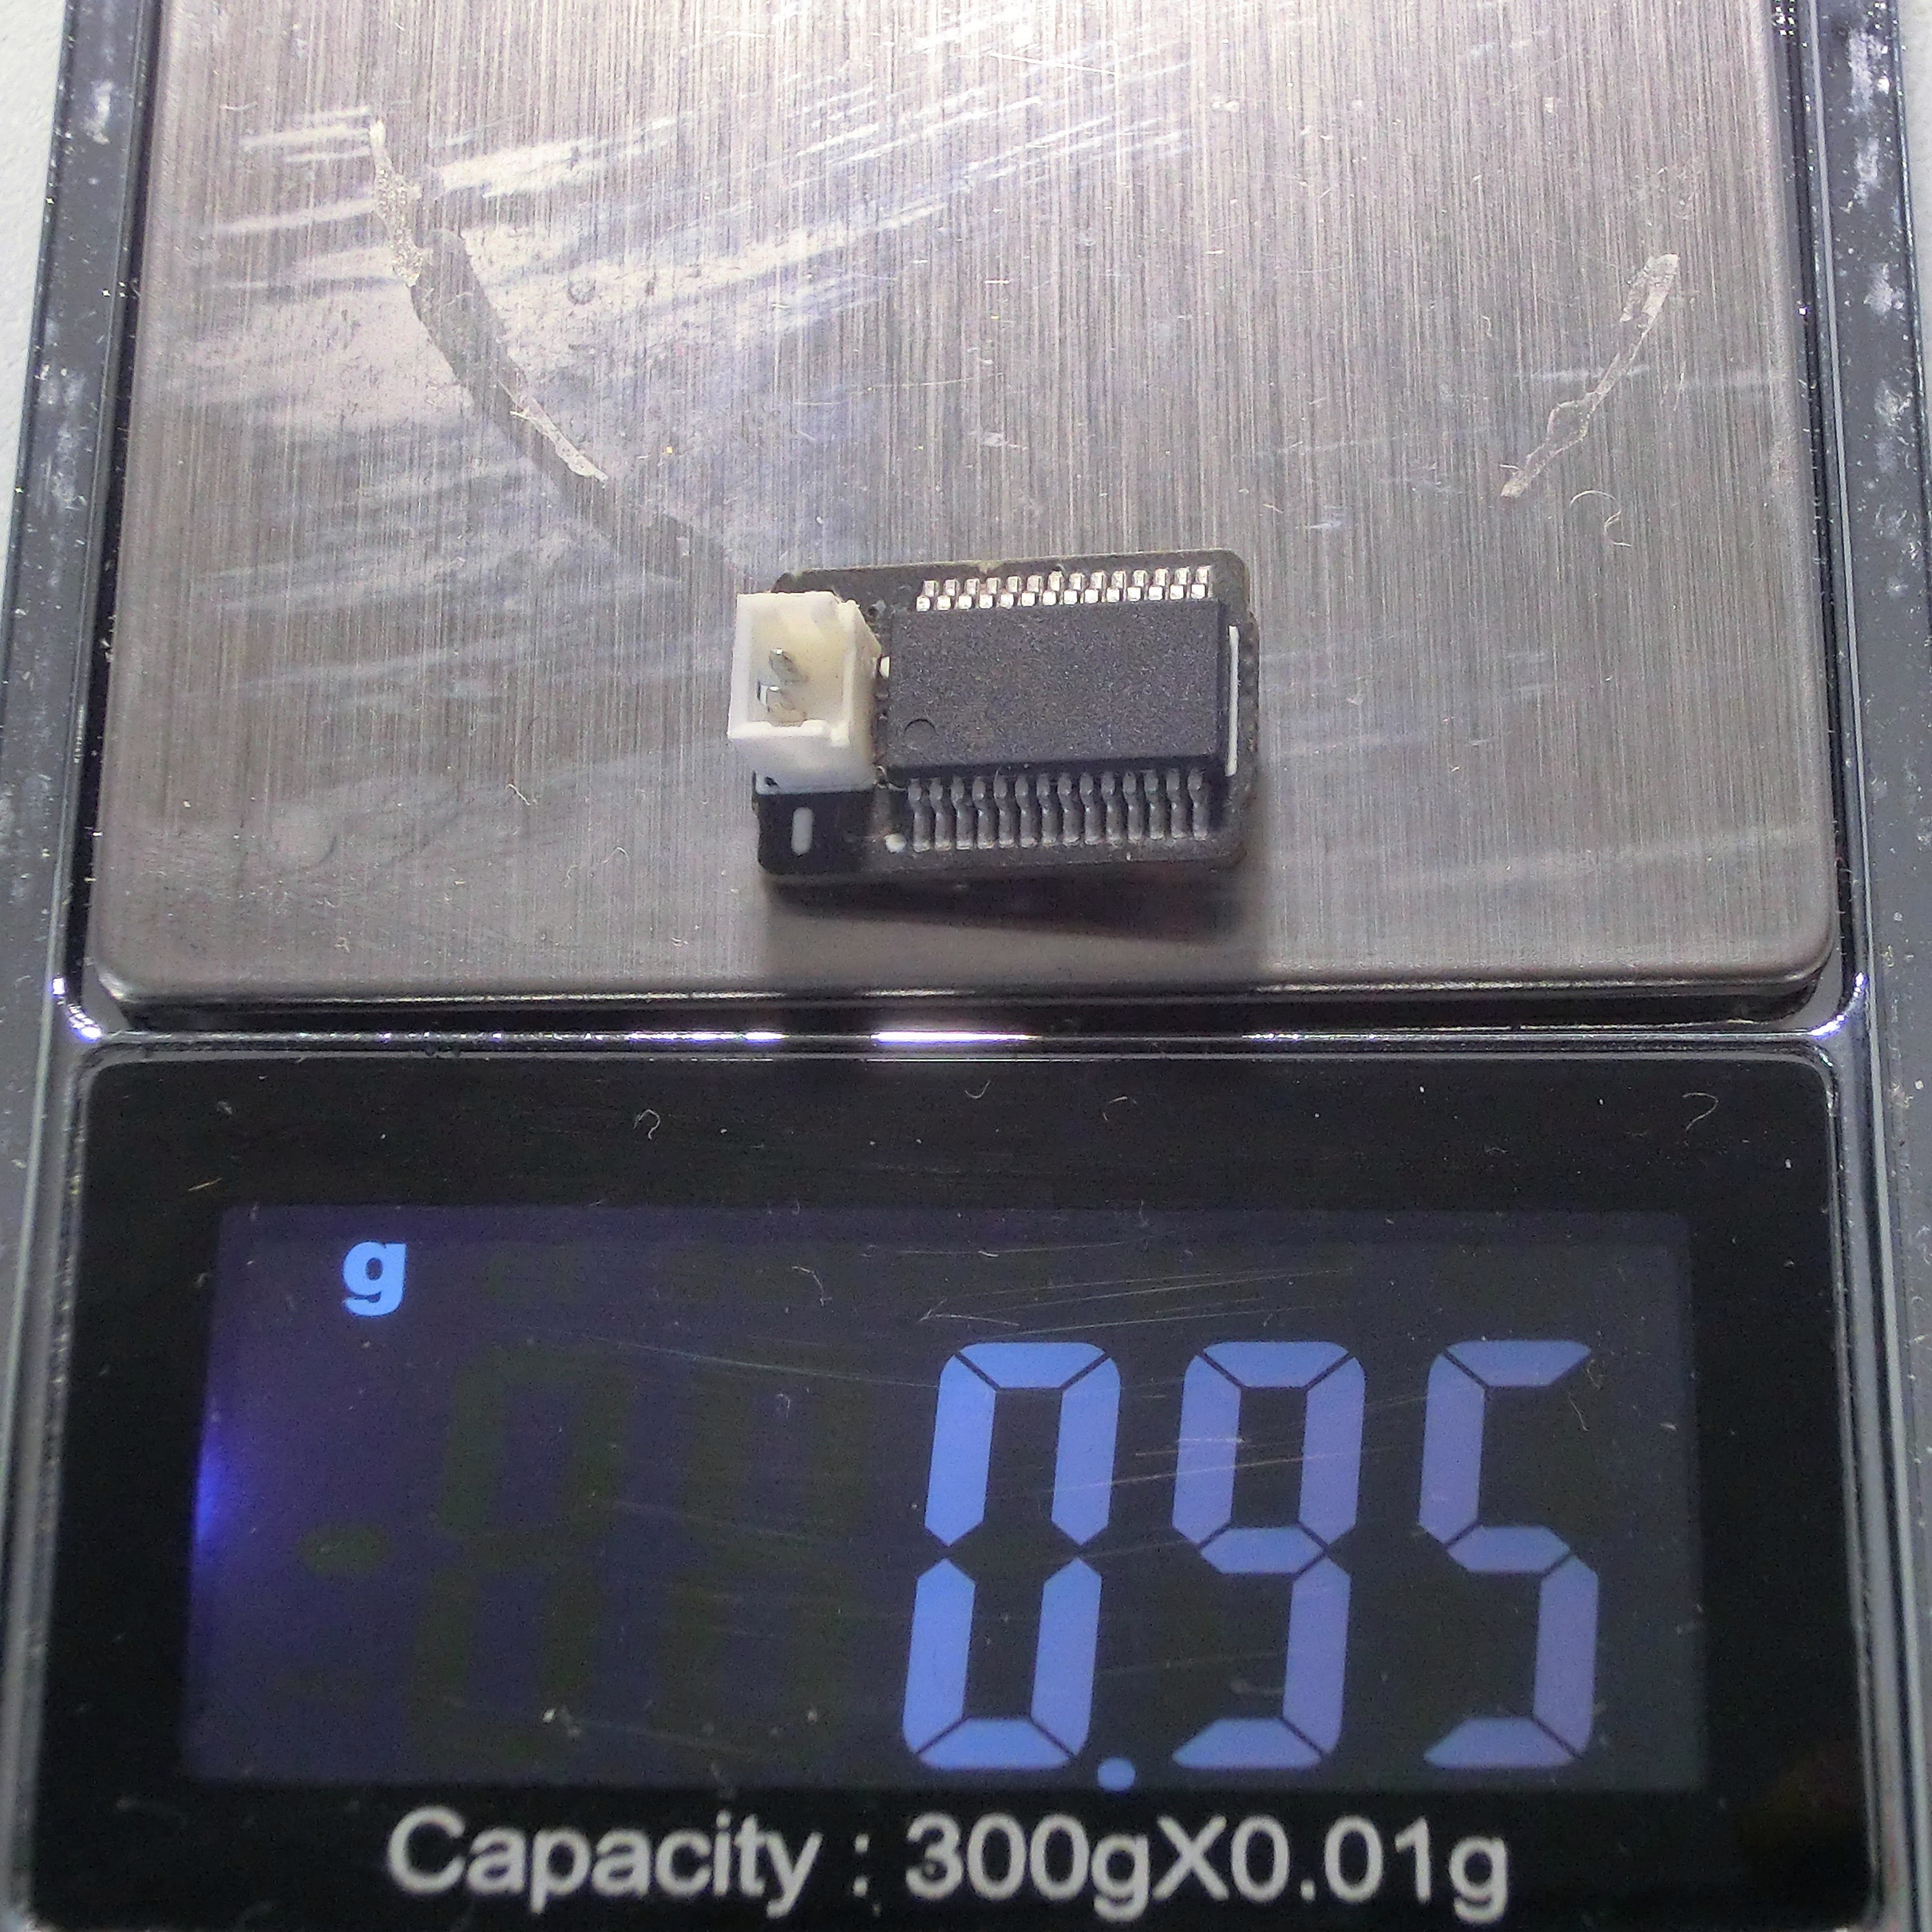
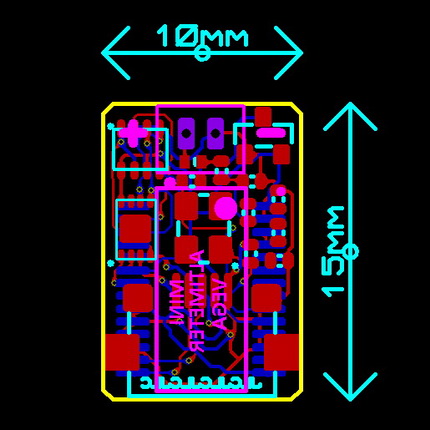
Size: 10 x 15 mm
Weight: 0.95 gr
Barometric sensor: SPL06-001
3D Acceleration sensor: N/A
3D Acceleration range: N/A
Records per second: 50
Total recording time: 1300 sec
BOM: 9.05 USD
REVISION 2.50
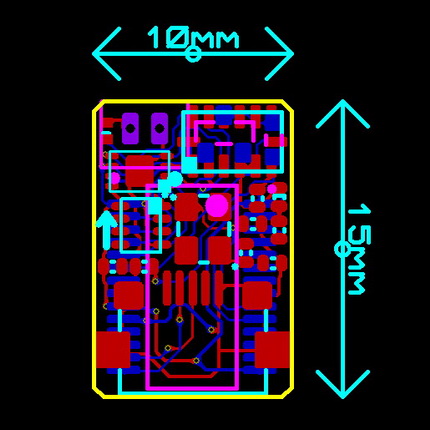
Size: 10 x 15 mm
Weight: 1.00 gr
Barometric sensor: SPL06-001
3D Acceleration sensor: ADXL345
3D Acceleration range: +-16 g
Records per second: 50
Total recording time: 650 sec
BOM: 15.90 USD
REVISION 3.50
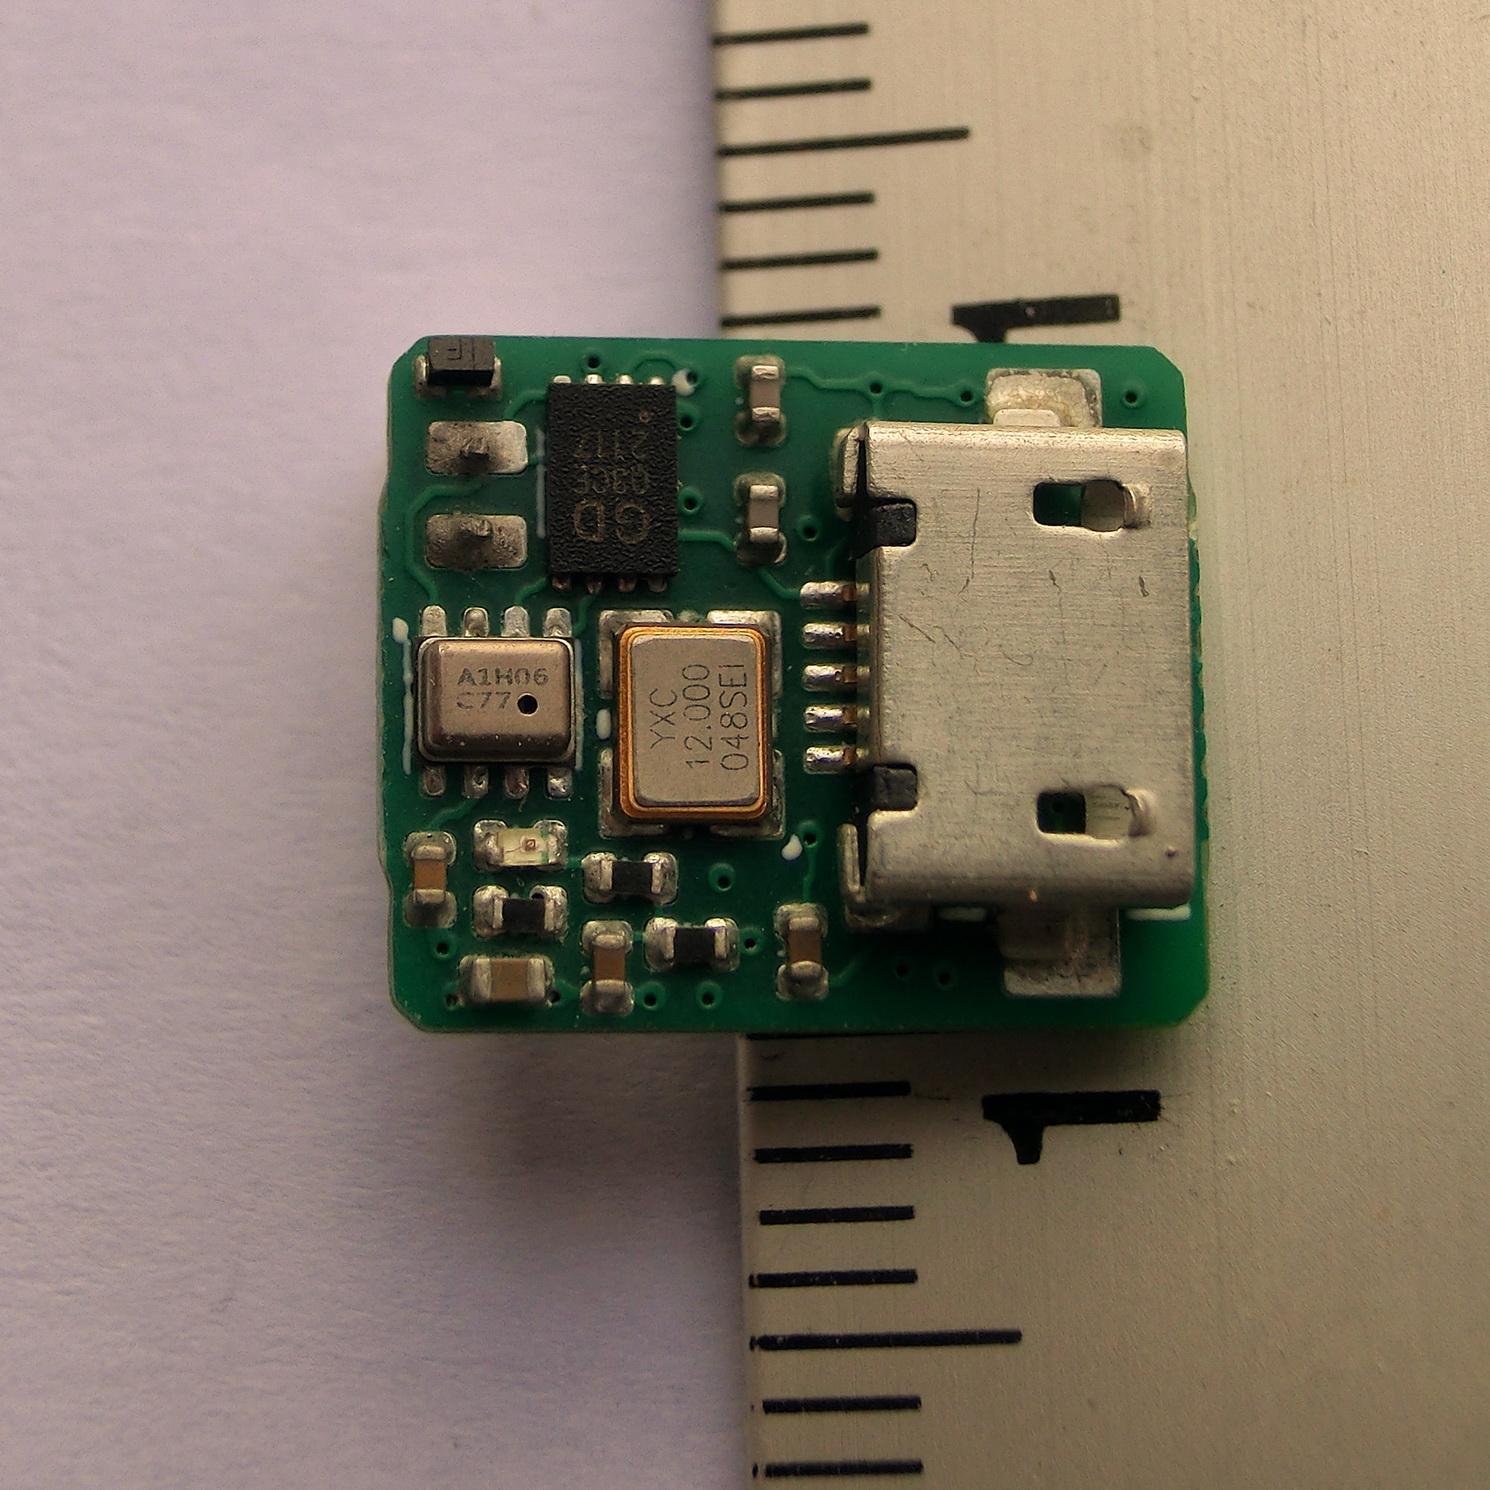
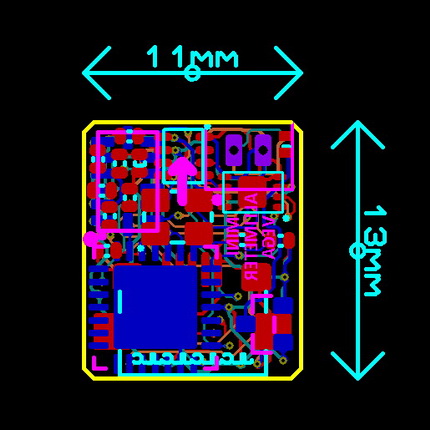
Size: 11 x 13 mm
Weight: 0.85 gr
Barometric sensor: SPL06-001
3D Acceleration sensor: ADXL345
3D Acceleration range: +-16 g
Records per second: 50
Total recording time: 650 sec
BOM: 15.80 USD
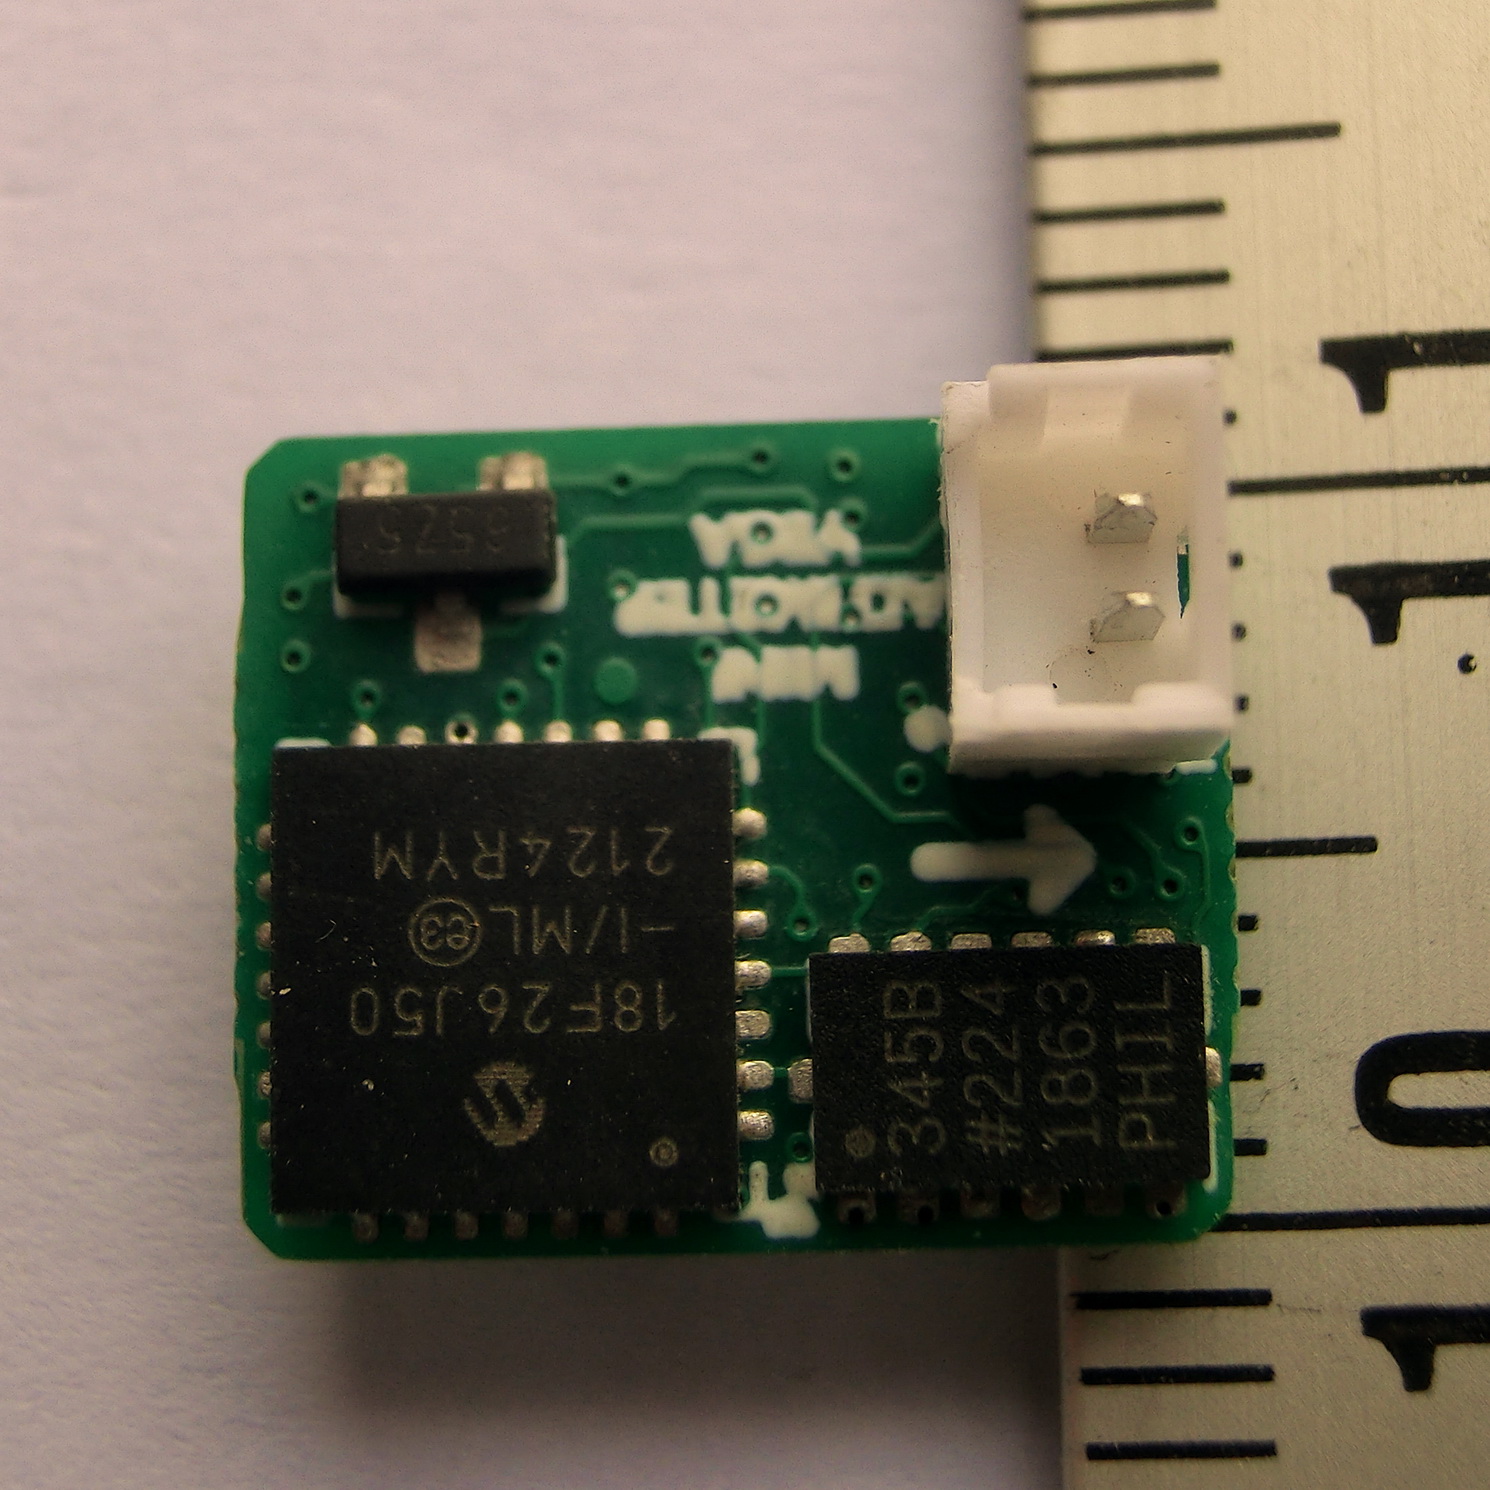
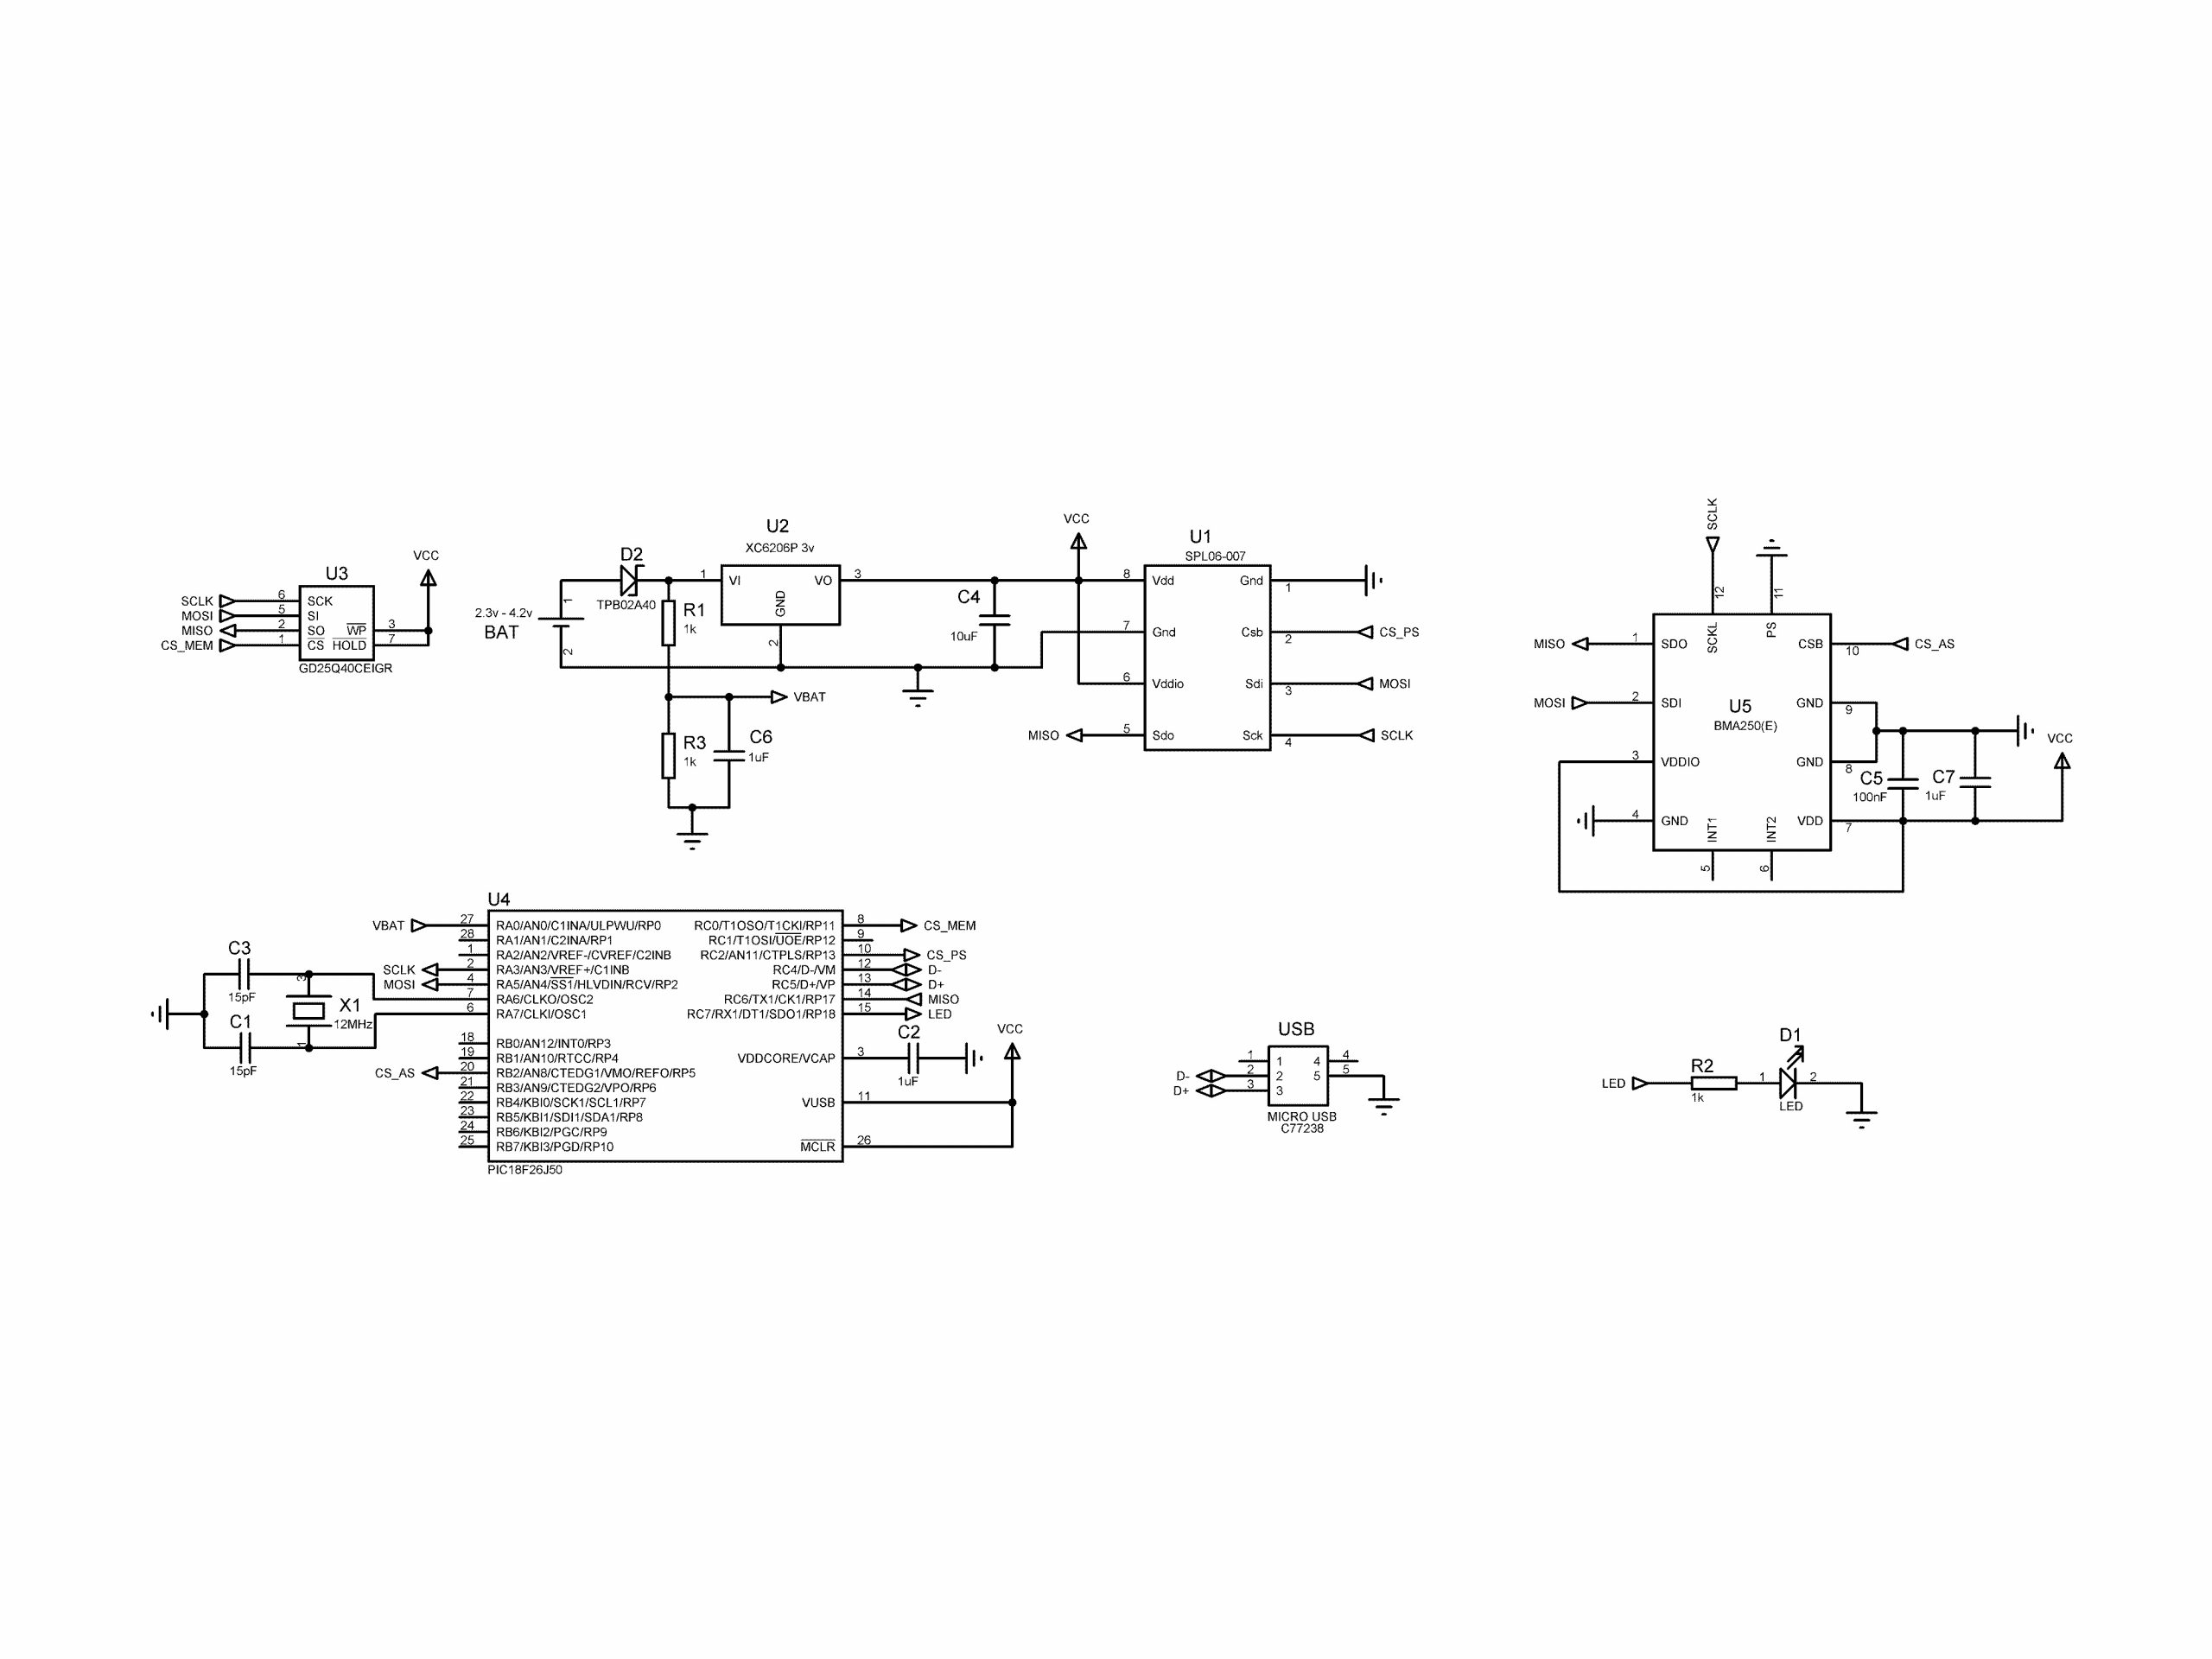
REVISION 4.50 (New)
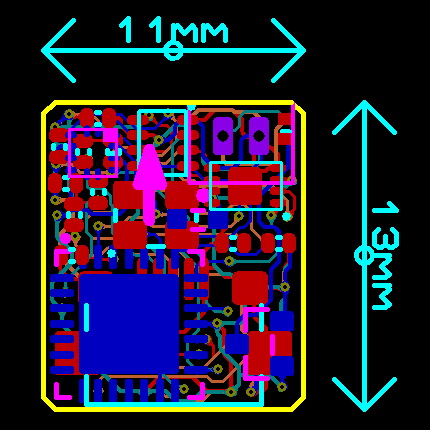
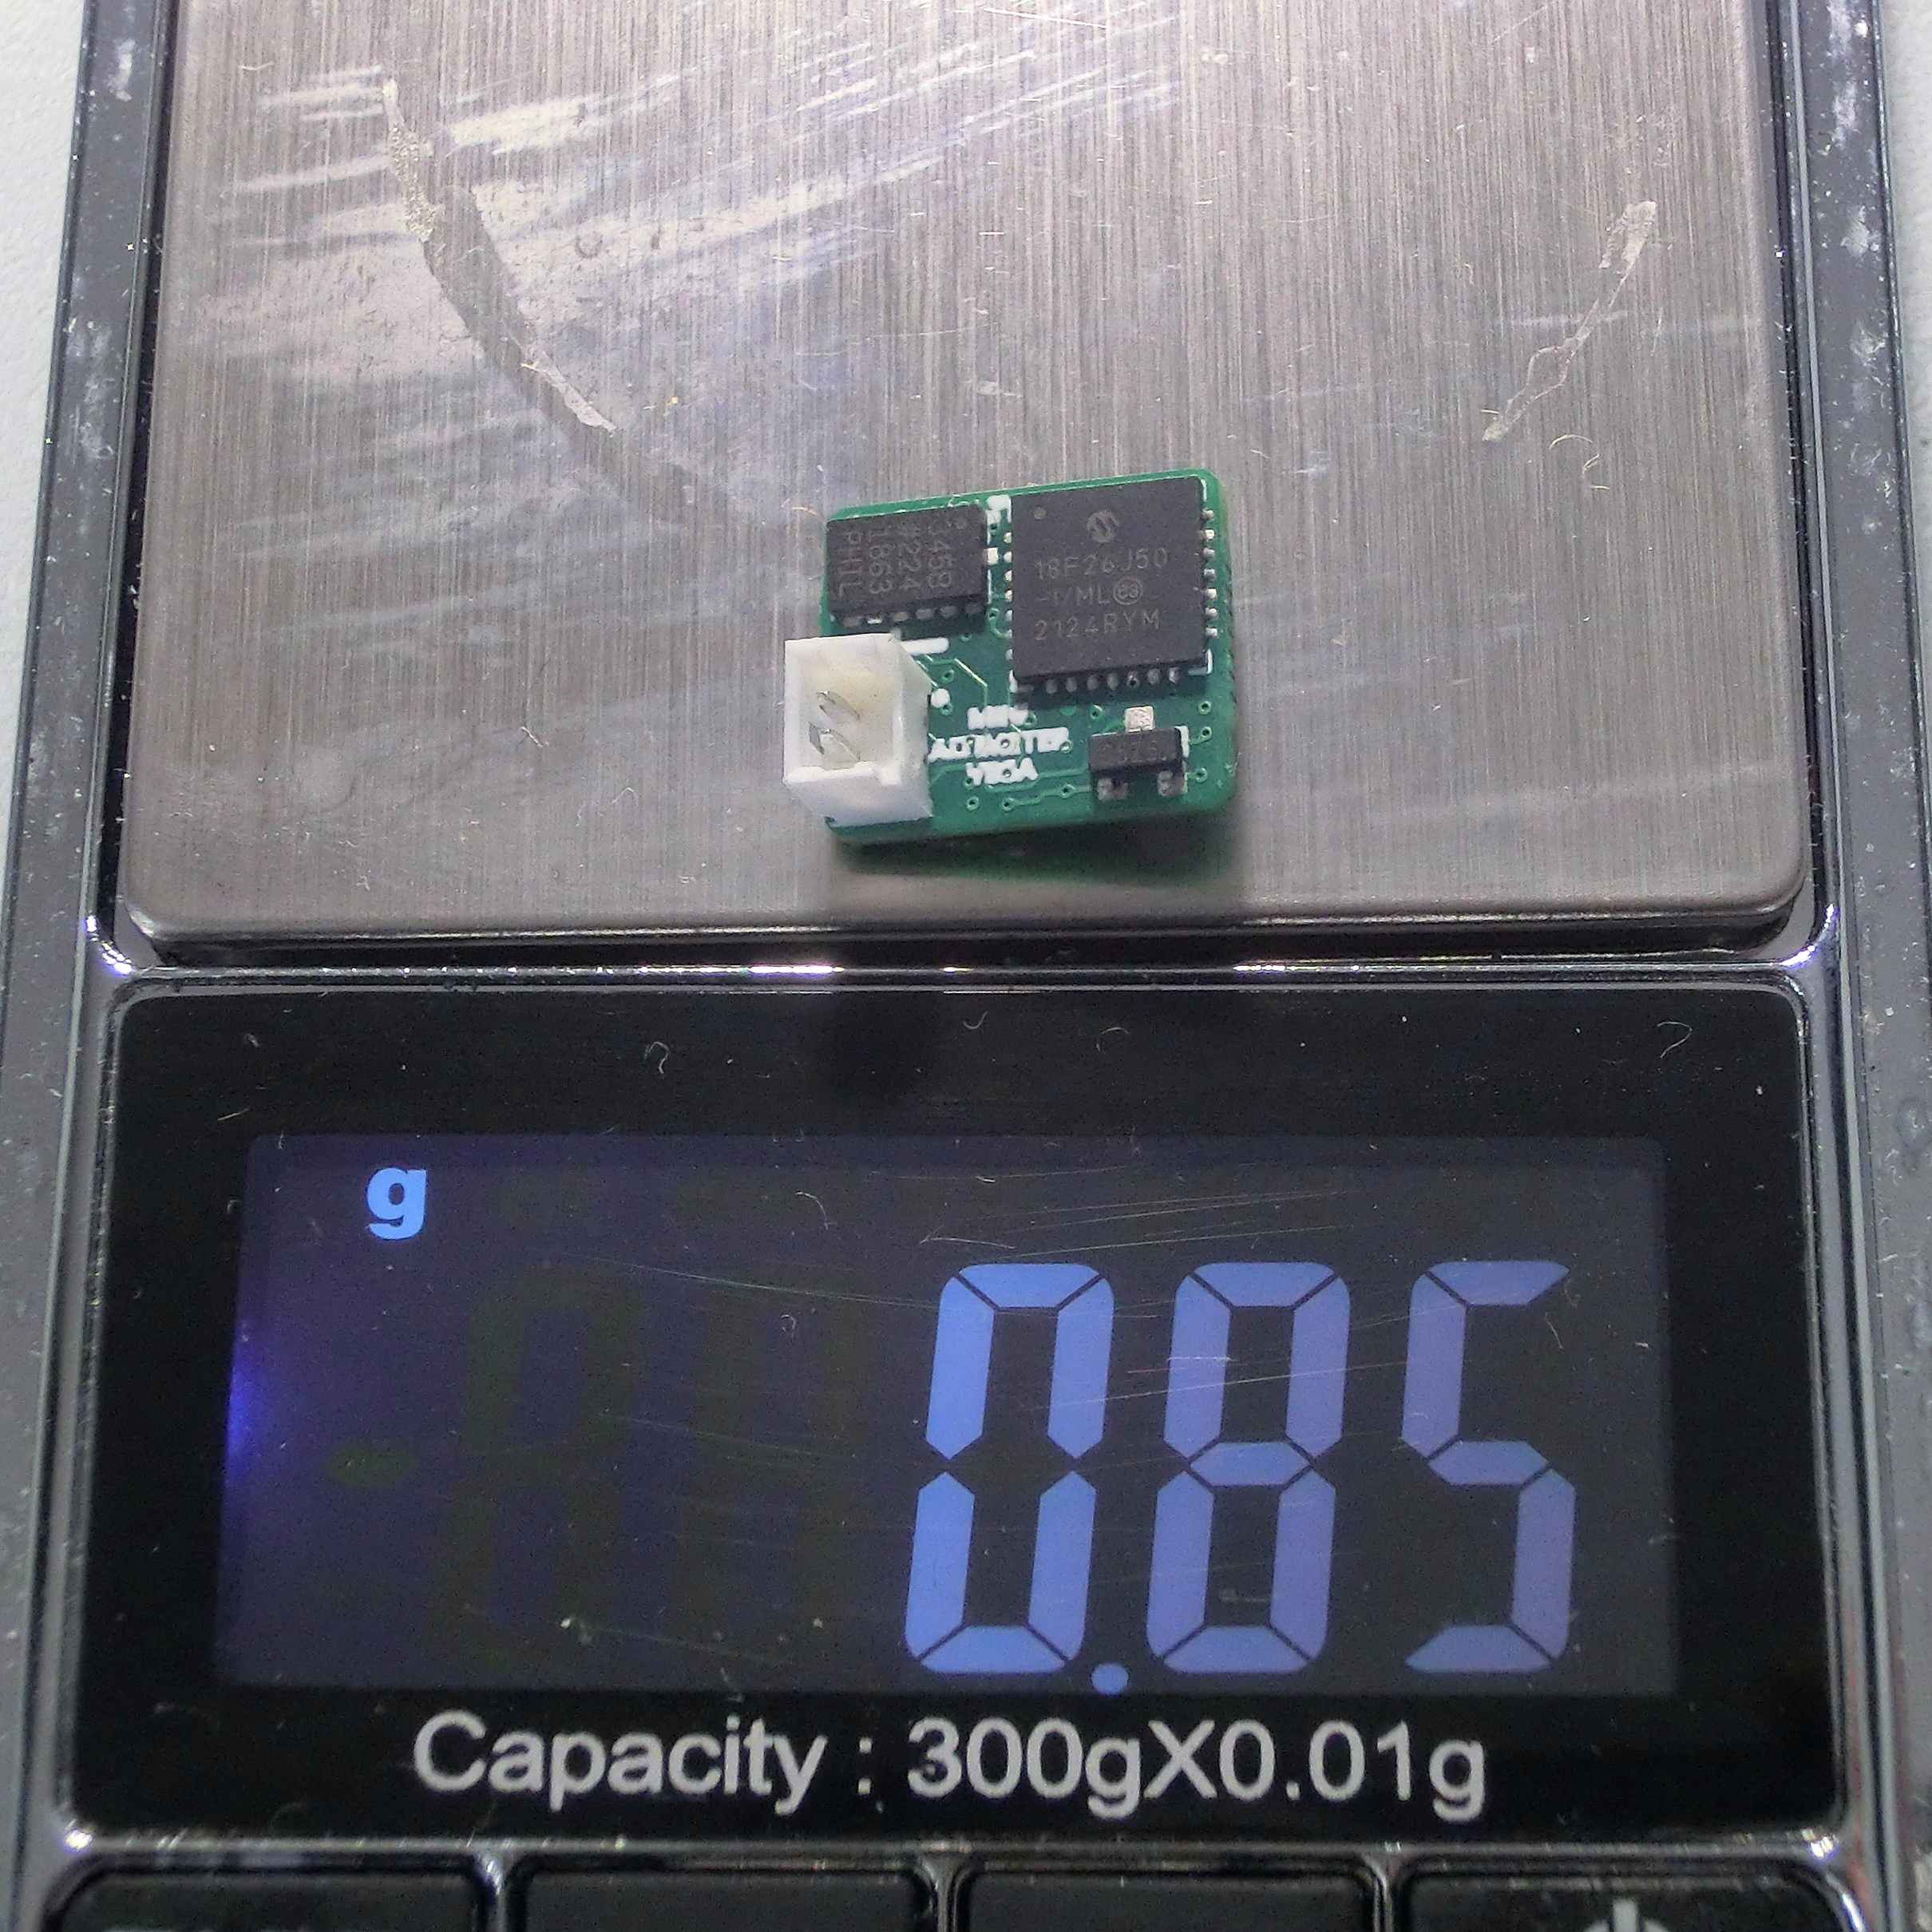
Size: 11 x 13 mm
Weight: 0.83 gr
Barometric sensor: SPL06-001
3D Acceleration sensor: BMA250E
3D Acceleration range: +-16 g
Records per second: 50
Total recording time: 650 sec
BOM: 10.00 USD
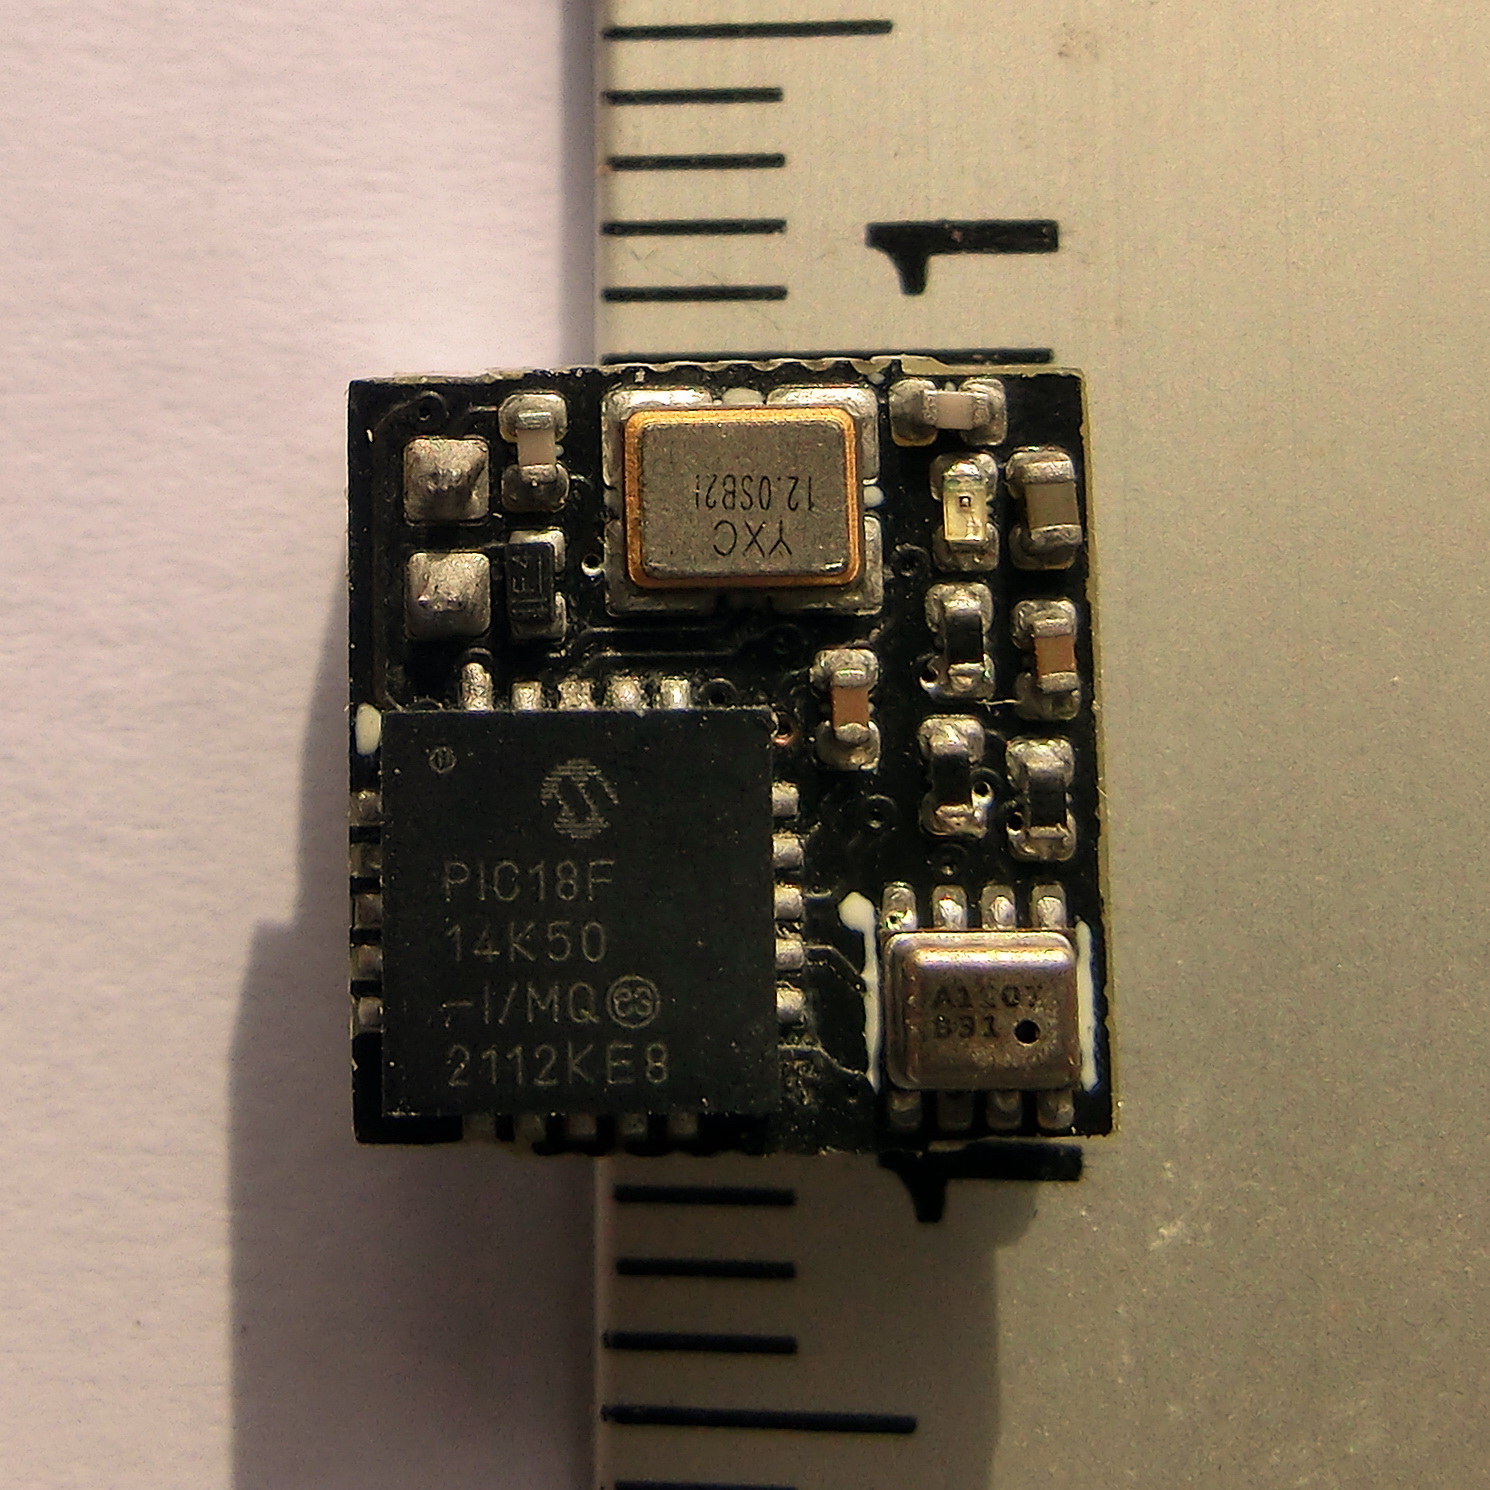
REVISION 5.00
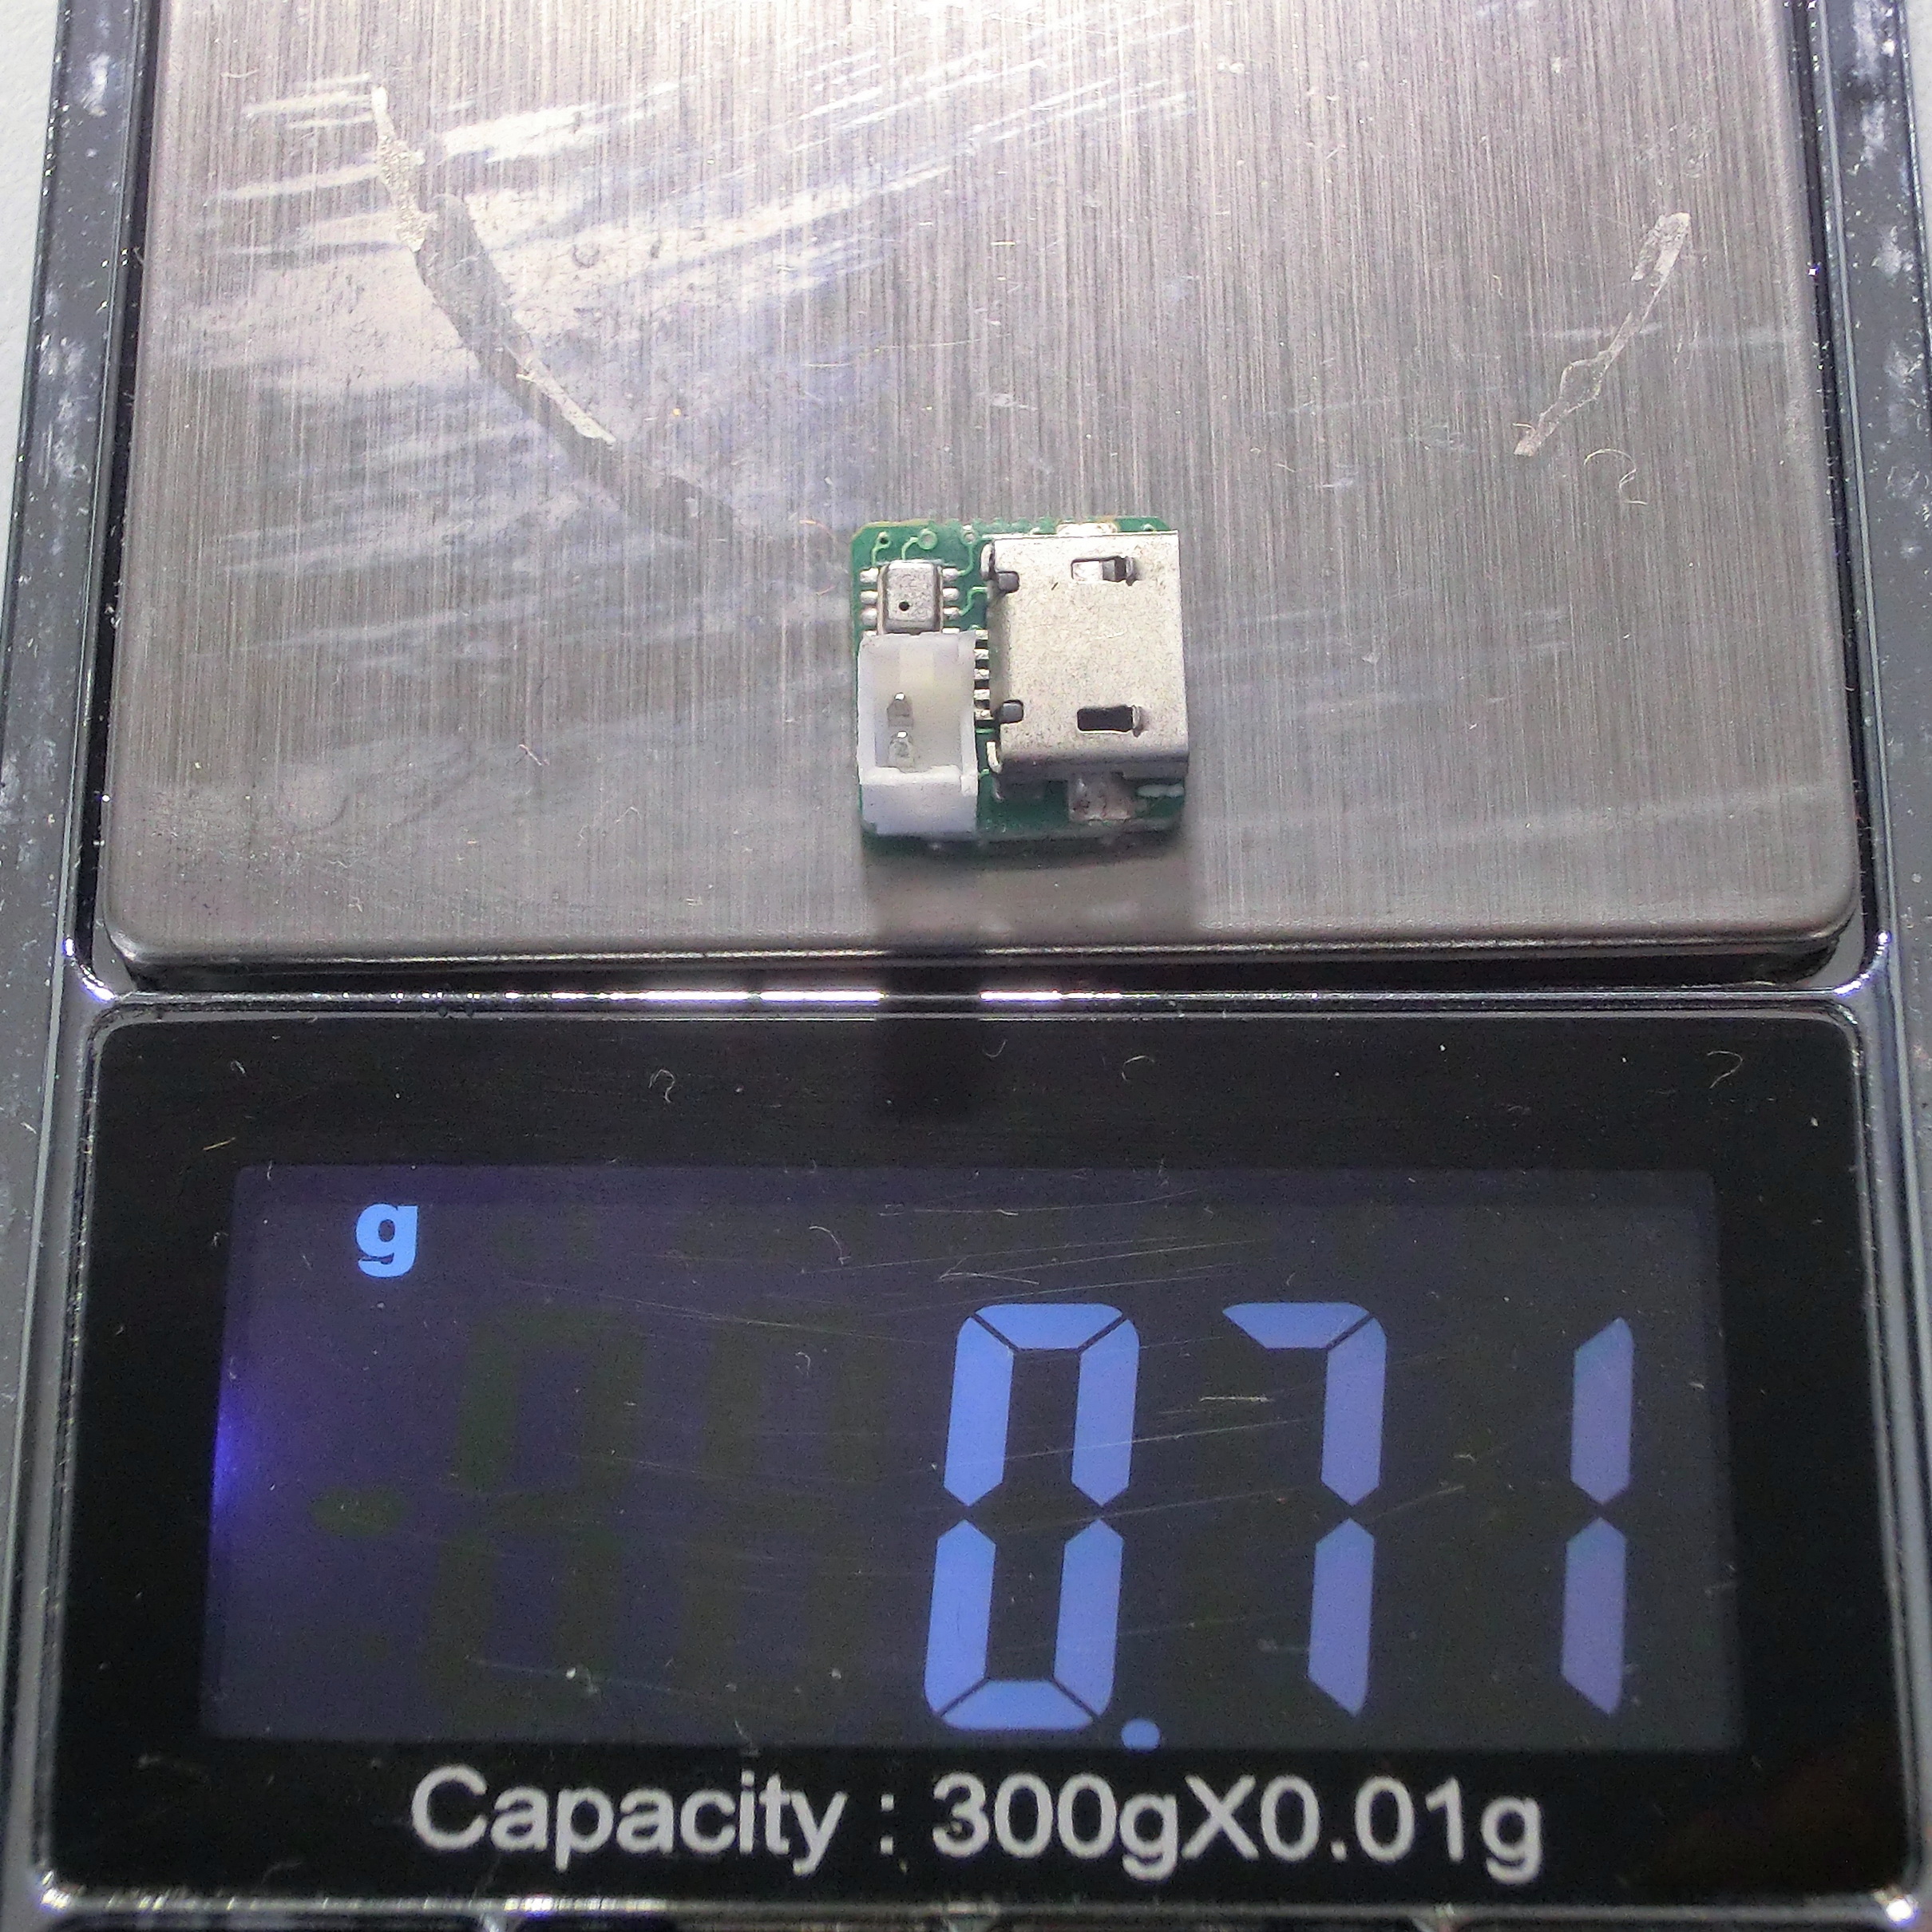

Size: 10 x 10 mm
Weight: 0.71 gr
Barometric sensor: BMP280
3D Acceleration sensor: N/A
3D Acceleration range: N/A
Records per second: 50
Total recording time: 1300 sec
BOM: 6.60 USD
• Future revisions will be added when ready
FIRMWARE LOGIC
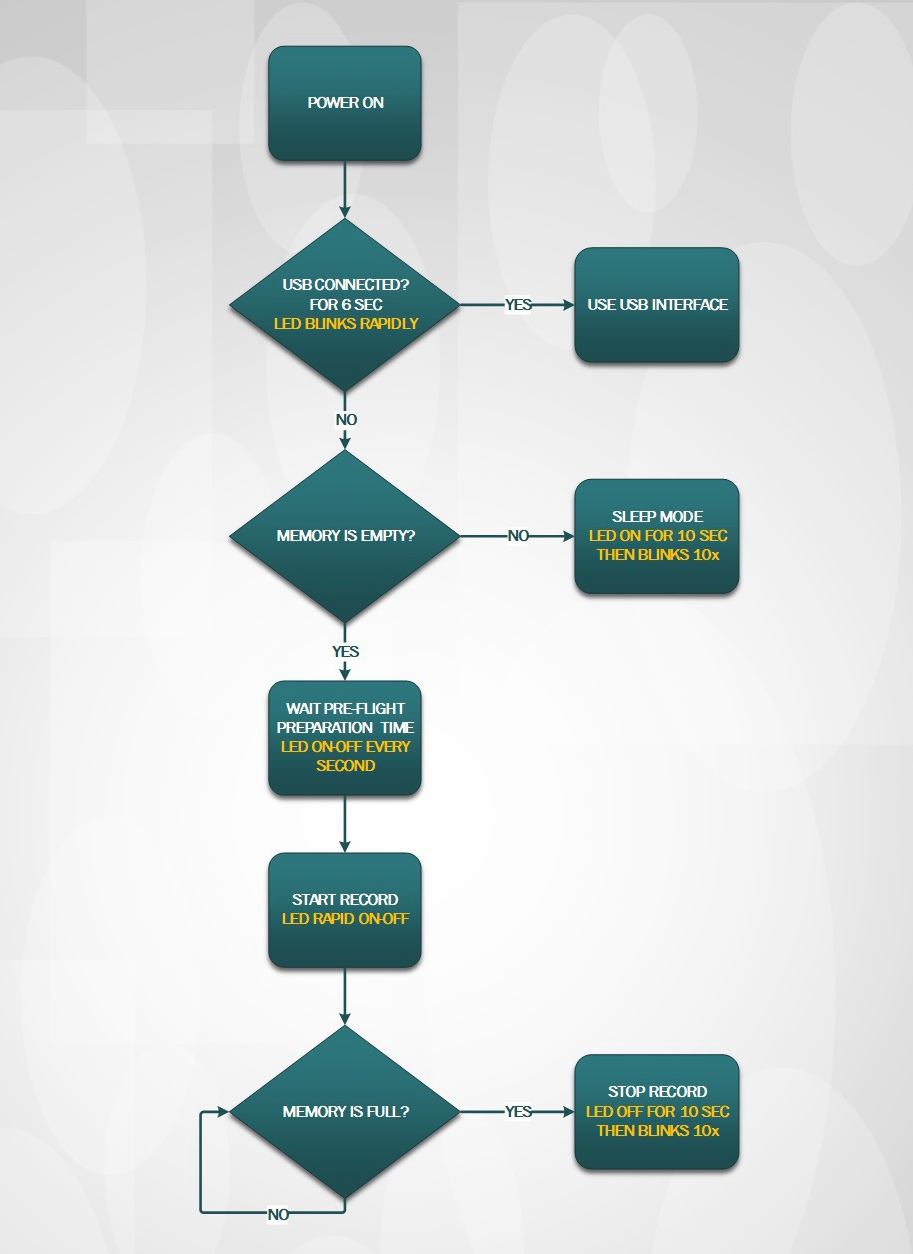
Because of the device simplicity, the firmware logic is not complicated either. After powering on, the MICRO ALTIMETER VEGA will check for about 6 seconds, while the LED is blinking very fast, if there is an USB connection. If there is, then the MICRO ALTIMETER VEGA will go into USB mode and the PC software will gain full control over it.
If there is no USB connection, the MICRO ALTIMETER VEGA goes into Flight mode. First the device will check if the memory is empty. * If the memory is not empty MICRO ALTIMETER VEGA will go into sleep mode and no new information will be recorded. In sleep mode, the LED stays ON for 10 seconds and then blinks fast 10 times.
If the memory is empty and thus new data can be recorded, the MICRO ALTIMETER VEGA will start the pre-flight preparation time count down as set through the software. During this countdown, the LED will turn ON-OFF every second.
Once the countdown has finished, MICRO ALTIMETER VEGA will start recording in the memory. While the MICRO ALTIMETER VEGA is recording, the LED will turn rapidly ON-OFF (about twice per second)
MICRO ALTIMETER VEGA will continue recording data until it is powered off or it runs out of memory. If the memory is already full, the LED will stay OFF for 10 seconds and blink fast 10 times.
*To prevent data loss, new data records can be written in the memory only after memory format, which can be initiated only through the USB interface.
SOFTWARE AND FIRMWARE
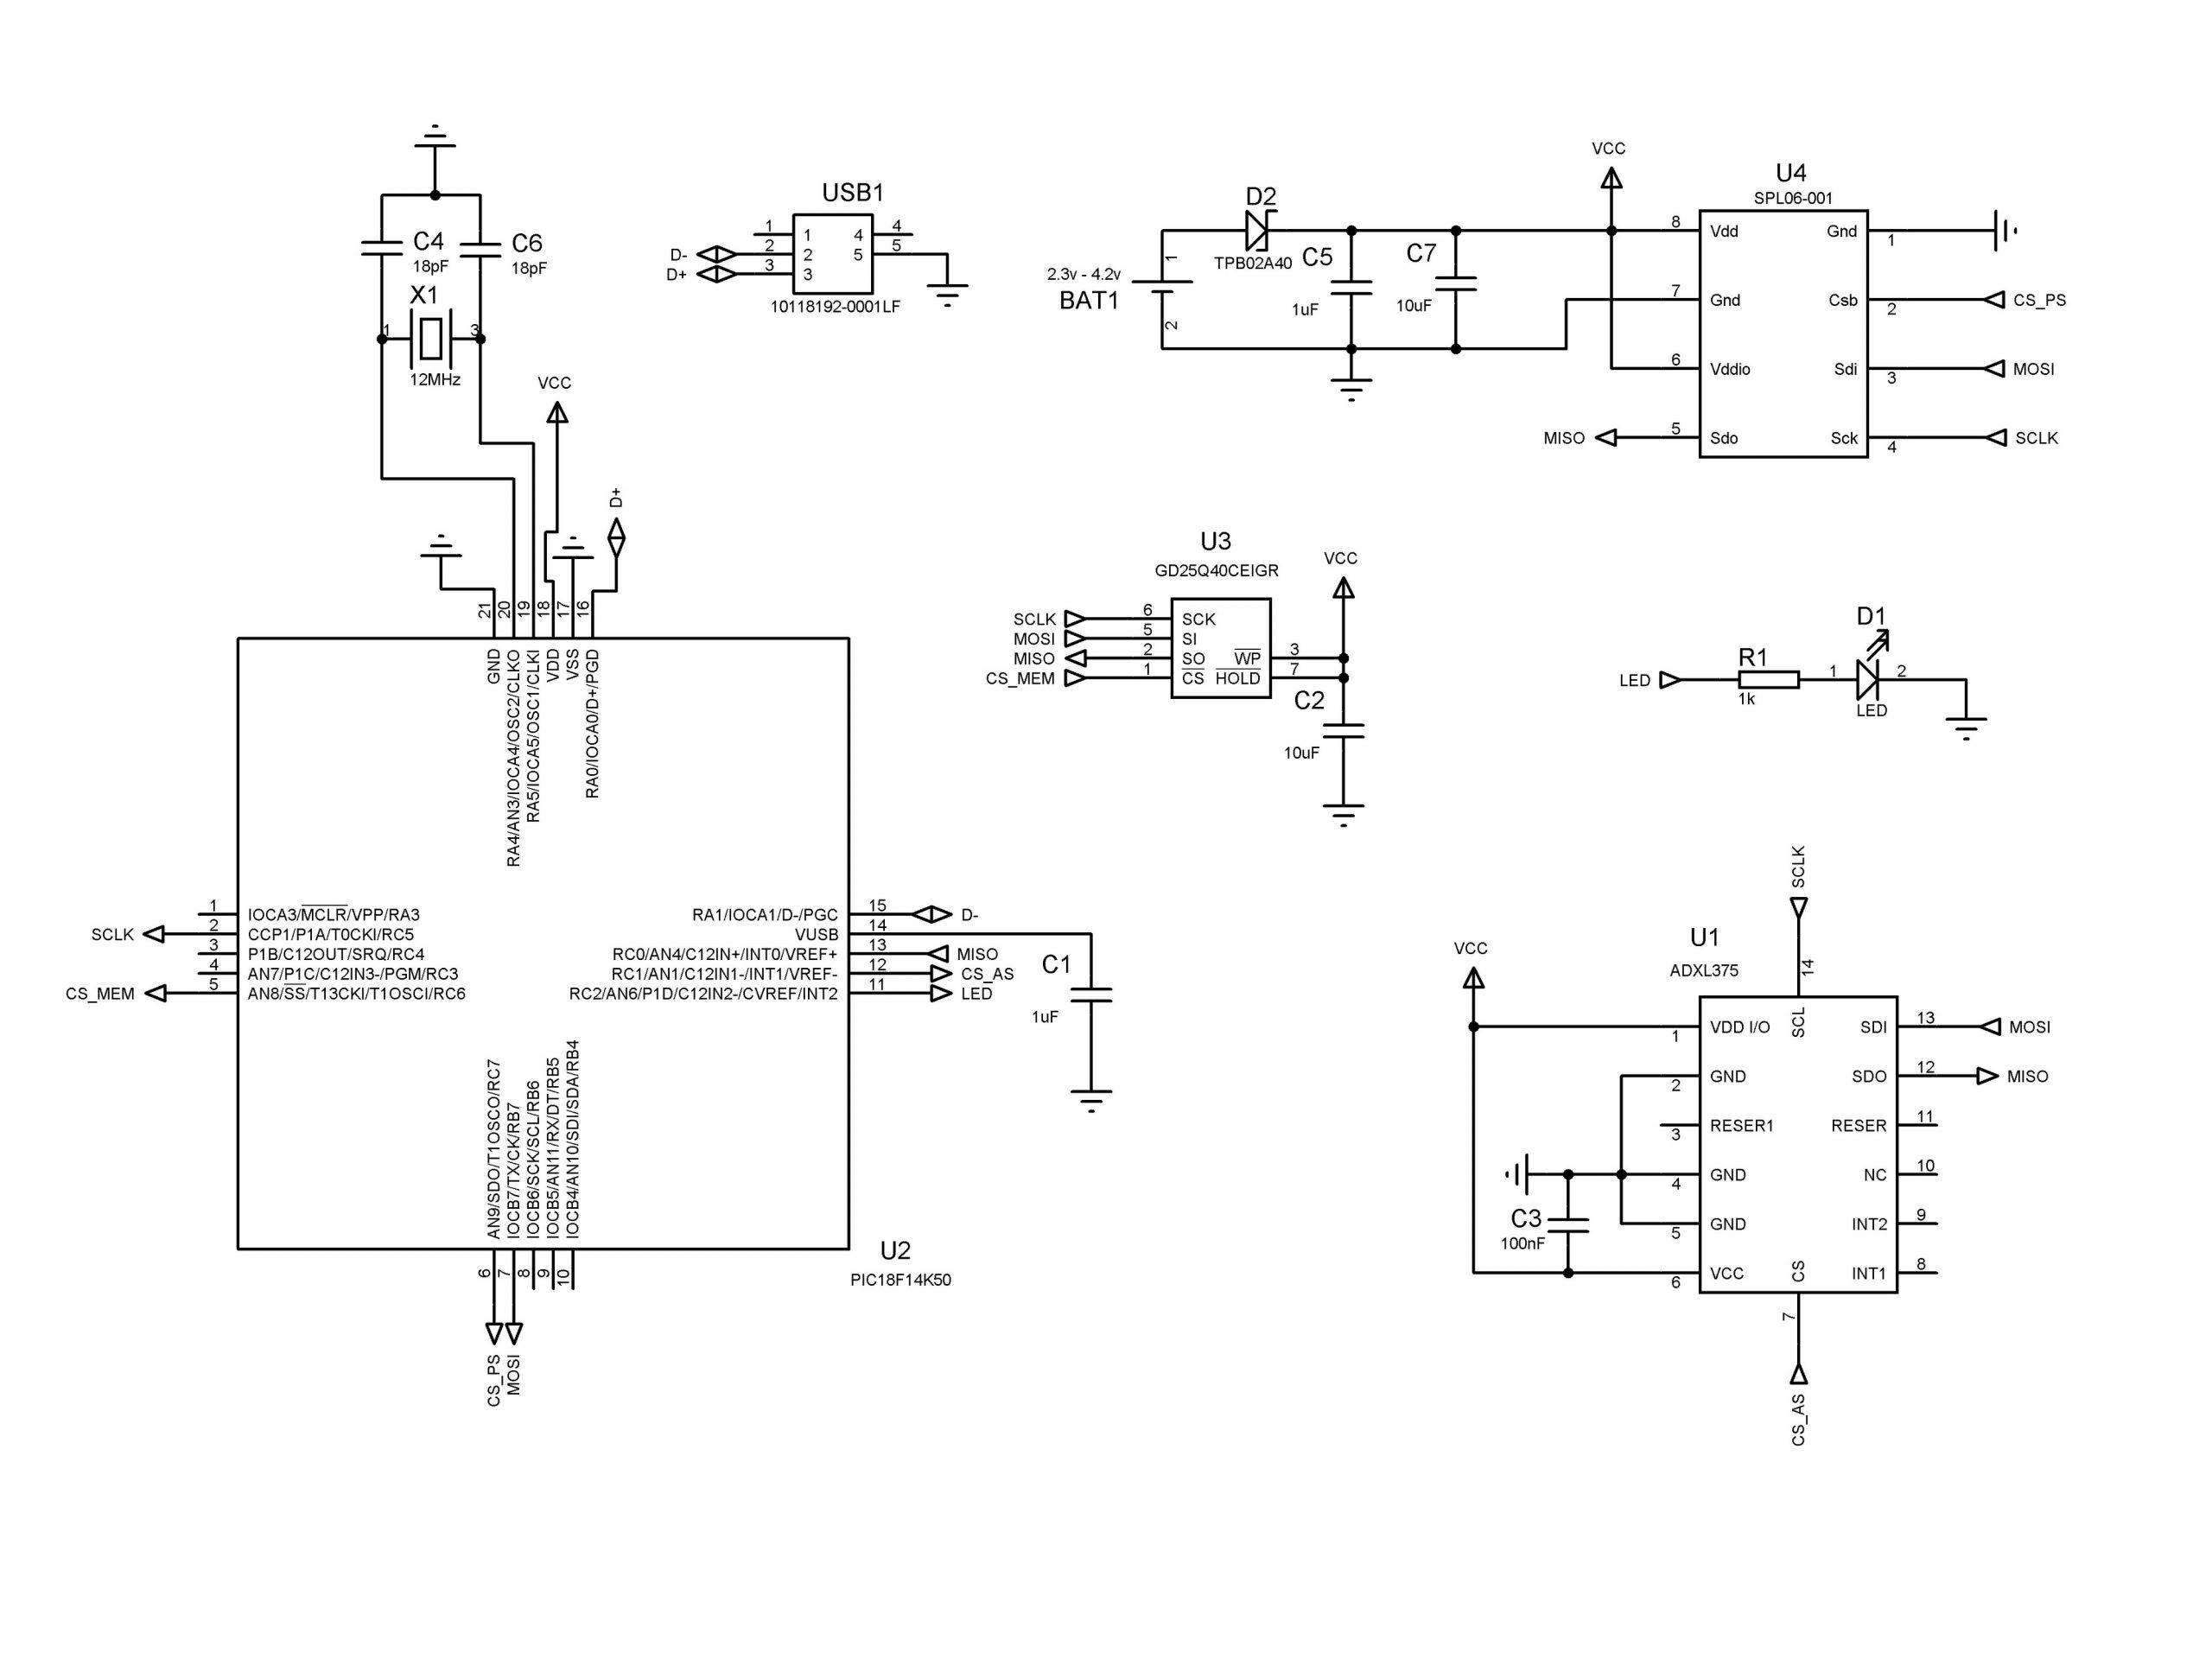
If you decide to build your own MICRO ALTIMETER VEGA you should know that you need to program the microcontroller in MICRO ALTIMETER VEGA with the corresponding Bootloader firmware, which I’ve written and I provide it at the end of this article, before you solder the Microcontroller.
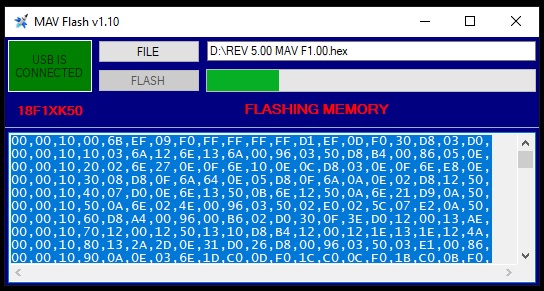
FIRMWARE UPDATE TOOL (MAV Flash)
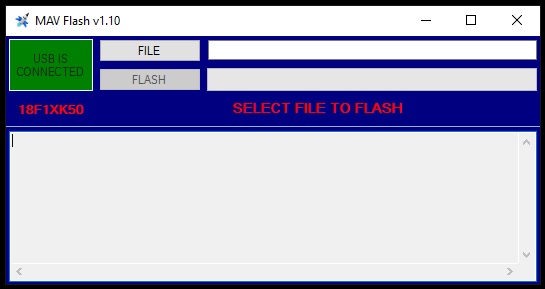
The Bootloader, which allows the Firmware updates via the USB port, is fully protected inside the Microcontroller and can’t be re-written and/or erased. So even if the flashing process is suddenly interrupted for example by a power failure, the device can be re-flashed which makes it virtually impossible to “brick” the MICRO ALTIMETER VEGA with firmware updates.
FIRMWARE UPDATE PROCEDURE:
1. Connect MICRO ALTIMETER VEGA to the PC with the USB cable
2. Start the MAV Flash application
3. Turn on the device
4. Wait until the red indicator turns green and says “USB CONNECTED”
5. Wait until the program indicates “DEVICE RECOGNISED”
6. Click on button FILE and select the firmware file (latest files are included in folder DATA FILES)
7. Wait until data is loaded (a lot of strange digits and letter will appear)
8. Click on button “FLASH” and confirm that you wish to continue
9. Wait until firmware flashing has finished
10. Restart the device by switching it off and back on
11. That’s it flashing is done
Again – don’t worry you can’t “brick” and render MICRO ALTIMETER VEGA inoperable –the Bootloader is protected and if something goes wrong, all you need to do is to re-flash the firmware.
The firmware and the Bootloader were written in POSITRON BASIC compiler for PIC Microcontrollers – excellent inexpensive compiler, written by Les Johnson, with lots of libraries, tools and very friendly and supportive community. Many professional and commercial products operate with firmware written in this language, definitely worth taking a look if you are interested in PIC Microcontrollers.
PC APPLICATIONS
To set-up, download data and visualize it, you will need two additional programs – Service application and User application.
SERVICE APPLICATION (MAV Service)
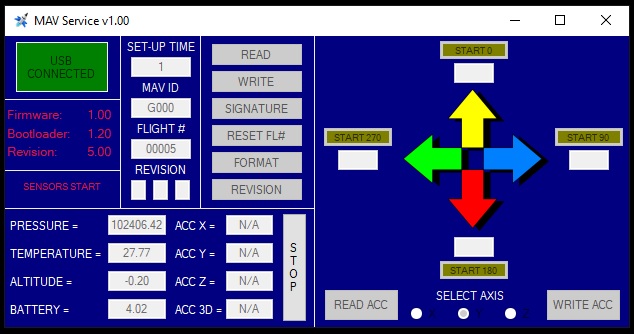 The MAV Service application allows you to set-up and test the MICRO ALTIMETER VEGA sensors.
SET-UP TIME – idle period in minutes, before the MICRO ALTIMETER VEGA starts recording data
MAV ID – MICRO ALTIMETER VEGA 4 symbol ID code (can be changed)
FLIGHT # – total number of flights recorded thus far by MICRO ALTIMETER VEGA (can reset)
READ – Read the current settings
WRITE – update the MICRO ALTIMETER VEGA Set-up time and ID
SIGNATURE – will record a unique digital signature in a separate memory space that can be used to verify against the device ID code in order to prevent forgery in competitions as per FAI requirements. This signature is based on random noise from the sensors and cannot be falsified. At the beginning of every flight record, this signature is being copied in the flight data header.
RESET FL# – will reset the flight count number
FORMAT – Format memory. To prevent data loss, new data records can be written in memory only after memory format, which can be initiated only through the USB interface
REVISION – Not available in MAV Service application, but in MAV Admin application and it is used to set up the revision version in brand new devices
START/STOP – Start displaying real time sensor data, useful to test the sensors
*SELECT AXIS – Select sensor axis to read/write
*READ ACC – Read the calibration coefficients for the axis previously selected
*START0 – Click to obtain the accelerometer’s 0-degrees coefficient for the selected axis. Device should be in the position, shown on the picture. Once the coefficient has been fixed, click again to stop. Value can be entered manually too.
*START90 – Click to obtain the accelerometer’s 90-degrees coefficient for the selected axis. Device should be in the position, shown on the picture. Once the coefficient has been fixed, click again to stop. Value can be entered manually too.
*START180 – Click to obtain the accelerometer’s 180-degrees coefficient for the selected axis. Device should be in the position, shown on the picture. Once the coefficient has been fixed, click again to stop. Value can be entered manually too.
*START270 – Click to obtain the accelerometer’s 270-degrees coefficient for the selected axis. Device should be in the position, shown on the picture. Once the coefficient has been fixed, click again to stop. Value can be entered manually too.
*WRITE ACC – Write the calibration coefficients for the axis previously selected
* Available only to MICRO ALTIMETER VEGA revisions with 3D acceleration sensors
USER APPLICATION (MAV User)
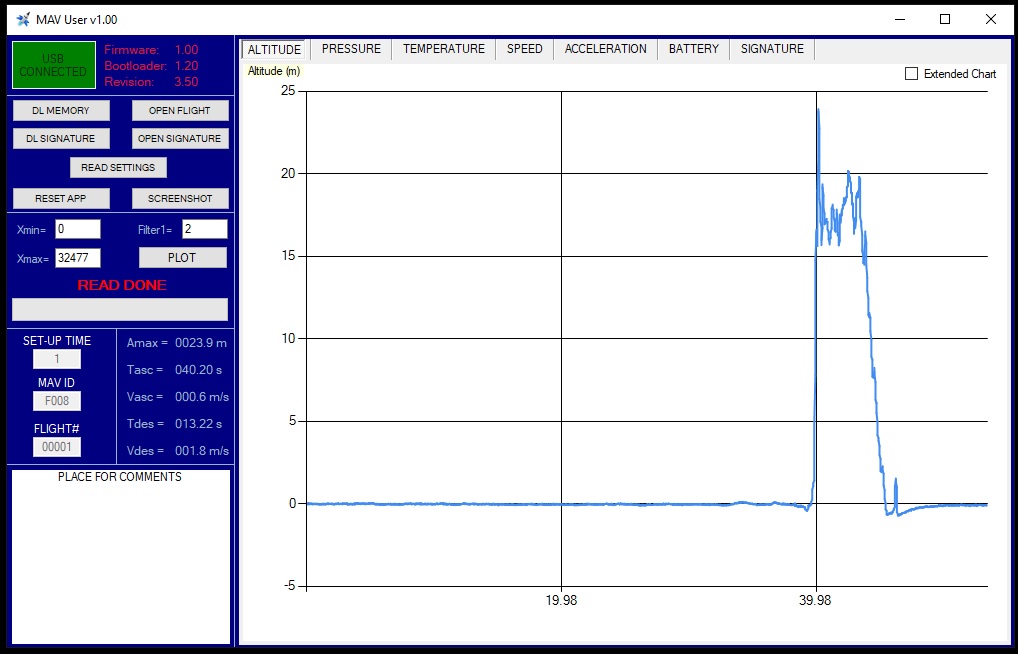
The user application is used for flight data downloading and visualization. Brief explanation how it works:
DL MEMORY – download the flight data and create a data file
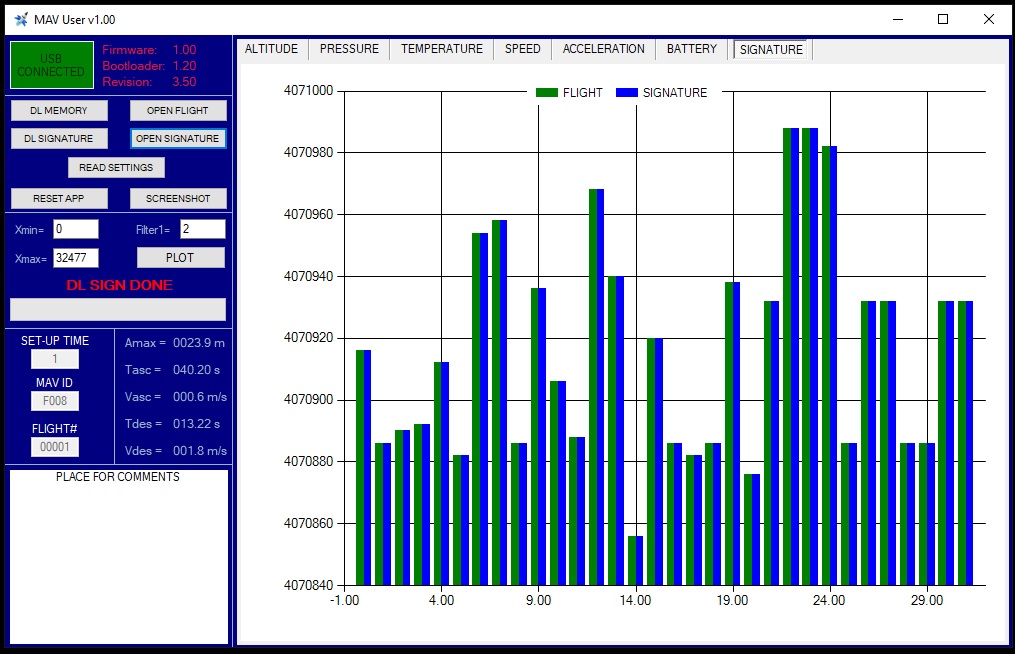
DL SIGNATURE – download and create a data file with the digital signature that can be used to verify against the device ID code in order to prevent forgery in competitions as per FAI requirements. This signature is based on random noise from the sensors and cannot be falsified. At the beginning of every flight record, this signature is being copied in the flight data header.
 OPEN FLIGHT – open the flight data file for visualization
OPEN SIGNATURE – open signature file to display and compare with the signature recorded in the flight data
READ SETTINGS – display the MAV ID and SET-UP TIME
RESET APP – reset the application
SCREENSHOT – takes a screenshot for archive purposes
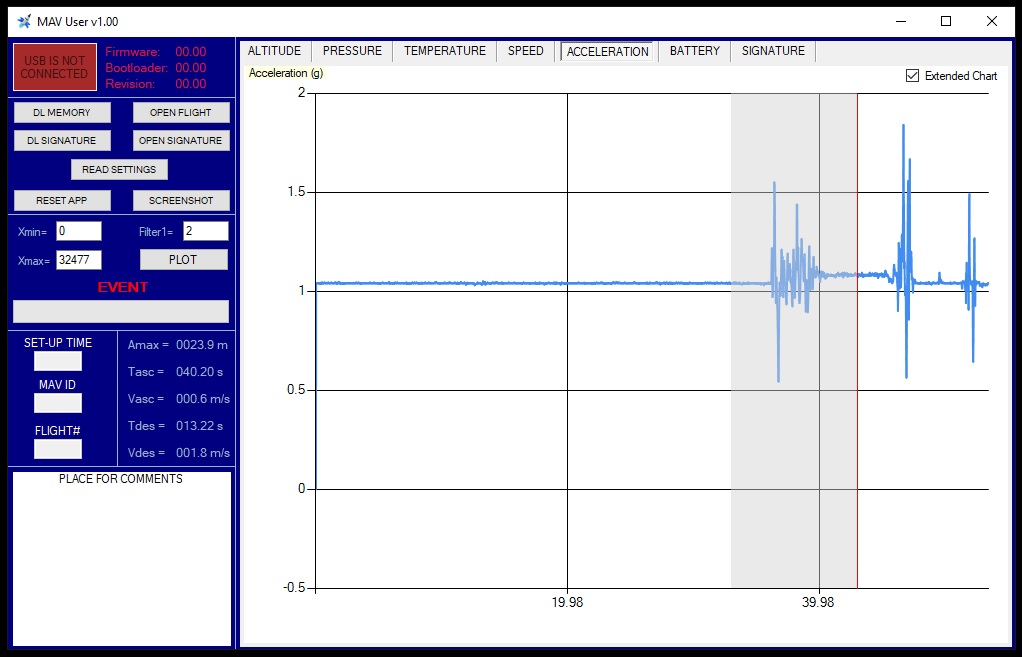
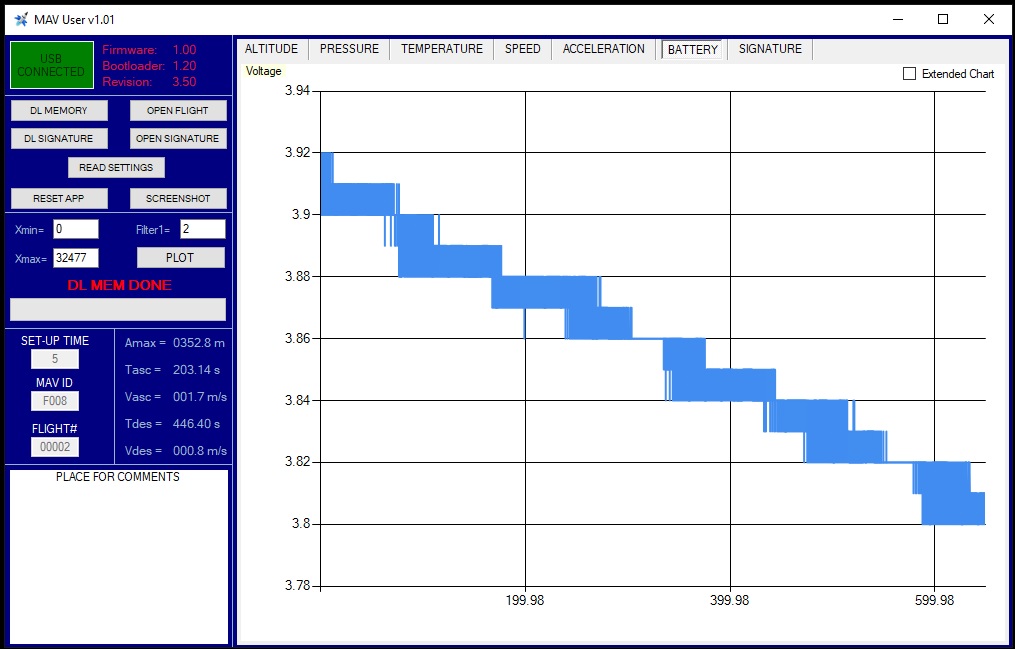
The USER APP will display various sensor data contained in the flight data file. There you will have information about the raw pressure, temperature, acceleration and voltage data, as well as some calculated data like altitude and 3D acceleration.
– Altitude is represented as absolute altitude, calculated using the barometric formula and the temperature sensor data. Therefore you can use any other spreadsheet software to display the data.
– When displaying the altitude in my application, it is displayed as relative altitude with respect to the absolute altitude in the first data point selected (Xmin). Therefore make sure you selected the correct flight start and stop points (Xmin and Xmax)
– Acceleration is being derived from the altitude change in devices without 3D sensor data and can be noisy because of the double derivative
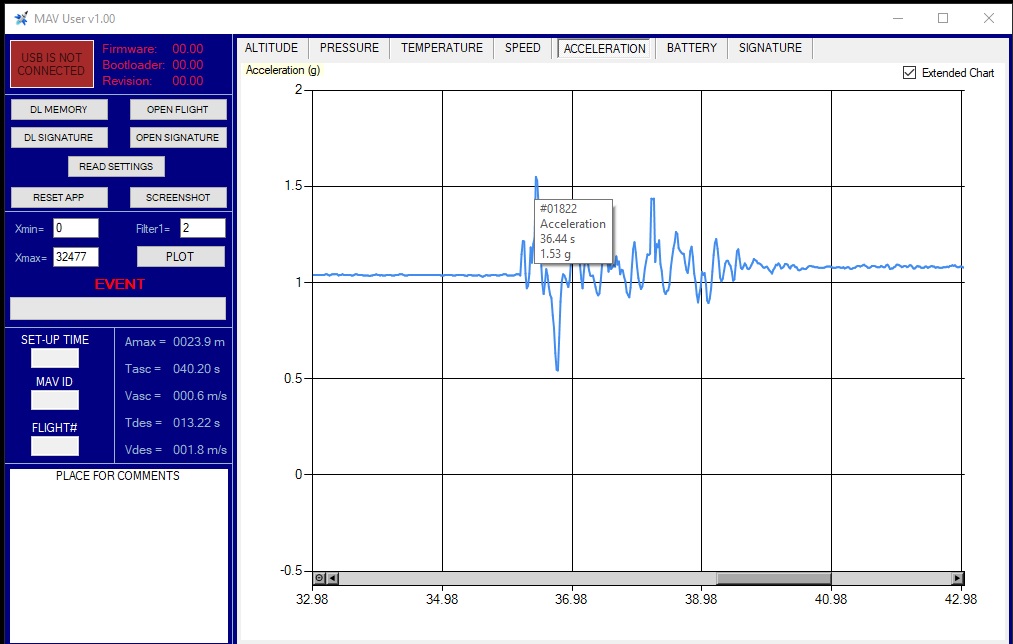
– “Extended Chart” mark will enable additional data to be displayed when hoovering over the chart points, however using this future for large data sets could cause temporary application freeze until the data is being calculated
– If you left click and hold over the chart and drag the mouse you can zoom in the chart
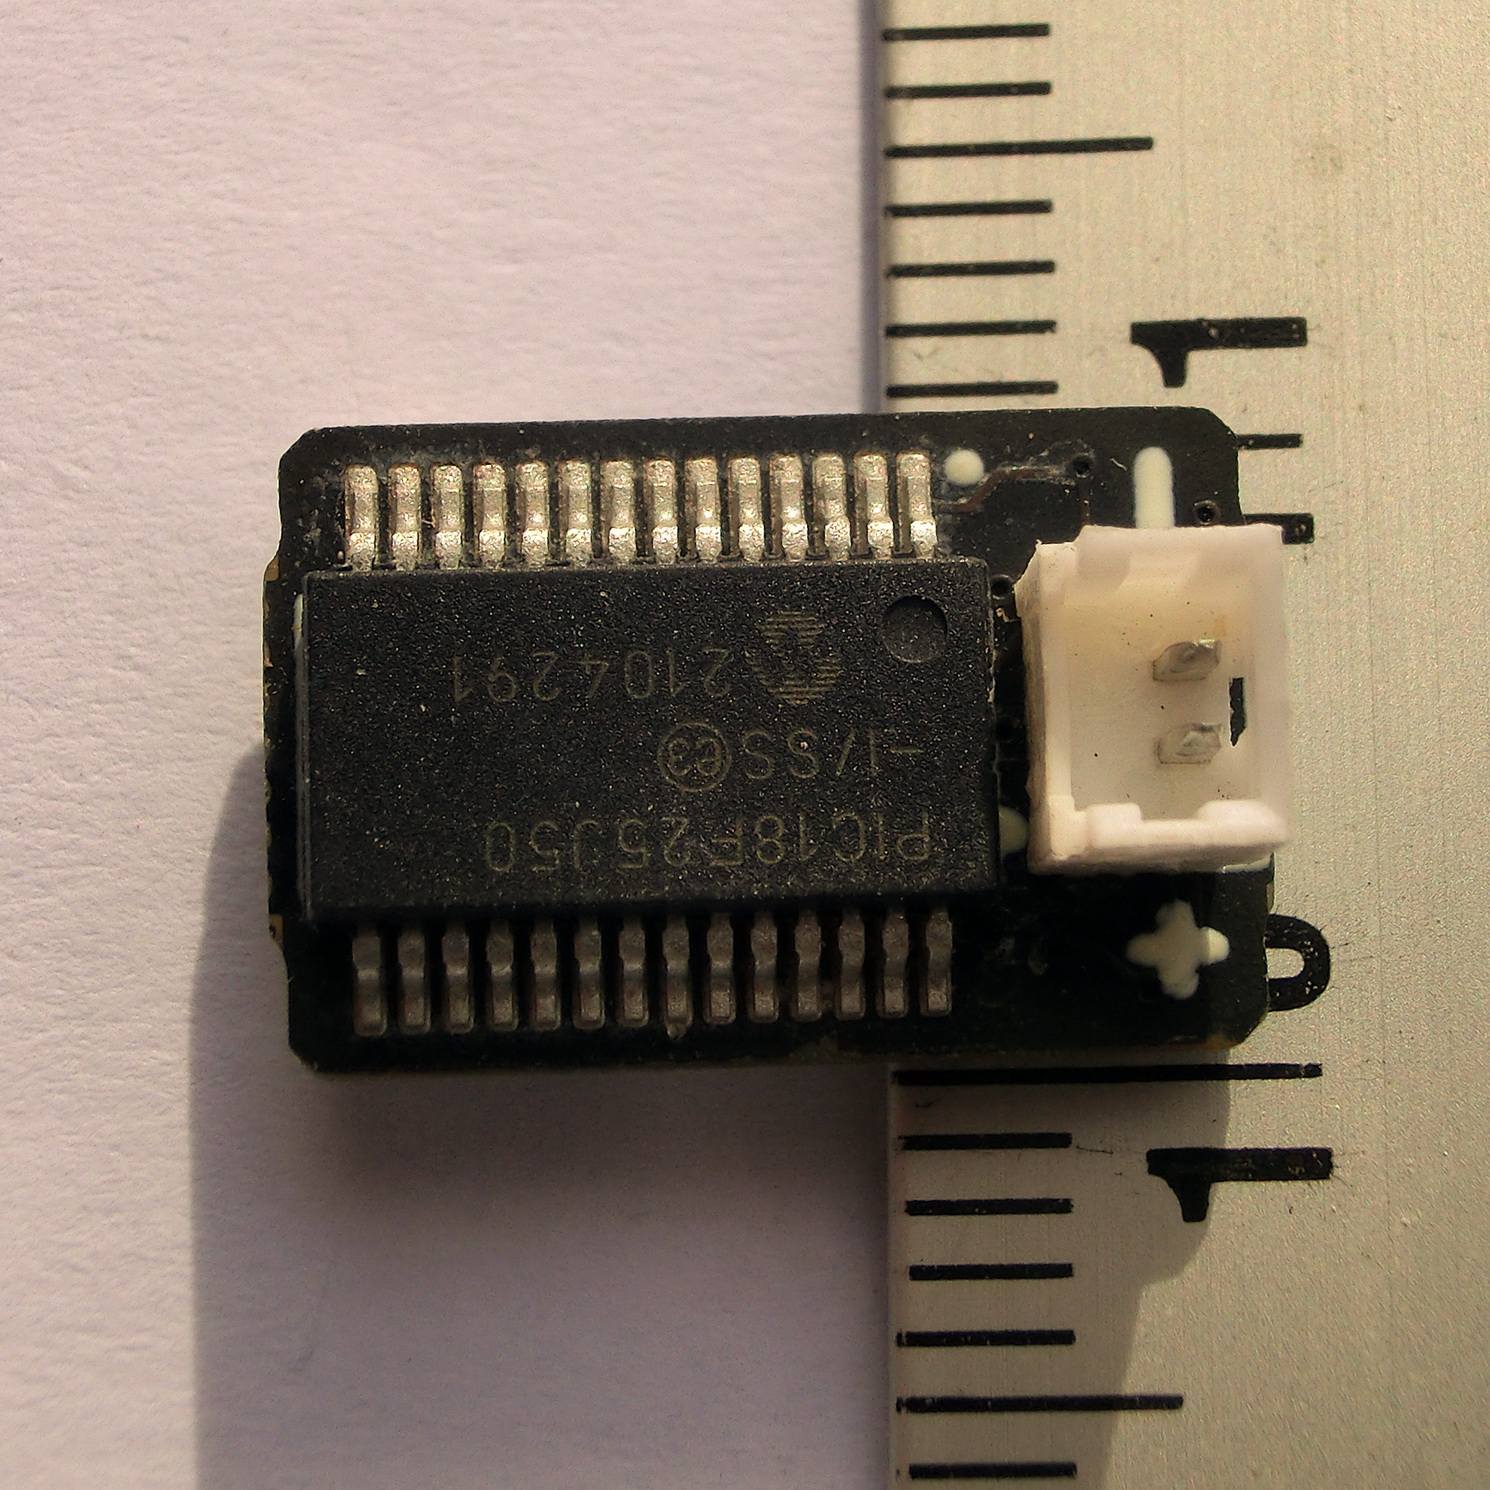
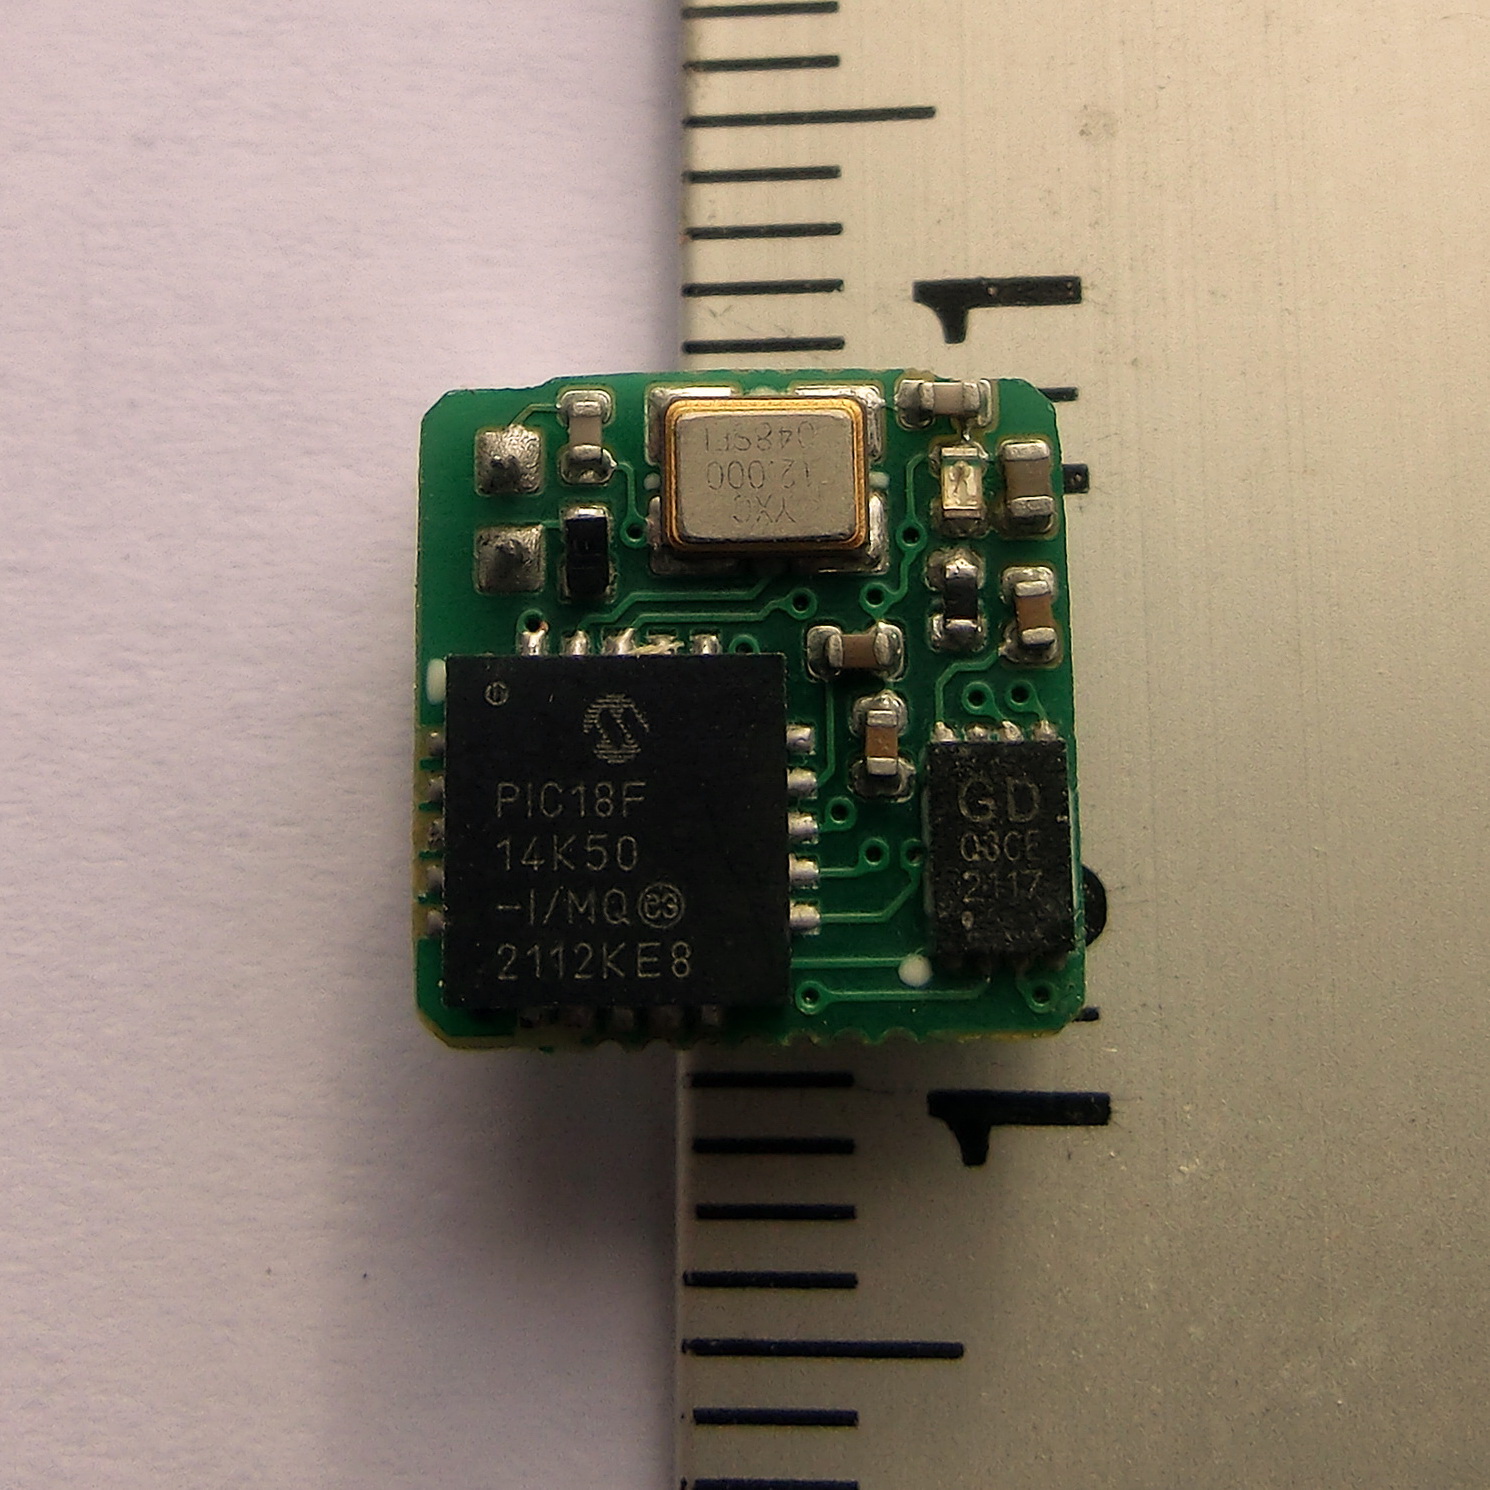
I hope these excellent small devices to be of help to the rocket enthusiasts. You can build those by yourself however this will require some soldering skills. In general I order a prototype panel at JLCPCB where they do one-side SMT assembly for the passives too and then I solder the Microcontroller, USB and few other large components, depending on design. Keep in mind that the Microcontrollers have to be pre-programmed with the USB bootloader firmware by using a programming tool like PickIt3 and then you can solder them.
The 3D acceleration sensor can be used to approximate the thrust curve. The sensor position is not important since the individual axis are not of interest, but their vector sum will give the thrust vector (and inertial forces) produced by the engine.
BATTERIES
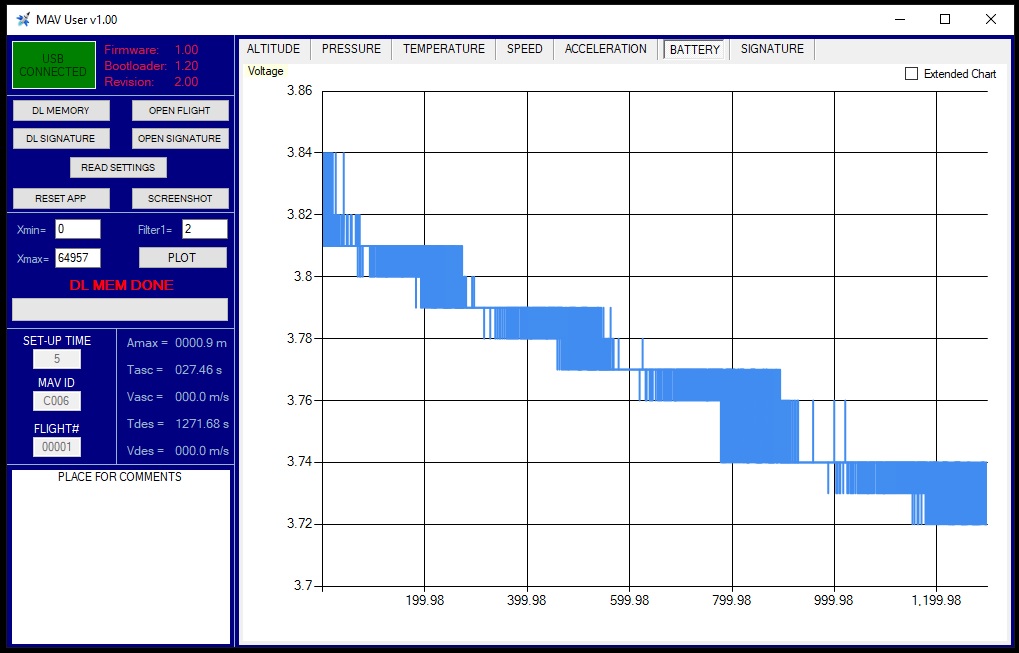
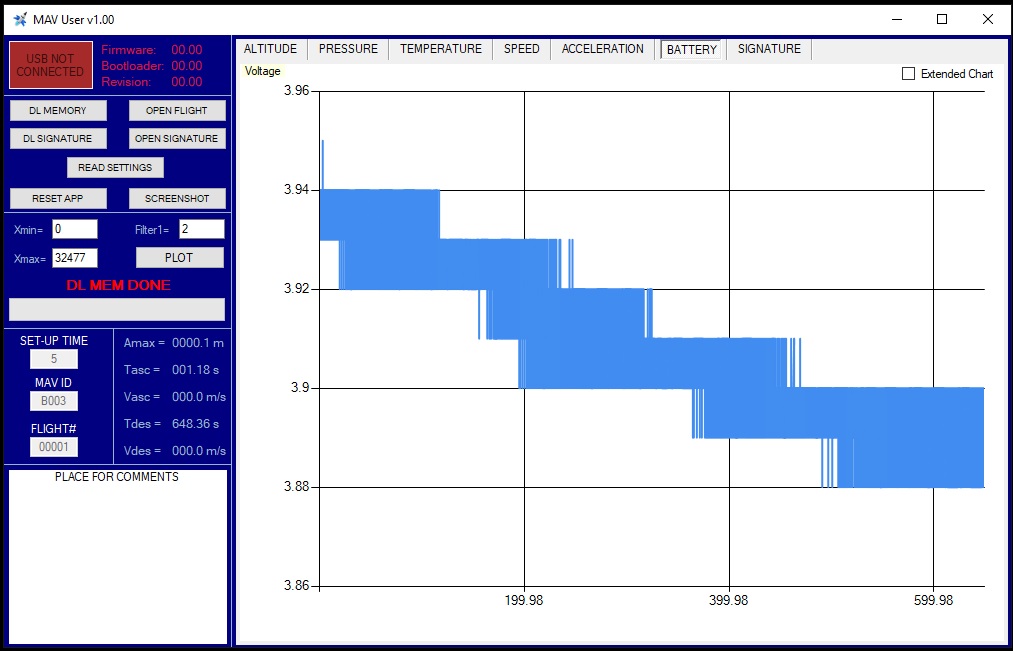
A question was raised by one fellow rocket enthusiast, namely what would be a sufficient capacity for the LiPo battery? I tested all altimeter versions (including with accelerometers) with a 40mAh LiPo battery, weighting 1.07gr. Those are the smallest batteries I could find. Maybe there exist 10mAh or 20mAh but I couldn’t find such. 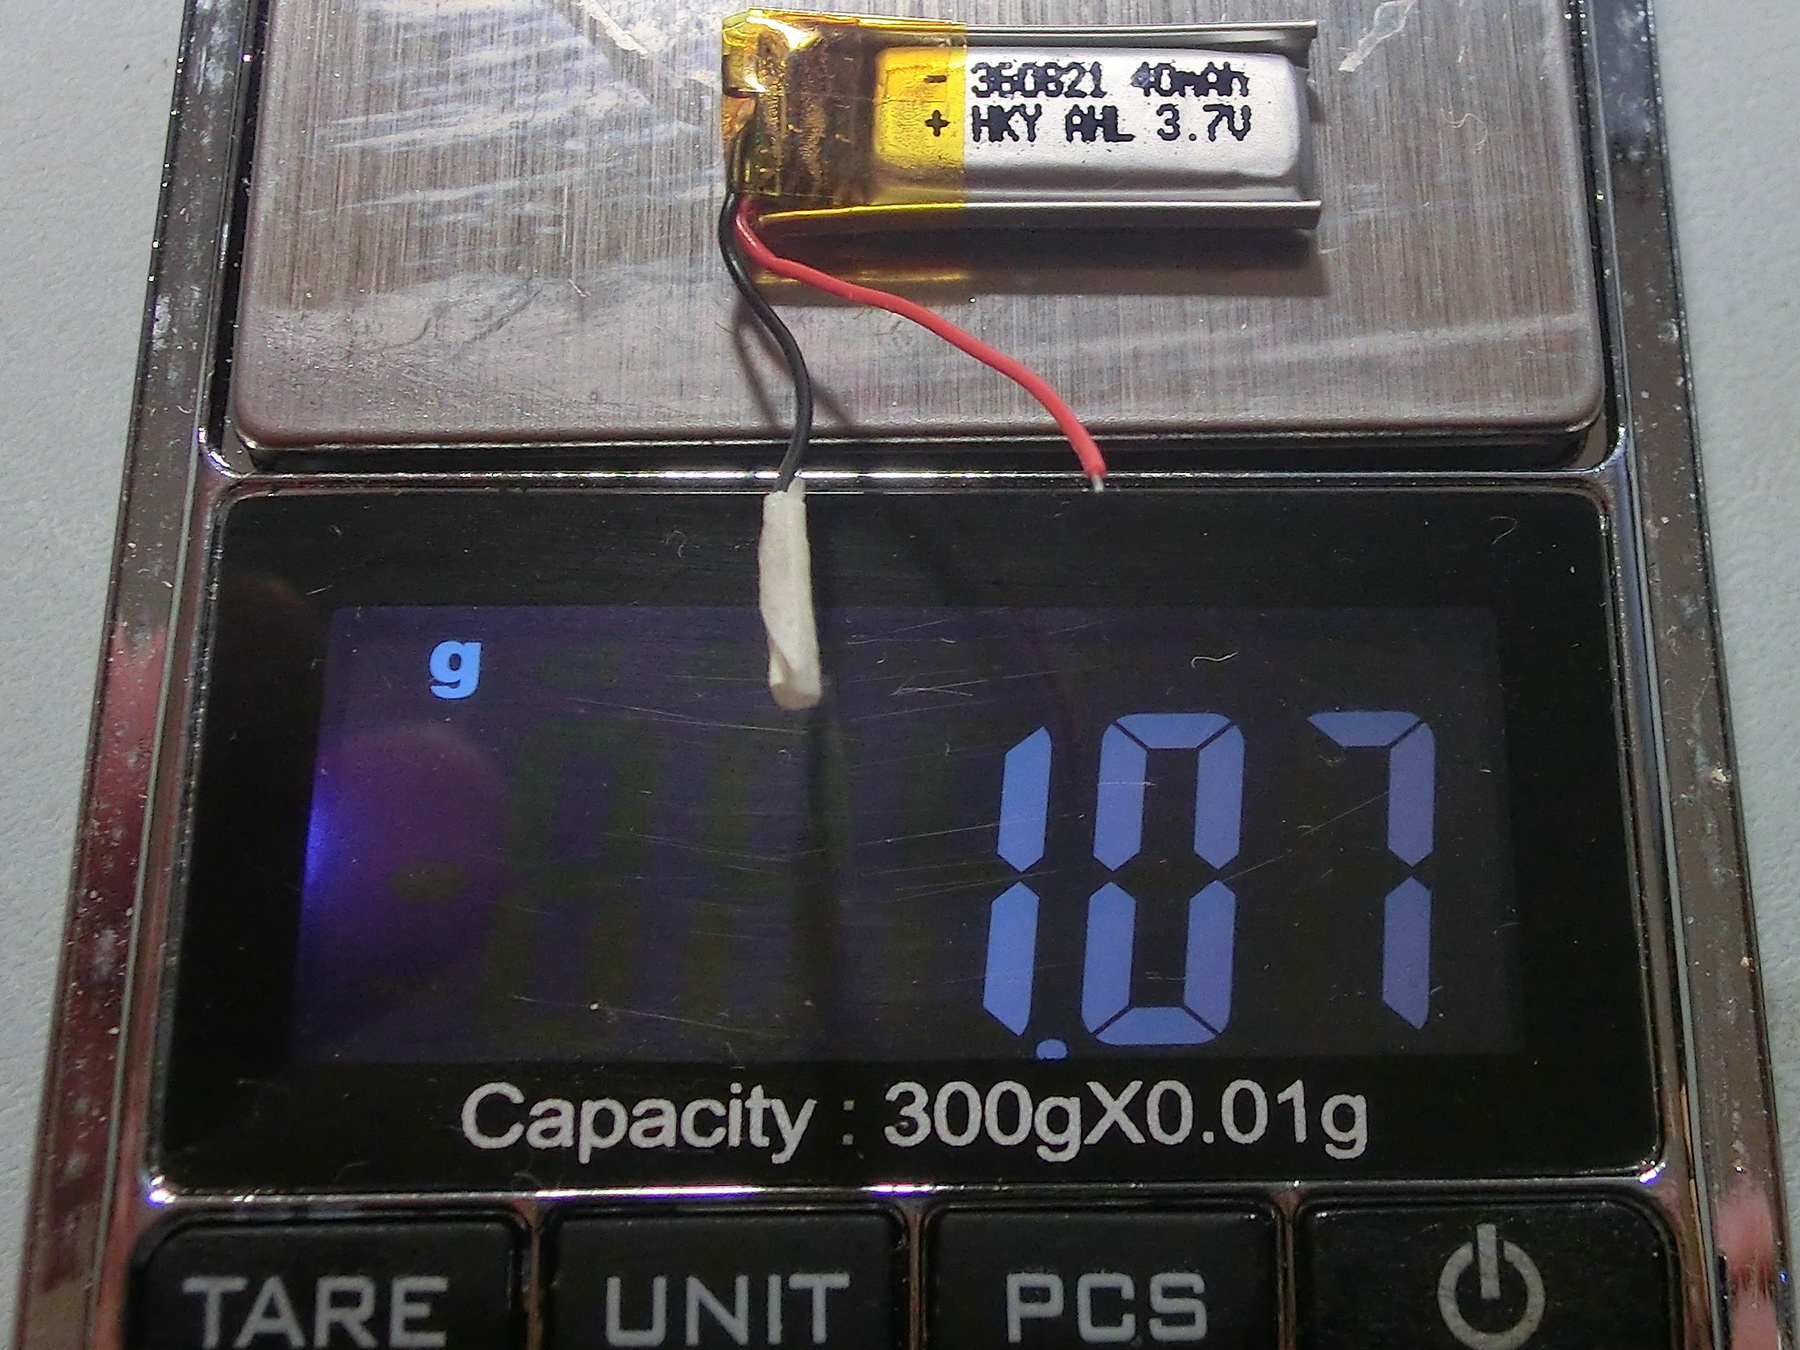 Test conditions were as follow: 5 minutes “PREPARATION TIME” (idling before starting data record) and running until the memory is full. Each time the battery was pre-charged to about 3.9v.
As you can see, each record was roughly 10 minutes and 20 minutes, depending on the altimeter revision and the voltage drop in the battery was between 0.1 and 0.2 volts for the total recording time.
Initially I was considering special energy saving methods to reduce the current consumption to minimum but it proved not necessary. If I can find 10mAh batteries I test how do they behave and if necessary will implement the energy saving modes if it makes sense.

20 mA LiPo BATTERIES (UPDATE)
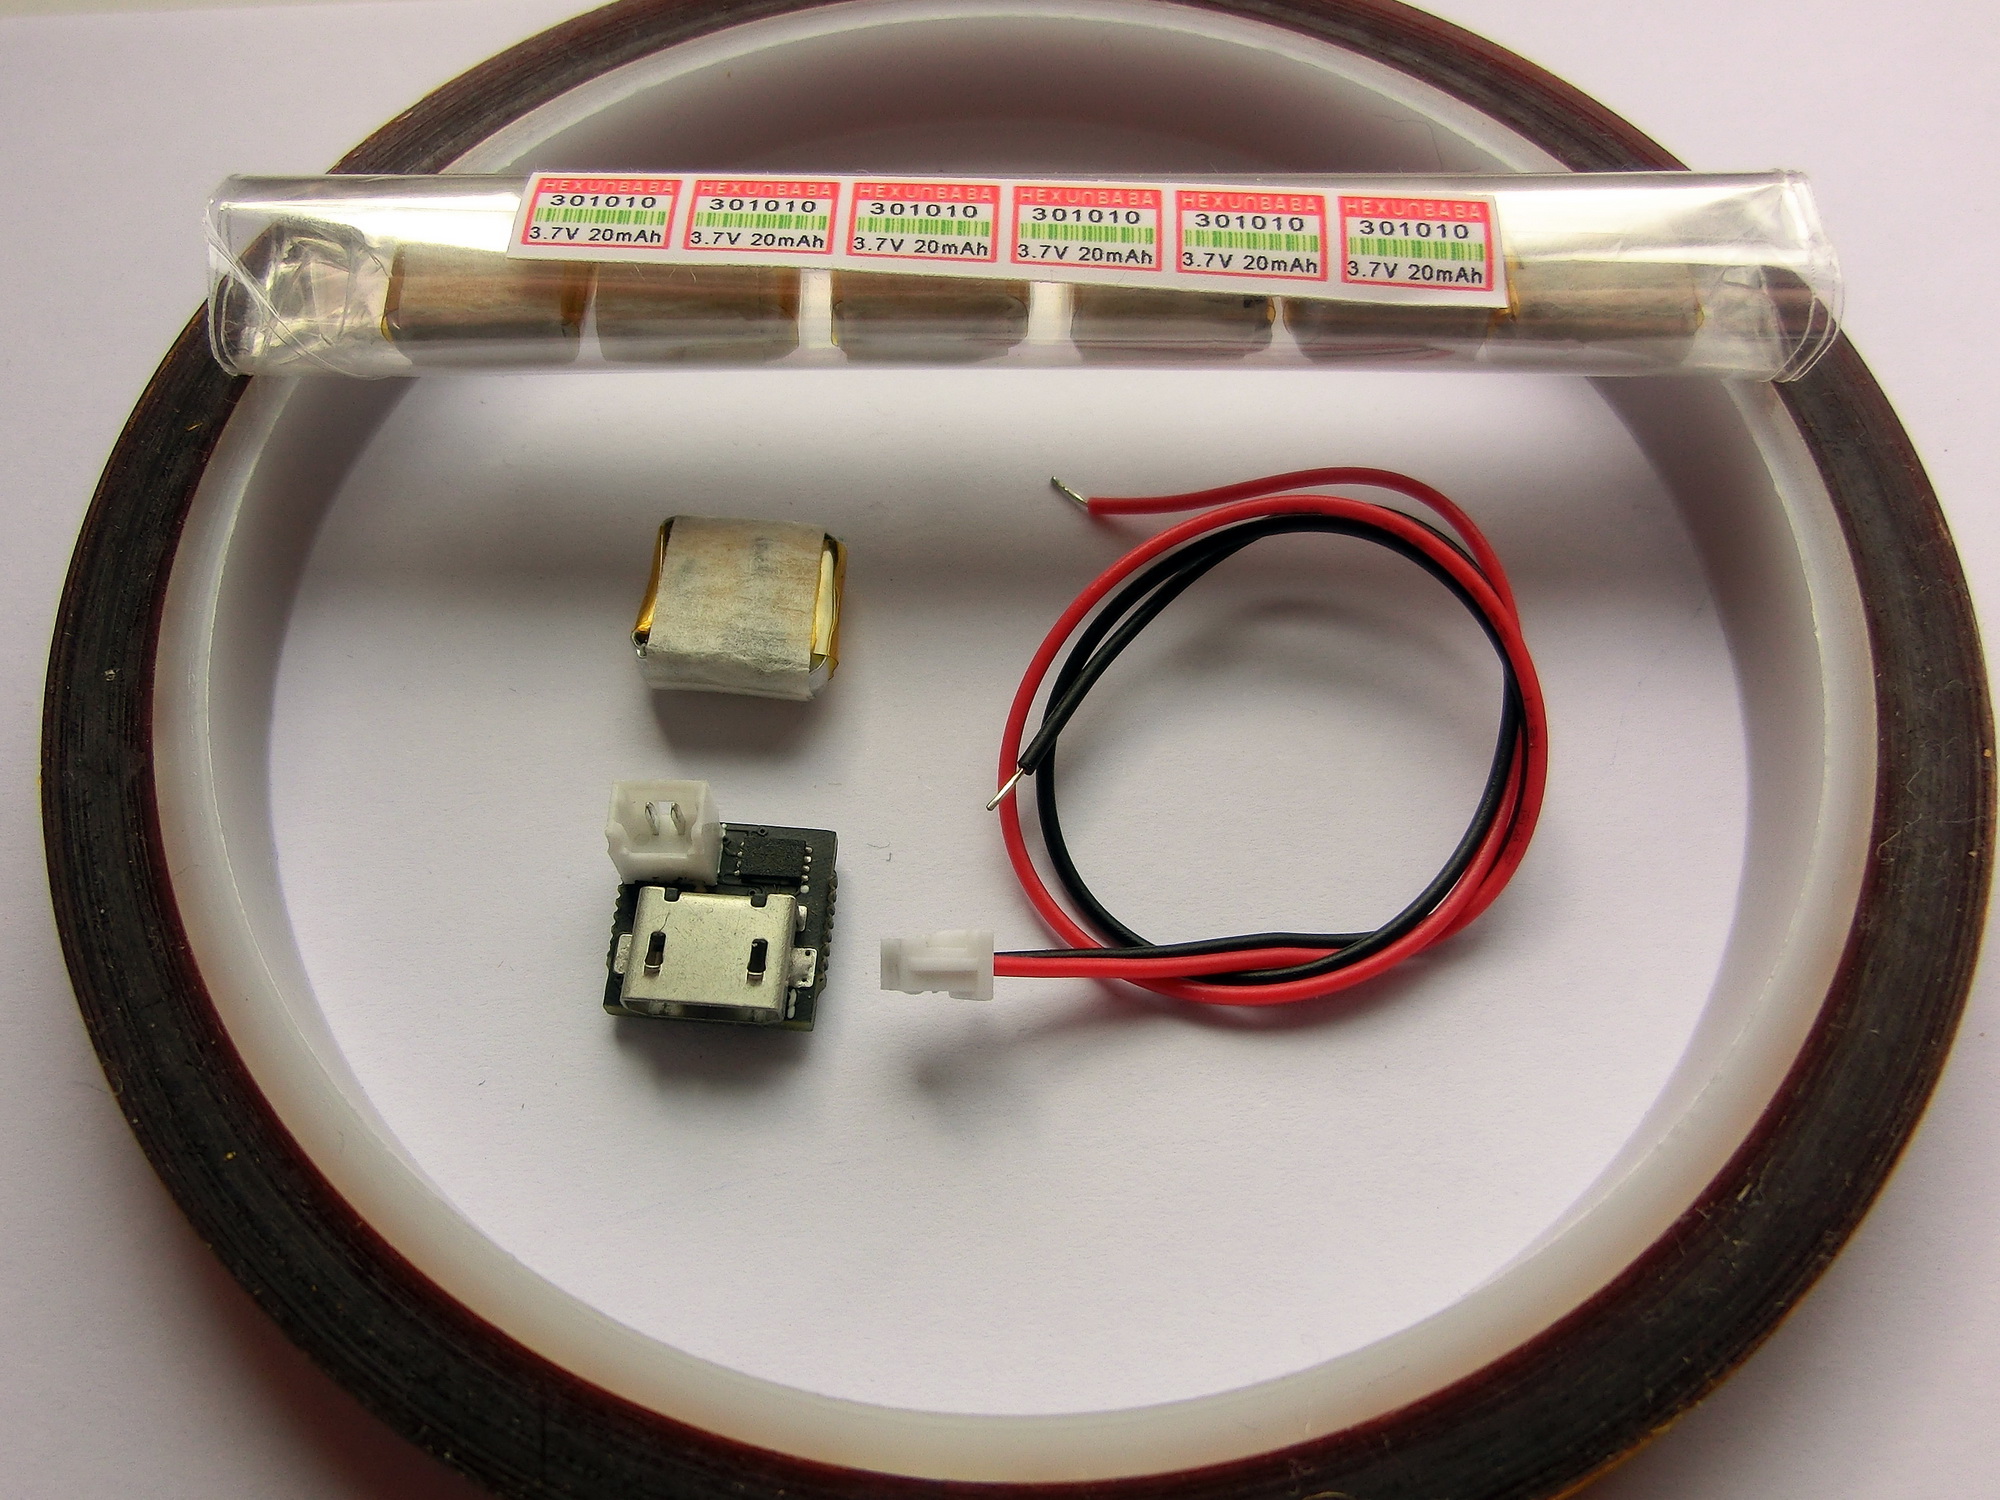
 I found on Aliexpress inexpensive 20 mA batteries with the designation 301010 which is 10x10x3 millimeters and weight only 0.8 grams. Those batteries are perfect for the micro altimeters. The size and weight of the battery is comparable with the devices themselves.
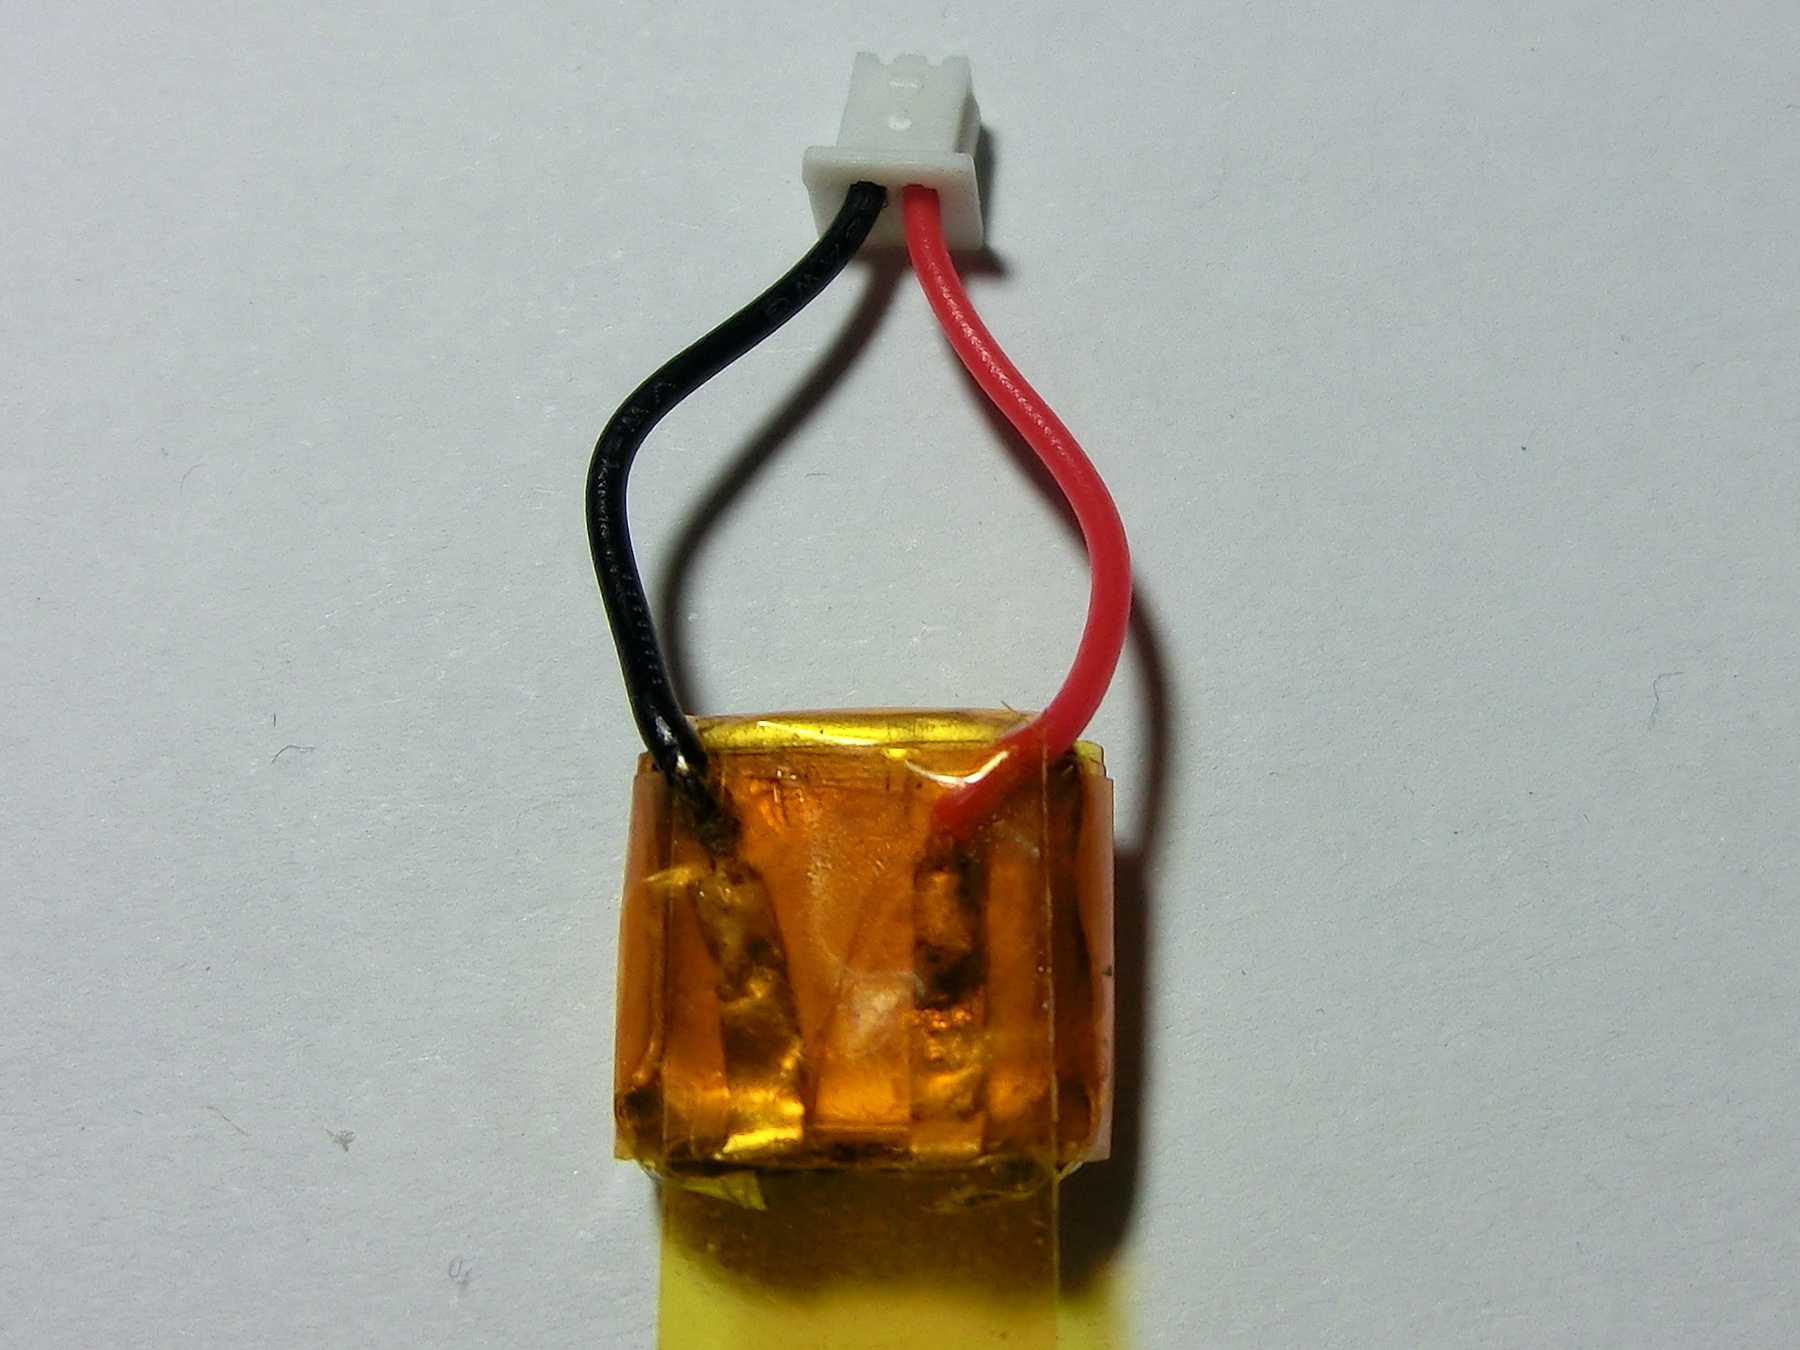
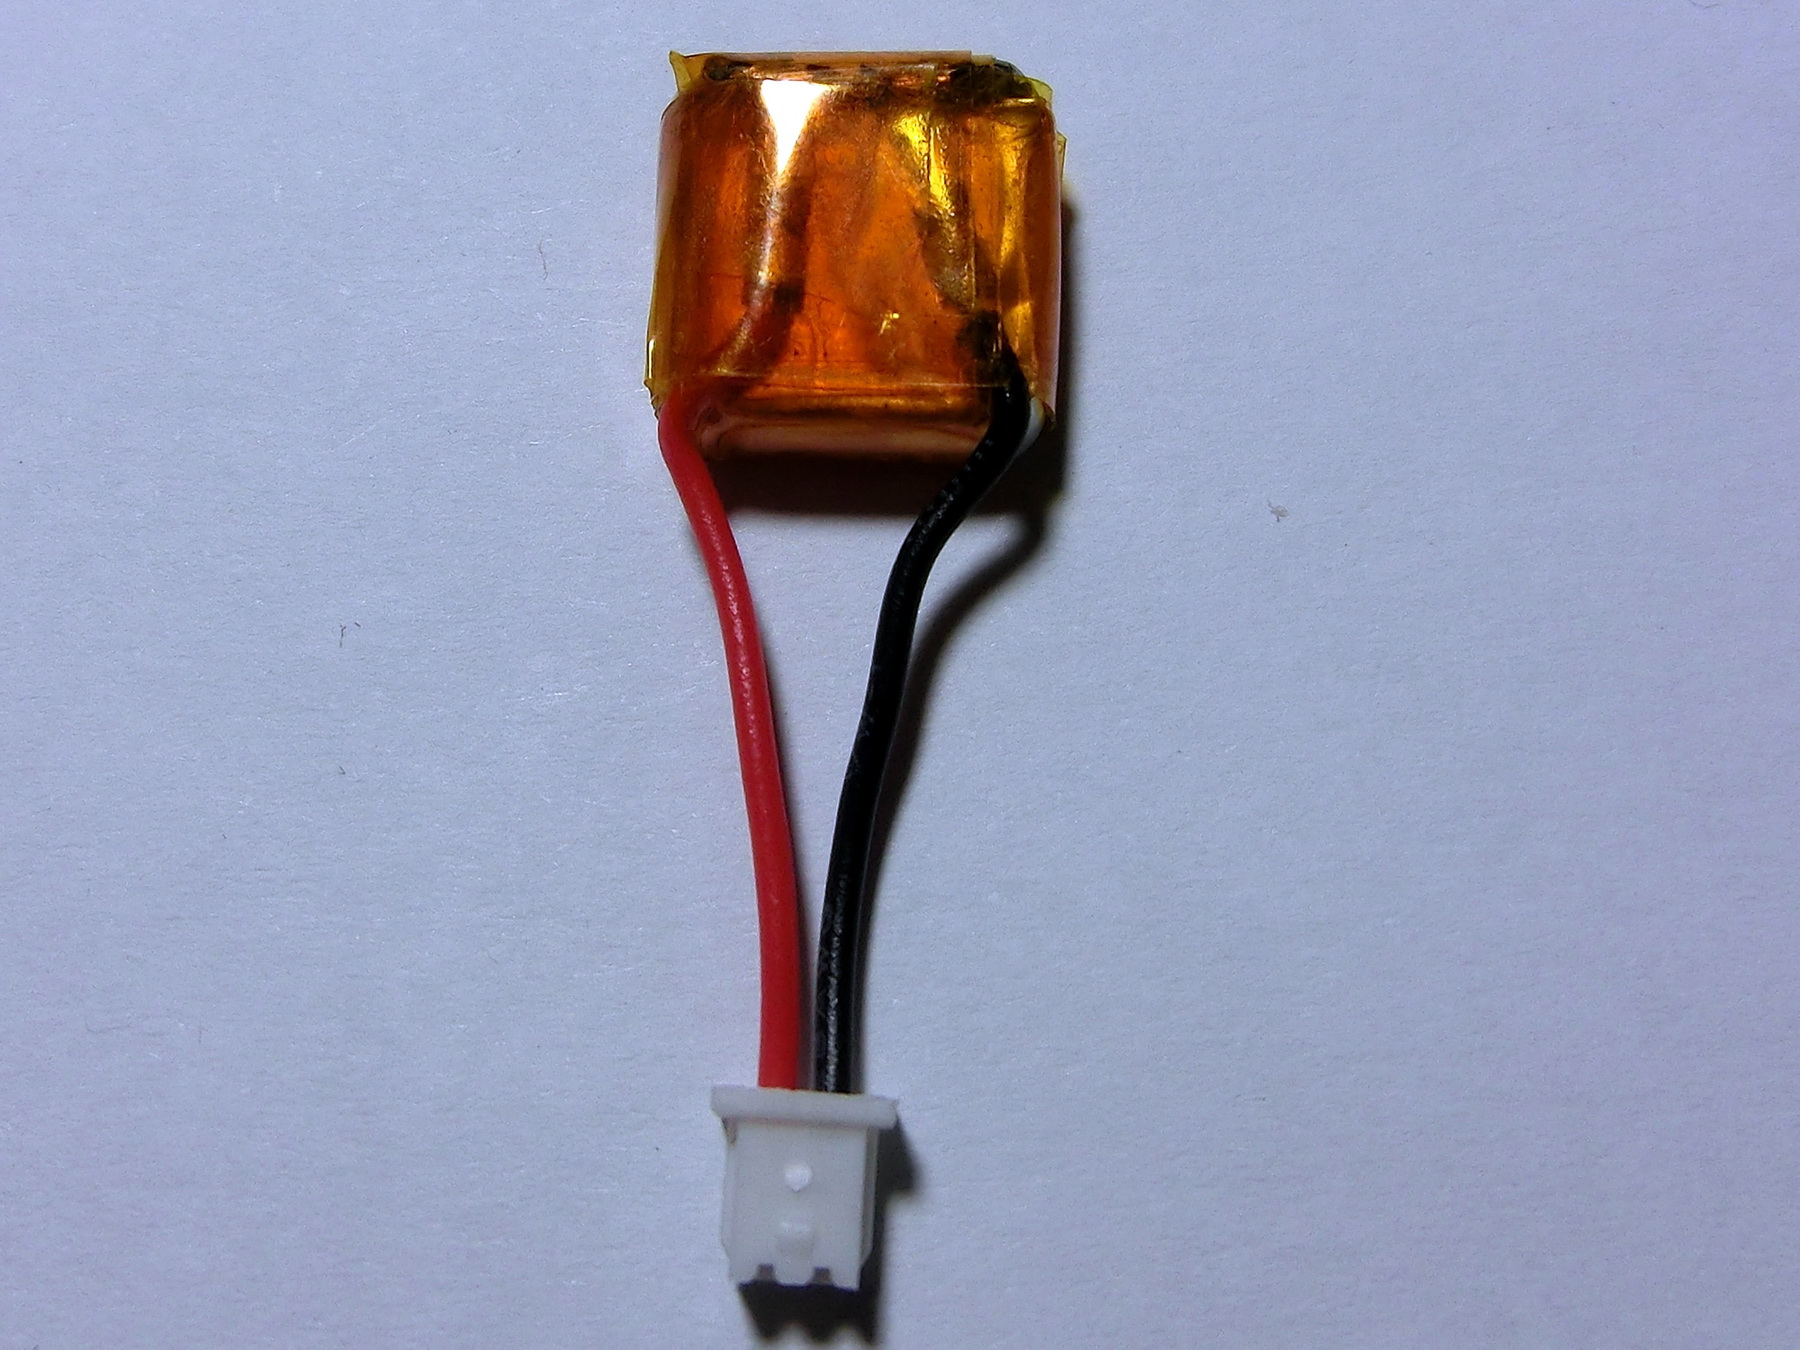
Unfortunately these batteries need some work, they come without any cables attached, so I had to do it myself. All I need in addition is some Kapton tape (polyimide film with silicone adhesive) of the right size i.e. about 8 mm width, which is also available on Aliexpress.
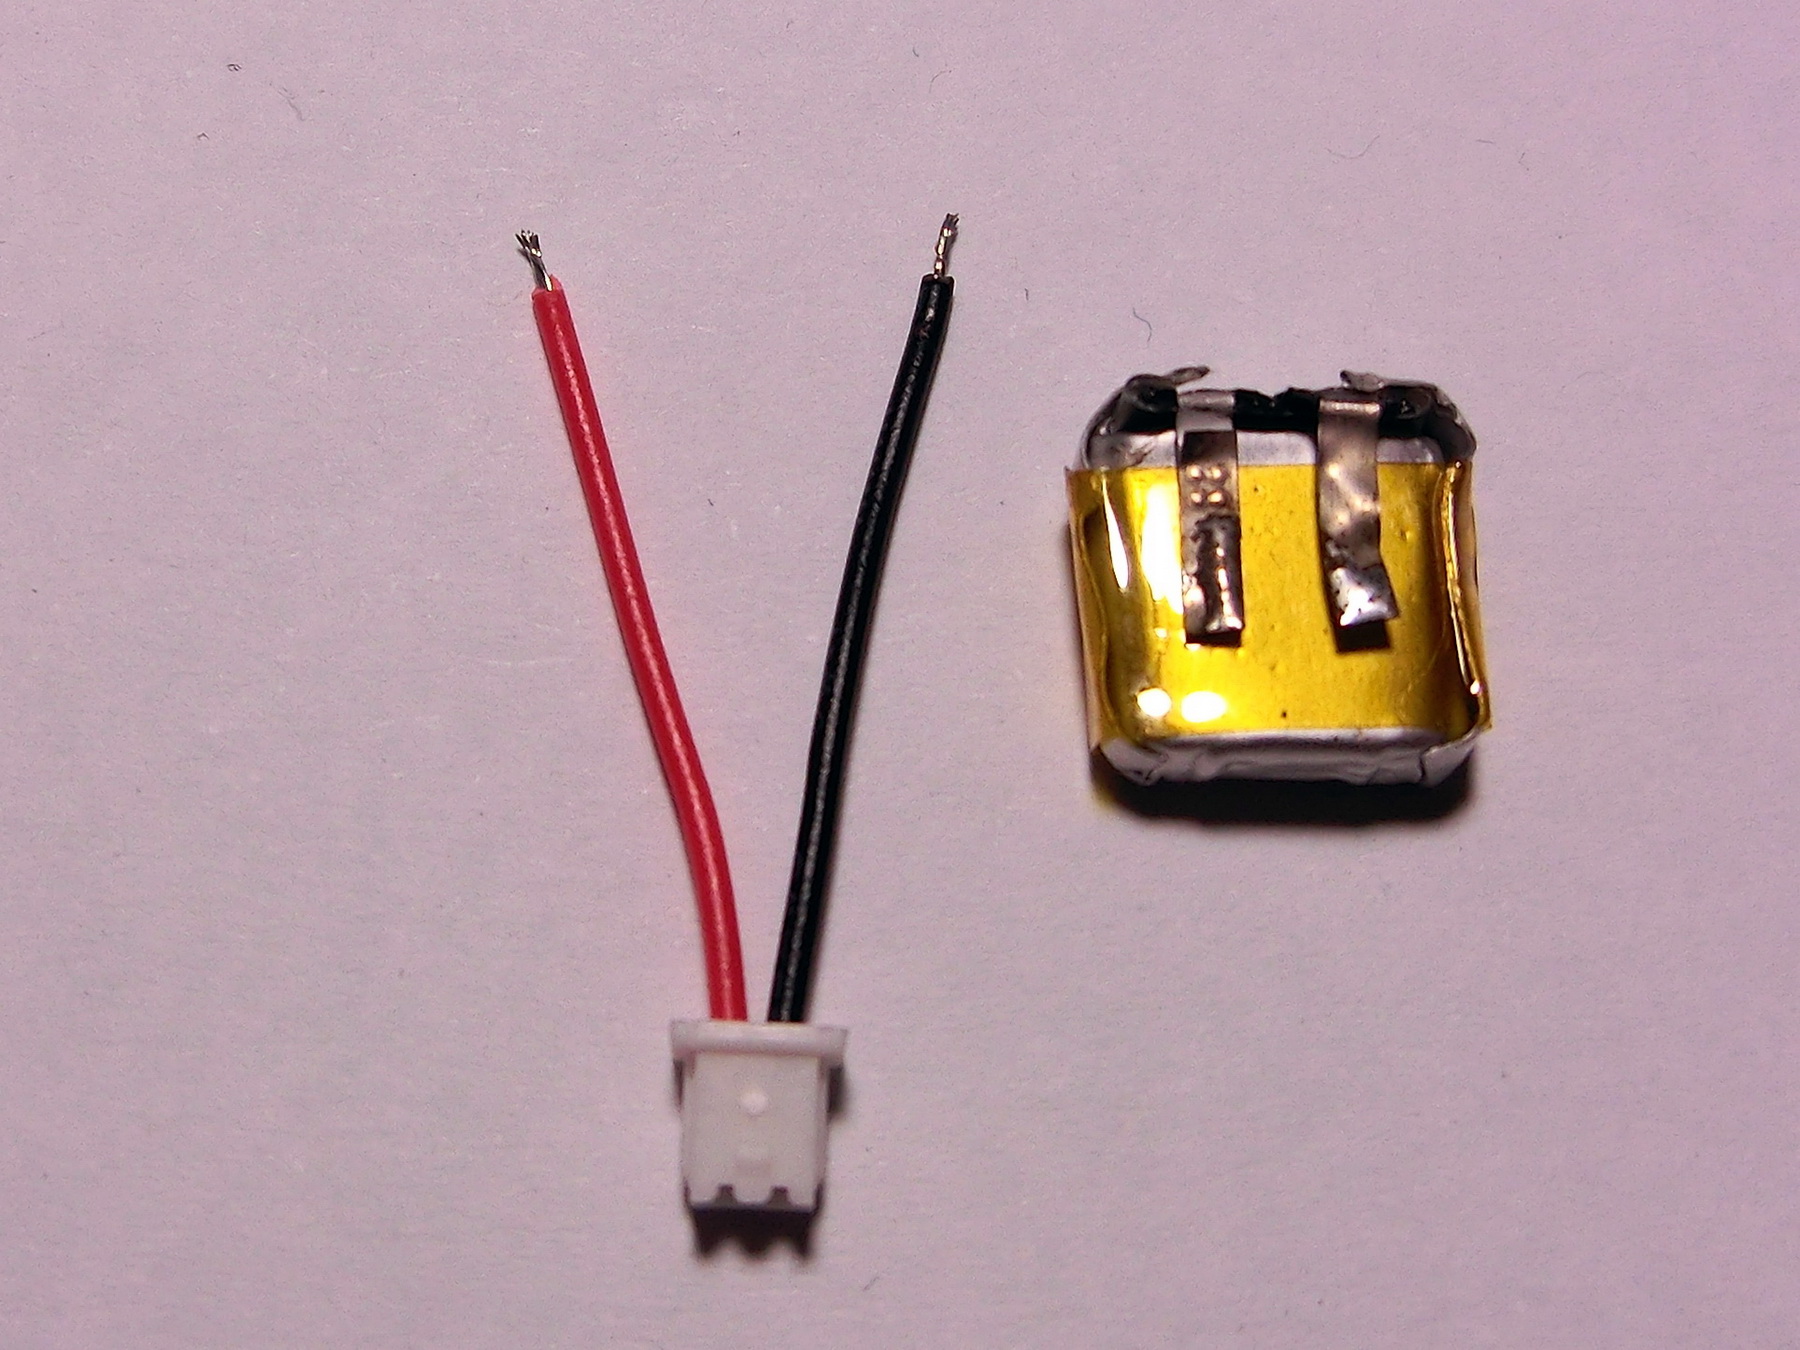
 First I unpacked carefully the battery, then with the multimeter I determined the positive and the negative terminal. Next I soldered the 1.5mm JST connector to the terminals. Then carefully I put some Kapton tape over the positive and under the negative terminal so they are physically separated and wrapped the remainder of the tape few times. Then I re-wrapped some Kapton tape in a perpendicular direction to fix the cables in the corners and one more piece of Kapton tape again in horizontal direction.

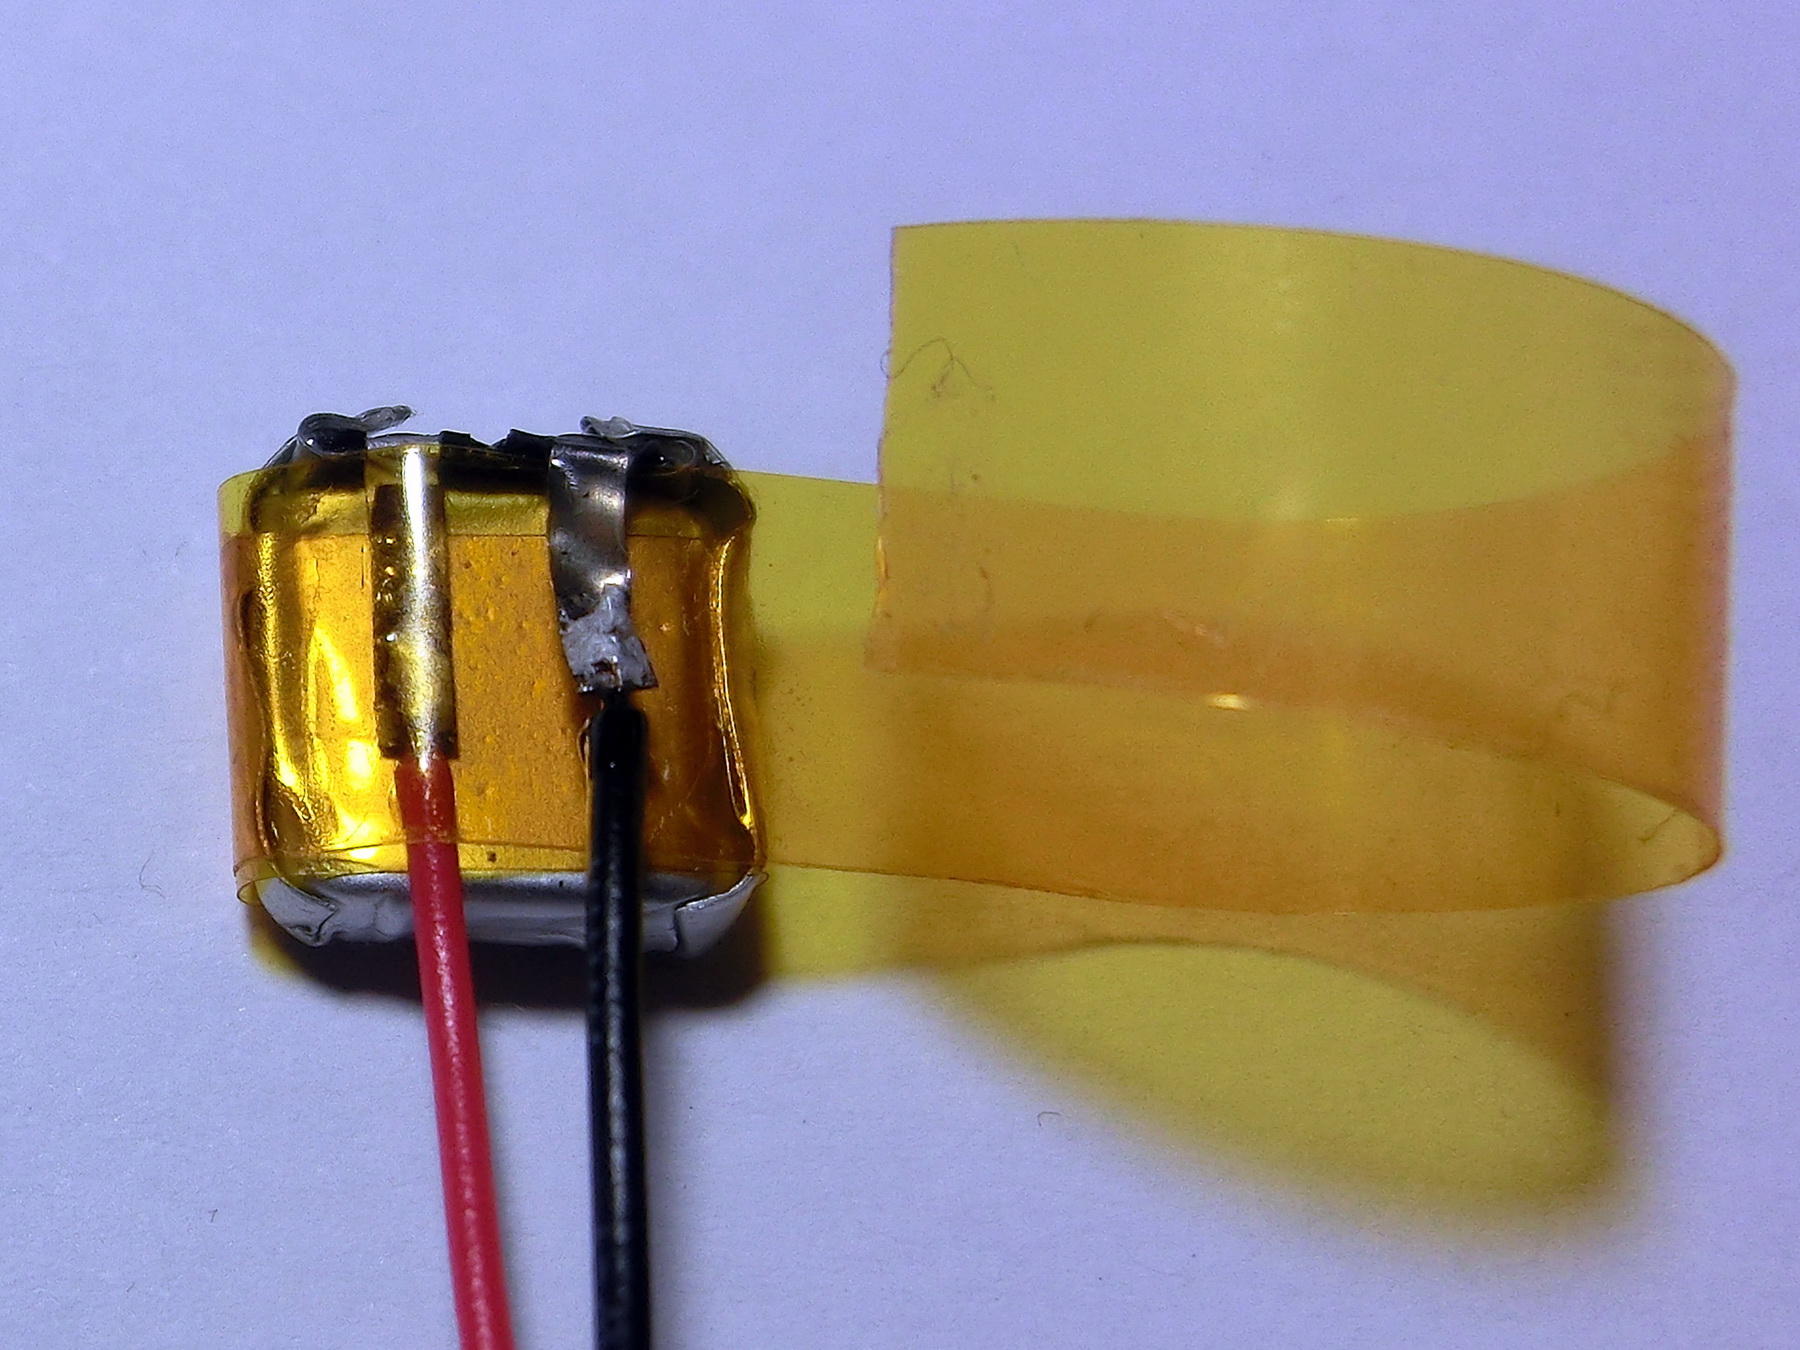
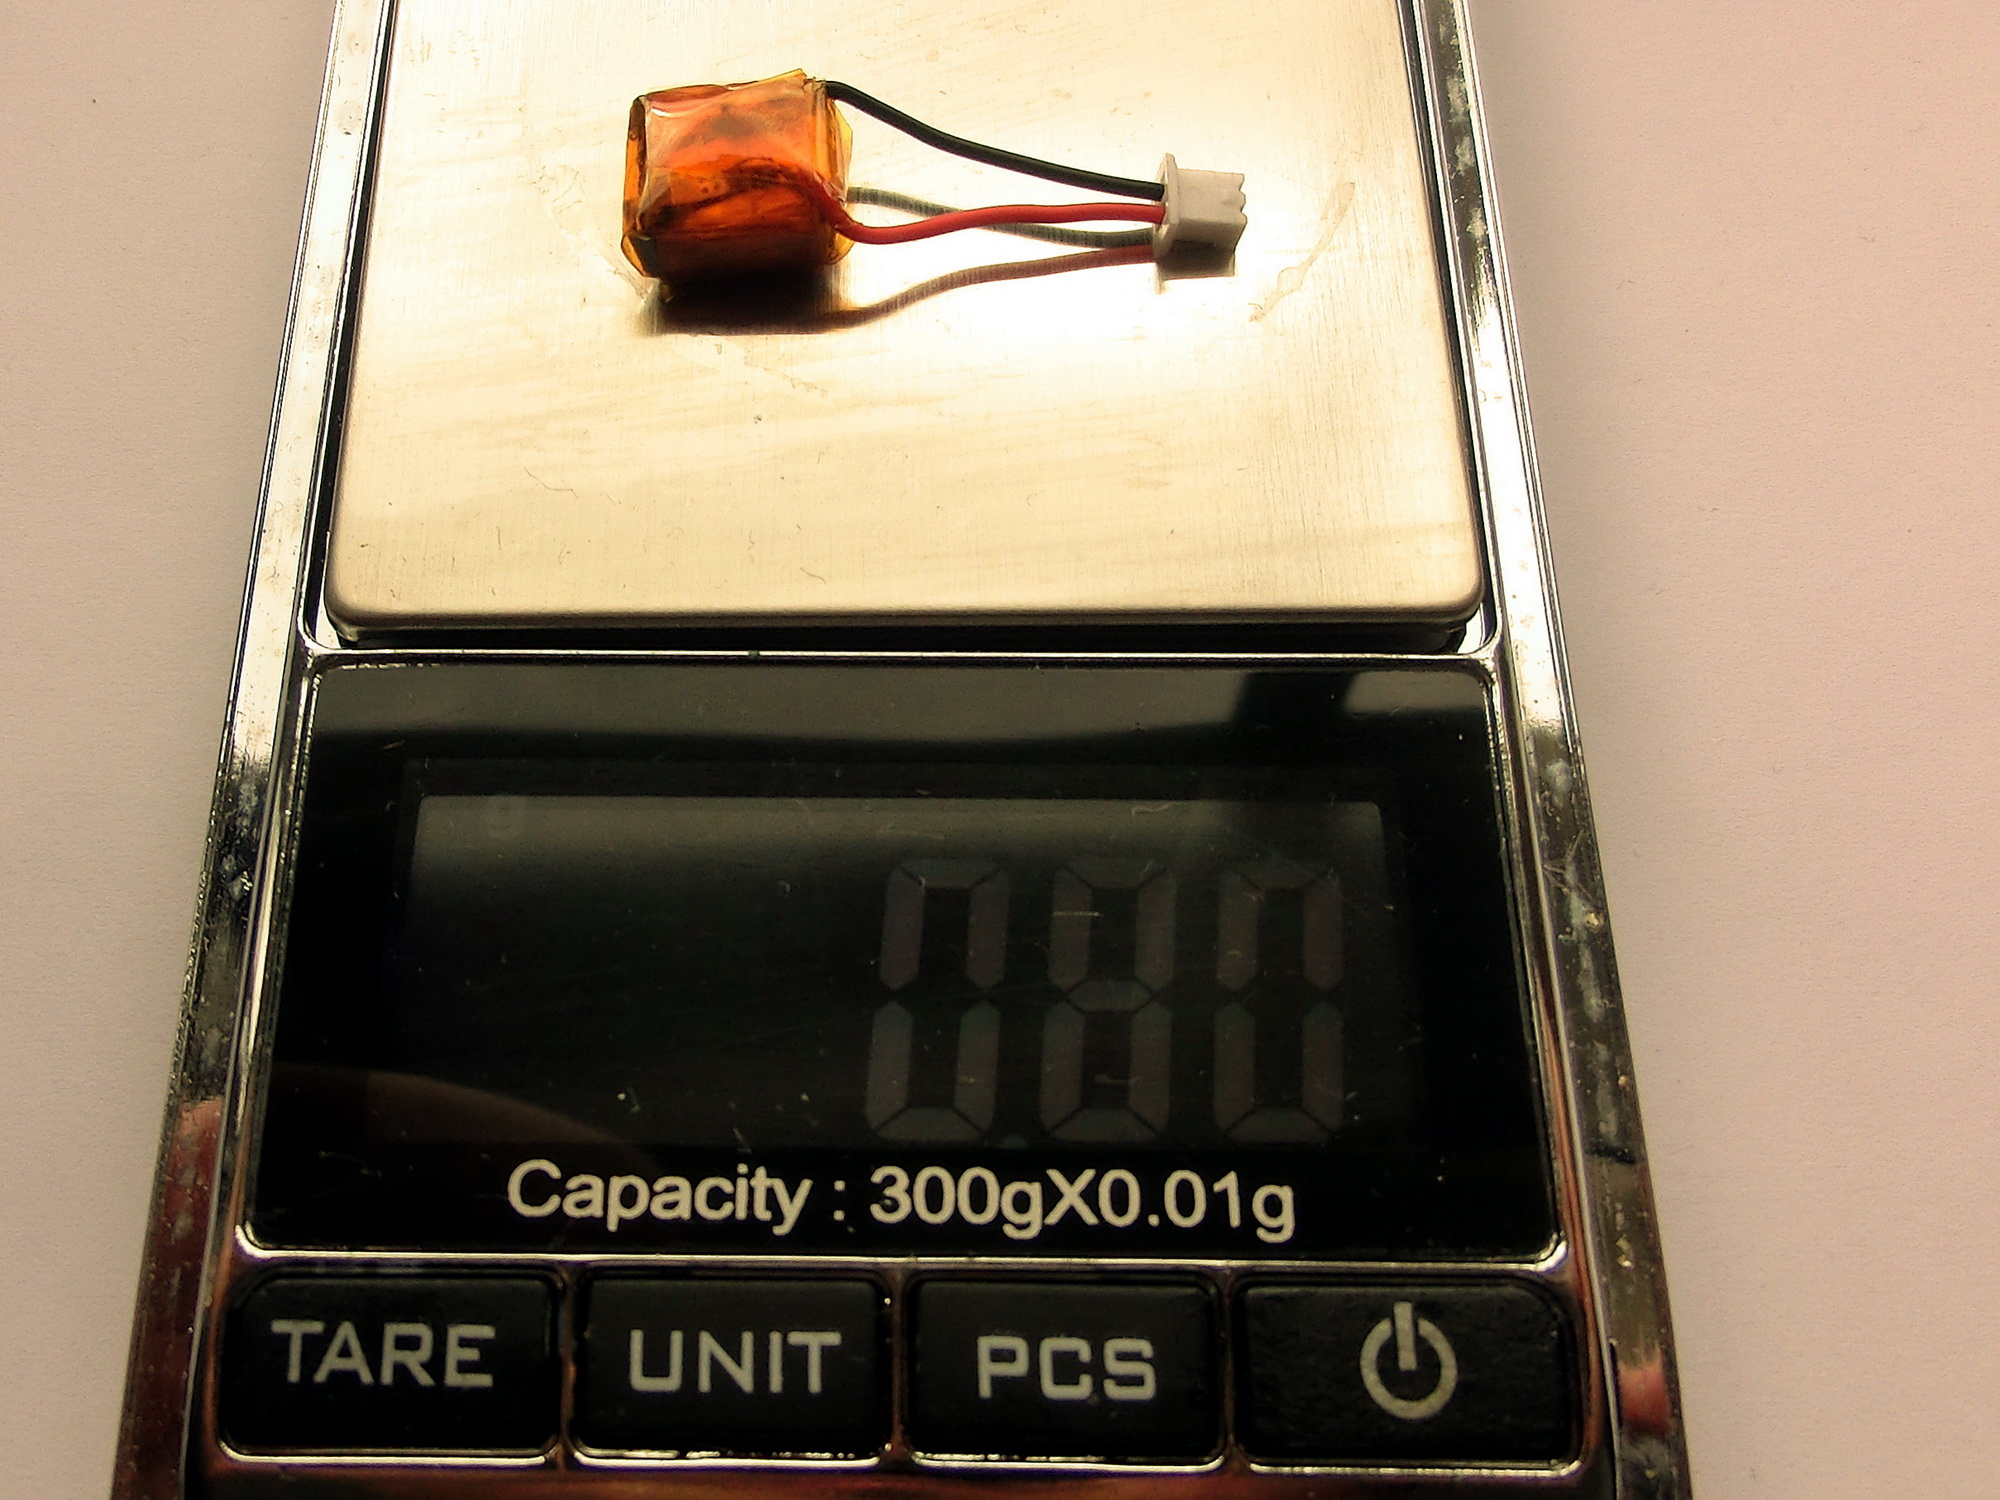
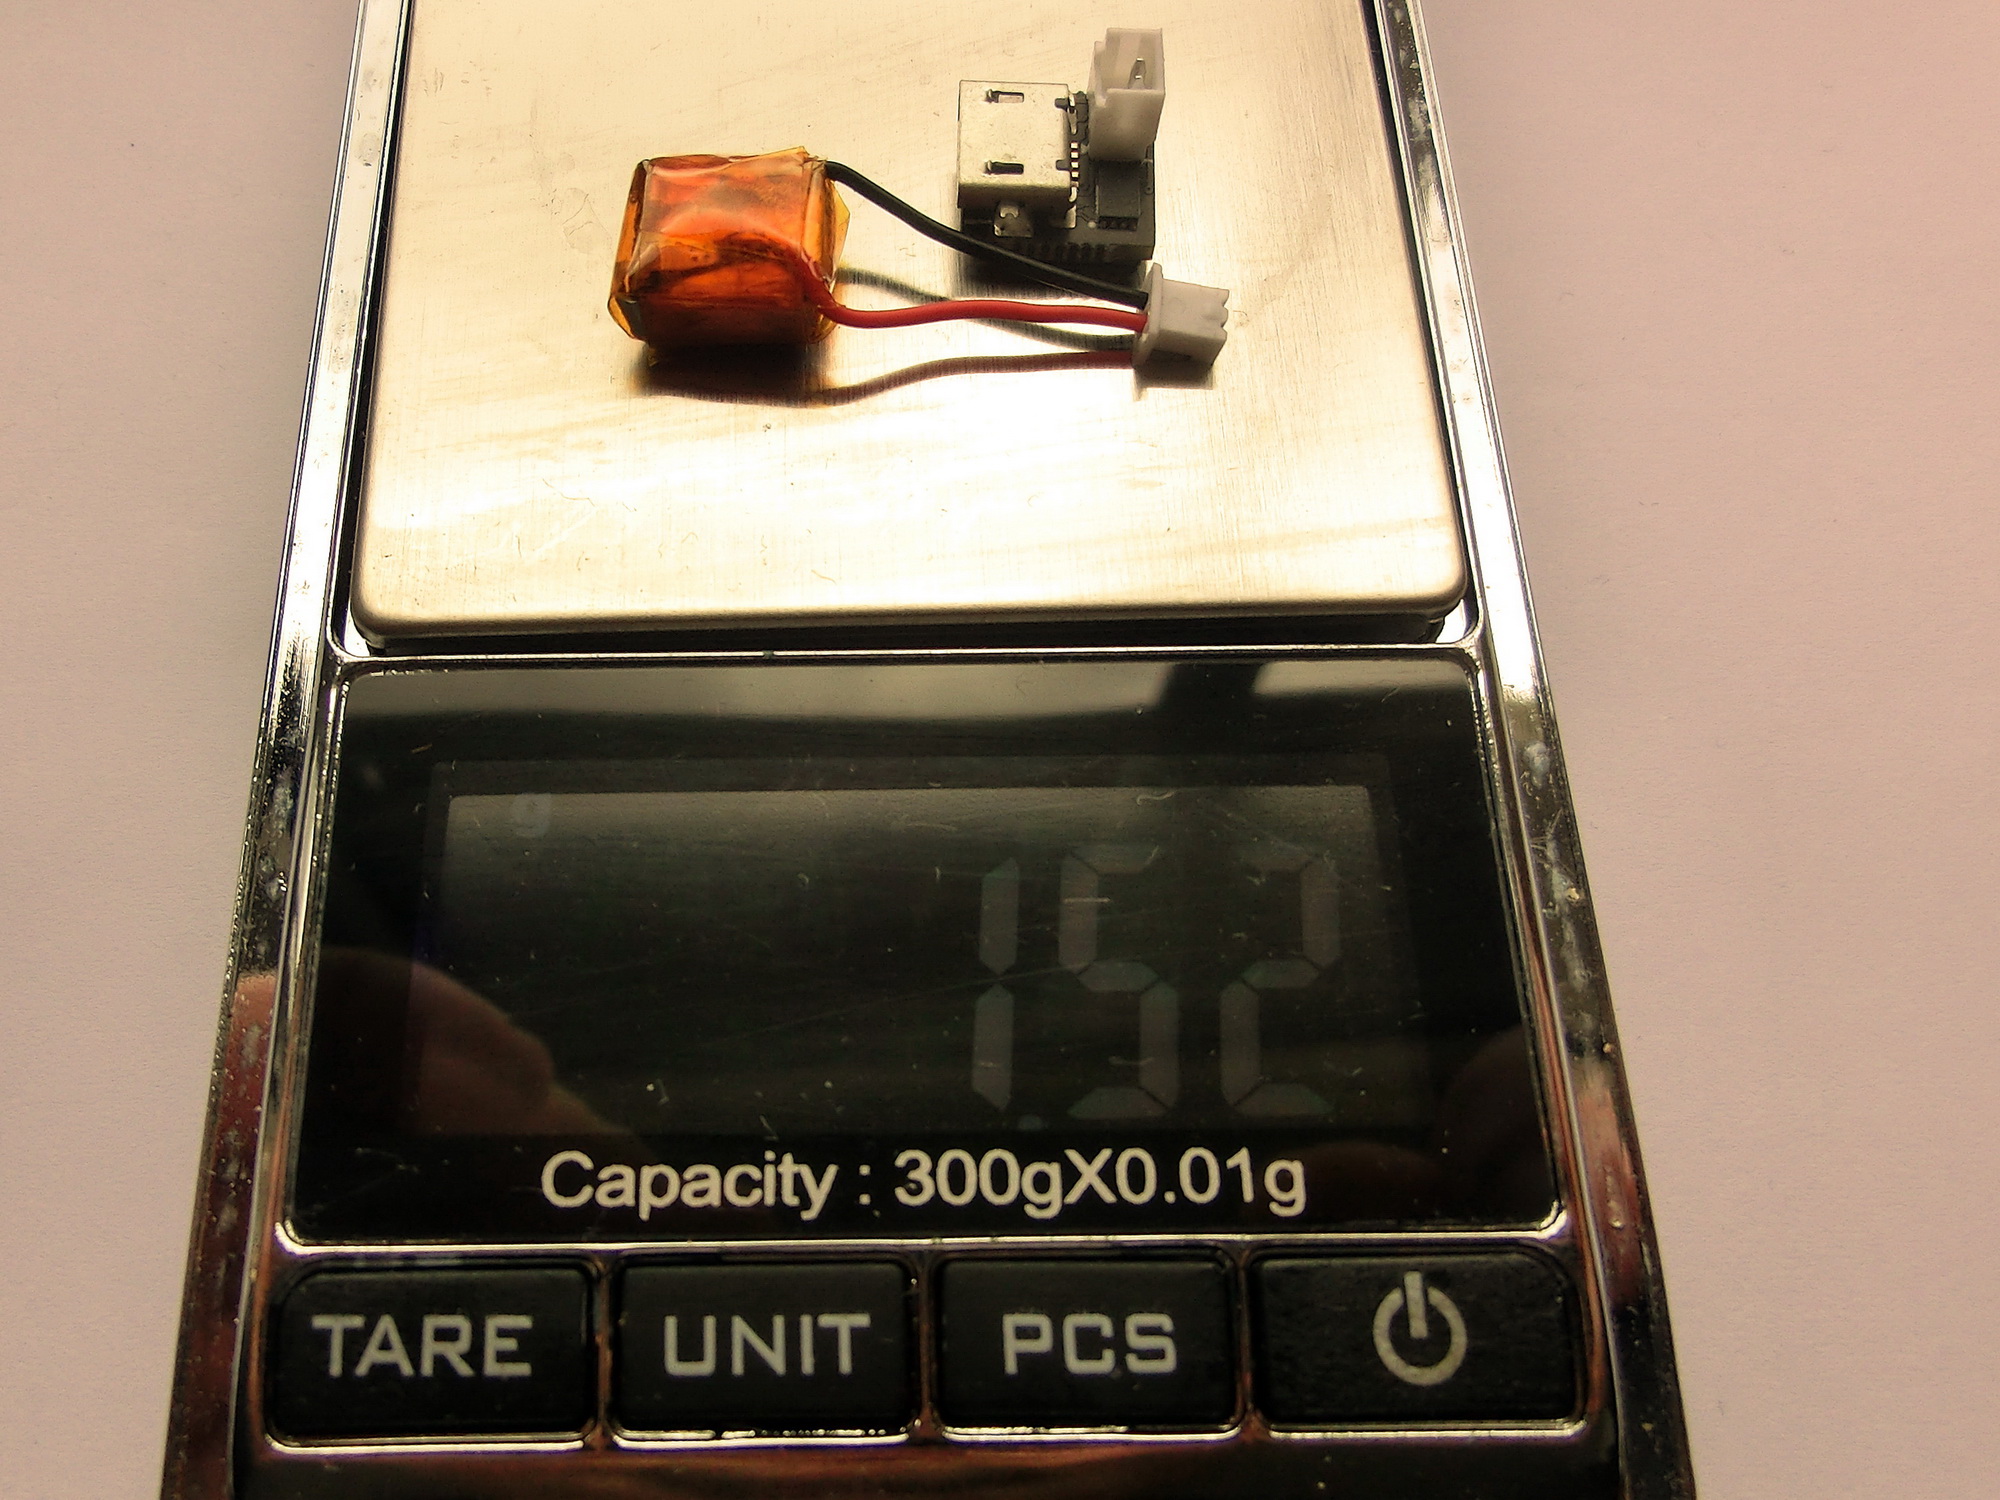
The battery with the connector and the Kapton tape insulation weights only 0.8gr and together with the Micro Altimeter 1.5gr.
Of course it is important that the battery has enough capacity to drive the Micro Altimeter for sufficient time. This seems to be of no concern at all. I made 2 test where I set-up 5 minutes waiting time and waited for full memory recording for both versions – with and without an accelerometer. A fully charged battery up to 4.1 volts discharged only down to about 3.8 volts in both tests.

IMPORTANT: Because I order small panels from China, I’ll have few extra altimeters to share as test pieces for the price of the components only. My calculations show between 10 USD for the no 3D acceleration sensor, 12 USD with the +-16g sensor and 15 USD for the +-250g sensor. I’ll post here when these become available, but you can always message me and I’ll reserve one for you since it will be on a first come-first served basis.
FLASH APPLICATION 1.10
SERVICE APPLICATION 1.00
USER APPLICATION 1.02 (NEW)
PIC18F14K50 BOOTLOADER
PIC18F25J50 BOOTLOADER
PIC18F26J50 BOOTLOADER
REVISION 1.00 MANUFACTURING FILES
REVISION 1.50 MANUFACTURING FILES
REVISION 2.00 MANUFACTURING FILES
REVISION 2.50 MANUFACTURING FILES
REVISION 3.50 MANUFACTURING FILES
REVISION 4.50 MANUFACTURING FILES
REVISION 5.00 MANUFACTURING FILES
FIRMWARE 1.02 (ALL REVISIONS) (NEW)
Note: Manufacturing files contain PCB Gerber files, BOM file and Pick and Place file
Hi Dyanko, great stuff, I wonder if there’s a way to pre-record to a buffer, then when it senses a launch, keep the buffer and record data for the full launch. You can get rid of the anxiety of timing the launch.
Hello Chalie, have not heard from you for a while.
I was thinking about a launch detection algorithm like in my flight computer but decided against it for few reasons:
– there’s a possibility for false early start detection at which point data might be lost
– those altimeters are mainly for small rockets which don’t fly for long
– it is easier and safer to simply set the altimeter start timer to say 5 minutes and use a stop watch
– given the large memory even if you are late couple of minutes after the altimeter started recording, there’s still plenty of recording time in the memory
– these micro altimeters were intended for FAI competitors and the federations require using a time counter for record start.
But I think there is enough memory in the micros to implement as a second option to choose from while setting up the micro altimeters.
P.s. send me an e-mail how are you doing with your projects if you have some spare time.
The smallest lipo I’ve seen lately is 25mAH. Have a search.
I found those batteries you suggested, they are really tiny 10x10x4 mm but twice the price of the 40mAh.
Considering the small voltage drop when I tested it with the 40mAh LiPo battery, I think with the 25mAh battery wouldn’t be much different.
I was hoping for 10mAh batteries, but can’t find such.
Hi,
Very good project and documentation!
We are trying to find or make a more affordable altimeter (because we loose them :)) to use in our local competitions
I have a question about temperature compensation and altitude data filtering.
Does the onboard temperature sensor and then the software take into account, for instance, if one rocket is on the sun and another in the shade (different starting temperatures).
Do you filter the altitude data from any noise like air gusts or motor “back fire”?
Best regards
Matjaž
Hello Matjaž, thank you for reply.
Data is not being filtered in any way while being recorded in the device memory, only the pressure sensor’s internal oversampling is being applied.
At each iteration step, pressure temperature and battery voltage is being recorded in the memory.
Once the data is downloaded to the text file, it can be parsed and pressure and temperature can be computed from the data in the file using Excel or other spreadsheet program, or the software I provide.
When calculating the altitude, my program takes into consideration the temperature data present at each step. Then the relative current altitude is calculated as the difference between the instantaneous absolute altitude and the absolute altitude at the chosen starting point.
The software offers simple moving average filtering. For more complex filtering you’ll have to use and write Excel script for that.
Hope this answers your questions.
Dear friends,
We need altimeters for Romania national contests in altitude and scale altitude FAI rule .
We want to buy
Can you help?
Hello,
I’ve discovered problem with those old generation barometric sensors used in these altimeters – their readings are not stable enough without heavy data filtering which will skew the actual flight parameters. Many of the old barometric altimeters on the marked rely exactly on excessive data filtering and averaging.
I’ve found a new generation of barometric sensors from ST which are much more stable and have factory calibrated output – they have excellent repeatability. The new MAV6 device is almost finished, I’ll describe it shortly:
https://www.youtube.com/watch?v=8D-wM44K7DQ
Maybe it’s better if you can test it first. I could prepare few test sample pieces for you if you wish to share data from the test to work out potential bugs since I redesigned the PC software interface.